Panasonic KV-S4065CL High Speed Color Scanner - Page 80
Shading Adjustment, When shading adjustment is required, Before proceeding with the shading adjustment
 |
UPC - 092281877075
View all Panasonic KV-S4065CL manuals
Add to My Manuals
Save this manual to your list of manuals |
Page 80 highlights
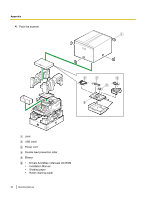
Appendix Shading Adjustment About shading adjustment The shading adjustment function corrects variations in the lamp intensity and pixel sensor sensitivity, and reduces unevenness in density in scanned images. It can be carried out by means of the User Utility using the special shading paper, which is provided with this scanner. When shading adjustment is required Perform shading adjustment when the density and brightness of sections of scanned images is considerably uneven, or when image quality does not improve after cleaning the inside of the scanner. Before proceeding with the shading adjustment Before beginning shading adjustment, thoroughly clean the image sensor cover (F), image sensor cover (B), conveyors in the scanning area, and all rollers. If you perform shading adjustment while these parts are dirty, lines will appear on scanned images. Shading adjustment procedure 1. Start the User Utility. 2. Click "User Shading" on the main menu, and operate as the image display dictates. Note • For further details, refer to section "4.6 [User Shading]" in the User Utility Reference Manual. Notice If lines still appear on the scanned images after performing the shading adjustment, and if these lines are not eliminated even after the image sensor cover areas have been cleaned, it means that the shading has not been compensated properly. Clean the parts again, and then proceed with the shading adjustment. 80 Operating Manual
-
 1
1 -
2
-
3
-
4
-
5
-
6
-
7
-
8
-
9
-
10
-
11
-
12
-
13
-
14
-
15
-
16
-
17
-
18
-
19
-
20
-
21
-
22
-
23
-
24
-
25
-
26
-
27
-
28
-
29
-
30
-
31
-
32
-
33
-
34
-
35
-
36
-
37
-
38
-
39
-
40
-
41
-
42
-
43
-
44
-
45
-
46
-
47
-
48
-
49
-
50
-
51
-
52
-
53
-
54
-
55
-
56
-
57
-
58
-
59
-
60
-
61
-
62
-
63
-
64
-
65
-
66
-
67
-
68
-
69
-
70
-
71
-
72
-
73
-
74
-
 75
75 -
 76
76 -
 77
77 -
 78
78 -
 79
79 -
 80
80 -
 81
81 -
 82
82 -
 83
83 -
 84
84 -
 85
85 -
86
-
87
 |
 |