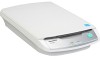
Panasonic KV-SS080 Operating Instructions - Page 16
Software Installation, Complete, All Drivers & Utilities, Custom, Application, Notice - driver scanner
 |
View all Panasonic KV-SS080 manuals
Add to My Manuals
Save this manual to your list of manuals |
Page 16 highlights
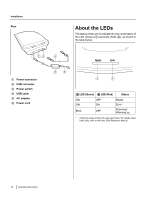
Installation Software Installation Be sure to install the software from the CD-ROM included with this unit. You can select from the 4 installation methods below, depending on your needs. a. Complete: Install all of the CD-ROM components. b. All Drivers & Utilities: Install all of the CD-ROM components except for applications. c. Custom: Install one of the drivers, utilities or manuals. d. Application: Select and install RTIV or the QuickScan Pro Demo. Notice • Make sure to log on as an administrator to install the software. • Before installing, make sure to exit all running applications. 1. Turn the power switch to " " (OFF) for both this unit and the scanner for connecting this unit. 2. Insert the included CD-ROM into the CD/DVD drive on your computer. • If you have a feature called "Autorun" activated, the installation process will start automatically. • The setup window will appear. Note • If the AutoPlay dialog box is displayed in Windows Vista, select "CDRun.exe". • If the program does not start automatically, from [My Computer] ([Computer] in Windows Vista), select the CD/DVD drive, and then double-click "CDRun.exe". 3. Select the scanner for connecting this unit from the "Select Scanner" list. 5. If you selected [Custom] for the installation type in step 4, select the item that you want to install. 6. Follow the instructions on the screen. • In Windows Vista, if a window appears with the message "Windows can't verify the publisher of this driver software", continue with the installation by selecting "Install this driver software anyway". 7. Set the power switch of the scanner to " " (ON) for both this unit and the scanner for connecting this unit (page 19). • If you installed a device driver, it is necessary to continue with the next step. 8. Follow the instructions of the hardware wizard to complete the installation. • The installation process is performed automatically in Windows Vista. Note Continue with the installation even if a window appears with the message "Digital Signature was not found for this driver" or "has not passed Windows Logo testing...". 4. Select the desired installation methods from the "Installation" list on the left side of the screen. • If you selected [Complete] or [All Drivers & Utilities], continue to step 6. • If you selected [Custom], continue to step 5. • If you selected [RTIV] or [QuickScan Pro Demo] in "Application", continue to step 6. 16 Operating Instructions
-
 1
1 -
2
-
3
-
4
-
5
-
6
-
7
-
8
-
9
-
10
-
 11
11 -
 12
12 -
 13
13 -
 14
14 -
 15
15 -
 16
16 -
 17
17 -
 18
18 -
 19
19 -
 20
20 -
 21
21 -
22
-
23
-
24
-
25
-
26
-
27
-
28
-
29
-
30
-
31
-
32
 |
 |
