Panasonic KX-HNC600 Installation Guide - CA - Page 20
Attaching to the hole on the rear side, For assistance, visit www.panasonic.ca/english/support
 |
View all Panasonic KX-HNC600 manuals
Add to My Manuals
Save this manual to your list of manuals |
Page 20 highlights
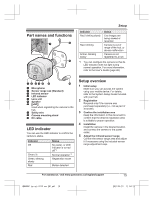
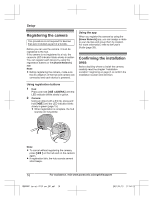
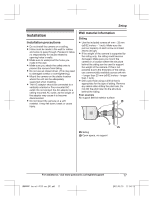
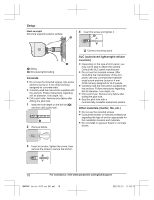
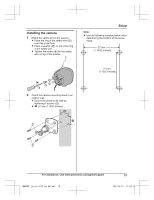
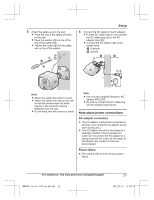
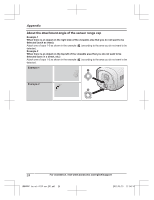
Setup 3 Attach the camera to the stand using the stand attachment hole on the rear or bottom of the camera, depending on the direction you want to aim the camera. R Loosen the screw (1). R Insert the tip of the stand (A) into the stand attachment hole (B) on the rear or bottom side. R Secure the camera by tightening the screw (2). Attaching to the hole on the rear side 211 4 Adjust the camera angle. R Loosen the screw (1) and then adjust the camera to the desired angle. R Tighten the screw (1) while holding the screw (2) until the camera is secure. 1 21 2 Attaching to the hole on the bottom side 211 2 20 For assistance, visit www.panasonic.ca/english/support HNC600C_(en_en)_0113_ver.201.pdf 20 2017/01/13 11:54:14
-
 1
1 -
2
-
3
-
4
-
5
-
6
-
7
-
8
-
9
-
10
-
11
-
12
-
13
-
14
-
 15
15 -
 16
16 -
 17
17 -
 18
18 -
 19
19 -
 20
20 -
 21
21 -
 22
22 -
 23
23 -
 24
24 -
 25
25 -
26
-
27
-
28
-
29
-
30
-
31
-
32
-
33
-
34
-
35
-
36
-
37
-
38
-
39
-
40
-
41
-
42
-
43
-
44
-
45
-
46
-
47
-
48
-
49
-
50
-
51
-
52
-
53
-
54
-
55
-
56
-
57
-
58
-
59
-
60
-
61
-
62
-
63
-
64
 |
 |

3
Attach the camera to the stand using the
stand attachment hole on the rear or
bottom of the camera, depending on the
direction you want to aim the camera.
R
Loosen the screw (
1
).
R
Insert the tip of the stand (
A
) into the
stand attachment hole (
B
) on the rear
or bottom side.
R
Secure the camera by tightening the
screw (
2
).
Attaching to the hole on the rear side
1
1
2
2
Attaching to the hole on the bottom
side
1
2
1
2
4
Adjust the camera angle.
R
Loosen the screw (
1
) and then adjust
the camera to the desired angle.
R
Tighten the screw (
1
) while holding
the screw (
2
) until the camera is
secure.
1
1
2
20
For assistance, visit www.panasonic.ca/english/support
Setup
HNC600C_(en_en)_0113_ver.201.pdf
20
2017/01/13
11:54:14