Panasonic KX-TGA273S C-r H-s For Kxtg2700 - Page 2
GETTING STARTED, A Accessories, Location of Controls - battery
 |
UPC - 037988473625
View all Panasonic KX-TGA273S manuals
Add to My Manuals
Save this manual to your list of manuals |
Page 2 highlights
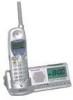
1 Getting Started 1-A Accessories (included) Battery one Order No. N4HKGMA00001 (P-P511) Handset Cover one Order No. PQKK10126Z1 Belt Clip one Order No. PQKE10340Z1 Charger Unit one Charger Order No. KX-TGA273S AC Adaptor Order No. PQWATGA273S Loop Antenna Order No. N1DAEYY00002 •For extra orders, call 1-800-332-5368. 1-B Location of Controls Handset Charger (with Clock Radio) [RADIO, ALARM ON/OFF] Button (4-C) Antenna [BUZZER, ALARM ON/OFF] Button (4-C) [SNOOZE/MUTE] Button (2-D, 4-C) [+, TUNE/CLOCK] Button (1-H, 2-A) [-, TUNE/CLOCK] Button (1-H, 2-A) [BUZZER, ALARM DISPLAY/SET] Button (4-B) Display Soft Keys (1-G) [RADIO, ALARM DISPLAY/SET] Button (4-A) Headset Jack (5-A) [ ] (TALK) Button [ ] (Speakerphone) Button [Y] (TONE) Button [CONF (Conference)/ FUNCTION] Button OFF TALK SP-PHONE 1 TINRTAENRSCFOEMR 2 5 4 8 7 TONE 0 CONF FUNCTION CFALLAL SWHAIT HOLD CLEAR 3 6 9 PAUSE REDIAL Navigator Key Charge Contacts (1-F) [OFF] Button [HOLD/CLEAR] (INTERCOM/ TRANSFER) Button RADIO DISPALLAAY/RSEMT BUZZER KX-TGA273 SNOOZE/MUTE [PAUSE/REDIAL] CHARGE Button [FLASH/CALL WAIT] Button CHARGE OFF SLEEP RADIO FMAM TUNE/CLOCK M1 M2 M3 M4 M5 Charge Contacts Indicator (1-F) (1-F) [OFF] Button (2-A) RADIO OANL/OARFFM BUZZER VOLUME TIME SET Note: The steps necessary to start up the [SLEEP] Button (3-A) Display handset are described in these Operating [AM/FM, RADIO] Button (2-A) Instructions. Please read the KX-TG2700/ KX-TG2720/KX-TG2730/KX-TG2740/ KX-TG2750/KX-TG2770/KX-FPG381 operating instructions for further details about Memory Buttons ([M1], [M2], [M3], [M4] and [M5]) (2-B) VOLUME Control (2-A) the handset operations. [TIME SET] Button (1-H) 1-C Connecting the AC Adaptor/Setting Up the Loop Antenna 2 3 1 Stand the antenna up by inserting the tab into the slot until it clicks into place. Loop Antenna •To disconnect the antenna, firmly pull the antenna cord, holding the cord near the plug. 1-D Installing the Handset Battery Insert the battery (#), and press it down until it snaps into the compartment ($). Close the cover. 2 1 Hook Hooks Make sure the AC adaptor plug is connected to the unit securely. Feed the cord through the hooks as shown. Power Outlet (AC 120 V, 60 Hz) AC Adaptor •USE ONLY WITH Panasonic AC ADAPTOR PQLV1 (Order No. PQWATGA273S). •The AC adaptor must remain connected at all times. (It is normal for the adaptor to feel warm during use.) 1-E Belt Clip You can hang the handset on your belt or pocket using the belt clip. To attach the belt clip To remove the belt clip While pressing the top of the clip (A), pull the right edge in the direction of the arrow (B). B A For assistance, please call: 1-800-211-PANA(7262)
-
 1
1 -
 2
2 -
 3
3 -
 4
4 -
 5
5 -
 6
6 -
 7
7 -
 8
8 -
9
 |
 |
