Panasonic MK-G20NR-W Operating Instructions - Page 5
oswitch, ®Lockin
 |
View all Panasonic MK-G20NR-W manuals
Add to My Manuals
Save this manual to your list of manuals |
Page 5 highlights
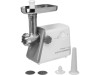
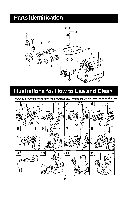
Parts Identification oswitch ®Locking knob (DIVIotor housing ()Opening ()Food pusher ®Hopper plate ®Head @Feed screw @Cutting blade 0-0Attachments @Cutting plate (fine) ()Cutting plate (medium) (DCutting plate (coarse) *Sausage attachment A @Sausage attachment B C)Kubbe attachment (to be used with ®) ®CaP How to Use Before Use Make sure that the voltage and frequency indicated on the bottom plate are the same as your local supply. Wash all the parts (except those that do not touch foods ® ,( , ® and®) in warm soapy water. Before plugging in, ensure the switch is off. To mince meat Follow the illustration of P2, the same number as in the box. (Assembling) 11 Place the head tightly onto opening of the motor housing. Holding the head with one hand, place the locking knob into the hole on the side of the motor housing and tighten it clockwise. pi Place the feed screw into the head, long end first, by turning the feed screw slightly until it is set into the motor housing. Tit Place the cutting blade onto the feed screw shaft with the blade facing the front as illustrated. - tf it isnot fitted properly. meat willnot be ground. 141 Place desired the cutting plate next to the cutting blade, fitting protrusions in the slots. I 5 I Screw cap into place until tight. -Do not over lighten. Place the hopper plate on the head and fix into position. Locate the unit on a firm place. - The air passage at the bottom and the side of the motor housing should be kept free and not blocked. (mincing meat) Cut ailfoods into pieces so that they fit easily into the I nipper opening. Plug in, then switch on. I61Feed foods into thehopper plate. -Use the food pusher. After use. switch off and unplug. -3-
-
 1
1 -
 2
2 -
 3
3 -
 4
4 -
 5
5 -
 6
6 -
 7
7 -
 8
8 -
 9
9 -
 10
10 -
 11
11 -
12
 |
 |
