Panasonic MK-G20NR-W Operating Instructions - Page 6
sausage, attachment, Kubbe
 |
View all Panasonic MK-G20NR-W manuals
Add to My Manuals
Save this manual to your list of manuals |
Page 6 highlights
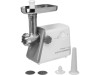
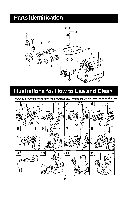
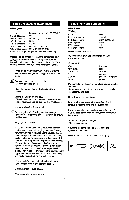
To use the sausage attachment To use the Kubbe attachment -Recipe- 5 pounds fresh pork (cubed with 20-25% fat) 1-2 tablespoons salt 1/2-1 tablespoon of freshly ground pepper 1/2-1 tablespoon sage 1-1 1/2 teaspoon thyme 1/3-1/2 teaspoon crushed red pepper 1/16-1/8 teaspoon finely ground red pepper Sausage casing (enough for 5 pounds of sausage) Meat should be minced following the same steps as in - E and seasoned before making sausage links. Assemble grinder using the selected cutting plate. (If you prefer a very fine texture, use the cutting plate (fine)). 7 Place the sausage attachments A and B onto the feed screw shaft together, fitting protractions in the slots_ 73--1 Screw the cap into place until tight. • Do not tighten too much. Place the hopper plate on the head and fix into position. -Recipe--(Stuffing) 100 g 1 1/2 tablespoons 1 112 tablespoons 1/3 teaspoon 112 teaspoon 1 1/2 tablespoons Mince meat once or twice. meat olive oil onion (cut finely) all spice salt flour Fry onion until brown and add minced meat, all spice, salt and flour. (Outer cover) 450 g 150-200g 1 teaspoon 1 a pinch dash lean meat flour all spice nutmeg powdered red pepper Pepper Mince meat three times and mix all ingredients together in a bowl. • More meat and less flour for outer cover creates better consistency and taste. Locate the unit on a firm place. • The air passage at the bottomand the side of the motor housing should be kept free and not blocked. Cut casing into 2 or 3 feet length_ 191Pull and gather all of casing over the sausage attachment A except the last 4 -6 inches as shown the illustration. Plug in, then switch on. Grind the mixture three times. Disassemble by reversingthe steps fromM-Mto remove the cutting plate and the cutting blade. Place Kubbe attachment and sausage attachment B onto the feed screw shaft together, nitiiry protrusions in the slots. Screw cap into place until tight -Do not over tighten. Place seasoned meat into the head. With the food pusher, press mixture through grinder. Stuff casing naturally with lithe resistance as the sausage comes out of the spout. If the meat is forced into the casing, packing it too tightly, the sausage is likely to break if not during cooking. Prevent air pockets from forming. Pierce at the end, if necessary, tiny holes in the casings to let the air escape. To make a link, pinch at desired length and press the sausage meat back a little. Then twist 3- 4 times. Flip the sausage in the opposite motion to secure the link. When the casing is filled, tie securely at the end with a string. Following the same steps as in®, make the cylindrical outer cover. Form kubbe as illustrated below and deep try. -Never push the food mixture into the grinder with your fingers. Always use the food pusher. Distribute meat through casing. After use, switch off and unplug.
-
 1
1 -
 2
2 -
 3
3 -
 4
4 -
 5
5 -
 6
6 -
 7
7 -
 8
8 -
 9
9 -
 10
10 -
 11
11 -
 12
12
 |
 |
