Panasonic PT52LCX16 PT52LCX16 User Guide - Page 47
Photo Viewer
 |
View all Panasonic PT52LCX16 manuals
Add to My Manuals
Save this manual to your list of manuals |
Page 47 highlights
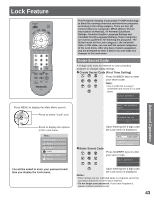
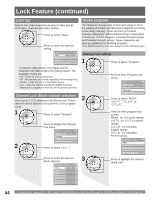
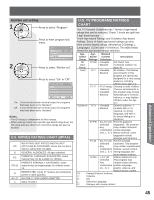
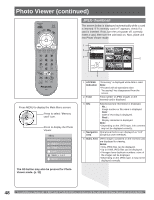
Photo Viewer Still image data (JPEG) made with a digital camera or digital video camera can be played back using an SD Card. WARNING As with any small object, SD cards can be swallowed by young children. Do not allow children to handle the SD card. Insert/Remove the Card CAUTION Do not remove the SD card while "Accessing" is being displayed on screen. Otherwise data may be lost or corrupted. CAUTION 1. Always insert card in the correct direction. Failure to do so may result in damage to the card and this unit. 2. The SD Card is precision devices. Do not subject them to excessive pressure or strong impacts. Card Data Protection • Do not remove the card while it is being accessed. • Do not touch the terminals on the back of the SD Card. • Electrical interference, electrostatic discharges and malfunctions of the unit or card may all result in damage to the card or data loss. It is recommended that any important data is also backed up on a PC. • Stored data should be periodically backed up as a protection against data corruption, data loss or device malfunction. Please note that our company shall not accept any liability for damage or loss of stored data. Data Format for Card Browsing Photo: Still images recorded with digital still cameras compatible with JPEG files of DCF* and EXIF standards Data format: Baseline JPEG 160 × 120 - 2 560 × 1 920 pixels (Sub-sampling: 4:4:4, 4:4:2 or 4:2:0) Max. number of files: 9 999 Image resolution: 8 × 8 to 5 120 × 3 840 * DCF (Design rule for camera file system): A Japan Electronics and Information Technology Industries Association's standard Insert the Card With the SD logo facing upward, insert the Card horizontally into the SD Card Slot. The card is secured when you hear a click. Front Card Slot (p. 10) SD Card Remove the Card Gently press in on the Card and release slowly. Pull the Card from the slot. Front Card Slot (p. 10) Notes: • Some parts of an image may not be displayed or the image may be displayed on a smaller scale depending on the size of the image. • Only JPEG images can be displayed on this unit. Press in lightly on SD Card, then release. Notes: • Compliant card type (maximum capacity): SD Card (2 GB), Mini SD Card (1 GB) (requiring mini SD adaptor). • Remove the Card carefully to prevent it from popping out of the slot too fast. Advanced Operation 47
-
 1
1 -
2
-
3
-
4
-
5
-
6
-
7
-
8
-
9
-
10
-
11
-
12
-
13
-
14
-
15
-
16
-
17
-
18
-
19
-
20
-
21
-
22
-
23
-
24
-
25
-
26
-
27
-
28
-
29
-
30
-
31
-
32
-
33
-
34
-
35
-
36
-
37
-
38
-
39
-
40
-
41
-
 42
42 -
 43
43 -
 44
44 -
 45
45 -
 46
46 -
 47
47 -
 48
48 -
 49
49 -
 50
50 -
 51
51 -
 52
52 -
53
-
54
-
55
-
56
-
57
-
58
-
59
-
60
-
61
-
62
-
63
-
64
-
65
-
66
-
67
-
68
-
69
-
70
-
71
-
72
-
73
-
74
-
75
-
76
-
77
-
78
-
79
-
80
 |
 |