Panasonic PV GS31 Digital Video Camera - Page 41
Editing Mode, Recording From A Tape Onto A Card, Audio Dubbing (pv-gs35 Only)
 |
UPC - 037988978007
View all Panasonic PV GS31 manuals
Add to My Manuals
Save this manual to your list of manuals |
Page 41 highlights
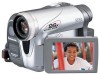
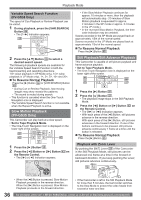
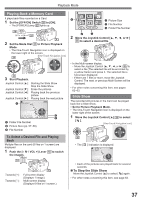
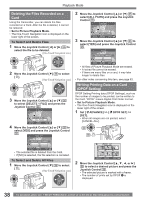
Editing Mode Editing Mode Recording from a Tape onto a Card Still pictures can be recorded on the Memory Card from scenes that have already been recorded on a cassette. 1 Set the Mode Dial 34 to Tape Playback Mode. • The One-Touch Navigation icon is displayed on the lower right of the screen. [One-Touch Navigation icon] 34 35 2 Insert a tape which already has recorded contents and a card. 3 Move the Joystick Control [▲] 35 to start playback and set the Camcorder to Still Playback Mode at the scene you wish to record, and press the [PHOTO SHOT] Button 25 . 25 • For other notes concerning this item, see page 63. Audio Dubbing (PV-GS35 Only) You can add music or narration to the recorded Cassette. • If the tape recorded in the [16bit] Mode is dubbed with the Audio Dubbing function, the original sound is erased. (If you wish to preserve the original sound, use the [12bit] Mode when recording.) • Audio Dubbing cannot be performed on a recording made in LP Mode. (p. 24) • Set to Tape Playback Mode. 1 Insert an external microphone securely into the [MIC] Jack 16 as far as it will go. 2 Press the [ ] Button 52 on the Remote Control where you want to add new sound. 46 52 4 To start Audio Dubbing, press the [ ] Button 52 on the Remote Control. • The [ ] Indication appears. • Talk into the microphone. 5 Press the [ ] Button 52 on the Remote Control to stop audio dubbing. „ To Cancel Audio Dubbing Press the [ ] Button 52 on the Remote Control. The Camcorder is in the Still Playback Mode again. „ Before Recording with Audio Dubbing • Set to Tape Recording Mode • When you want to preserve the original sound taken during recording, set [ SETUP] >> [ AUDIO REC] >> [12bit] to take pictures. (When set [16bit], the sounds taken during recording are erased after recording with audio dubbing.) • Set [ BASIC] >> [ REC SPEED] >> [SP] to take pictures. „ To Play Back the Sound Recorded by 12bit Audio Dubbing Set [ SETUP] >> [ 12bit AUDIO] >> [ST1], [ST2] or [MIX]. ST1: ST2: MIX: It plays back only the original sound. It plays back only the sound added by Audio Dubbing. It plays back both the original sound and the sound added by Audio Dubbing simultaneously. „ To Dub Audio While Listening to a Pre-recorded Sound When pausing the audio dubbing, set the [ 12bit AUDIO] on the [ SETUP] Sub-Menu to [ST2] and you can check the pre-recorded sound. When the line input is used, you can dub audio while listening to the pre-recorded sound from the speaker. • For other notes concerning this item, see page 63. 3 Press the [A.DUB] Button 46 on the Remote Control. • The [ ] Indication appears. 41
-
 1
1 -
2
-
3
-
4
-
5
-
6
-
7
-
8
-
9
-
10
-
11
-
12
-
13
-
14
-
15
-
16
-
17
-
18
-
19
-
20
-
21
-
22
-
23
-
24
-
25
-
26
-
27
-
28
-
29
-
30
-
31
-
32
-
33
-
34
-
35
-
 36
36 -
 37
37 -
 38
38 -
 39
39 -
 40
40 -
 41
41 -
 42
42 -
 43
43 -
 44
44 -
 45
45 -
 46
46 -
47
-
48
-
49
-
50
-
51
-
52
-
53
-
54
-
55
-
56
-
57
-
58
-
59
-
60
-
61
-
62
-
63
-
64
-
65
-
66
-
67
-
68
-
69
-
70
-
71
-
72
-
73
-
74
-
75
-
76
-
77
-
78
-
79
-
80
 |
 |