Panasonic PV GS320 Digital Video Camcor-english/spanish - Page 29
RECORDING ON A TAPE, On-screen display in the tape, recording mode, Concerning the remaining tape time - wide lens
 |
UPC - 037988980277
View all Panasonic PV GS320 manuals
Add to My Manuals
Save this manual to your list of manuals |
Page 29 highlights
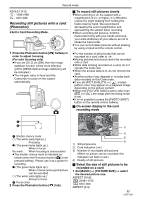
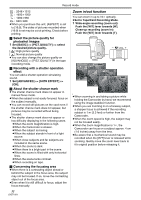
Record mode Recording on a tape Remove the lens cap. (-14-) (When the Camcorder is turned on with the lens cap attached, the automatic white balance adjustment may not function properly. Please turn the Camcorder on after removing the lens cap.) When this unit is purchased, the aspect ratio is set to [16:9] for recording images compatible with a wide-screen TV. To make this unit compatible with regular TVs (4:3), change the [ASPECT] setting before recording the images (-37-) or change the [TV ASPECT] setting when watching them on the connected TV (-44-). ≥Set to Tape Recording Mode. 1 Press the recording start/stop button to start recording. 2 Press the recording start/stop button again to pause recording. ; ≥For the recording time on a tape, refer to -16-. ≥Carry out a recording check (-30-) to verify that the image is recorded properly. ≥In order to find the unrecorded section, carry out the blank search (-30-) . ≥If you want to preserve the original sound recorded when audio dubbing (-49-), set [ADVANCED] >> [AUDIO REC] >> [12bit] to take pictures. ª On-screen display in the tape recording mode 1) ęç÷āú÷ 2) 3)¢ ø÷÷ 1 4)¢ 5)¢ 6)¢ ¢These are only displayed when you press the Photoshot button [ ] halfway while a card is inserted. These are not displayed when using the remote control. 1) Recording time elapse 2) Remaining tape indication 3) Still picture size 4) Card indication (-66-) 5) Number of recordable still pictures (When no picture can be recorded, this indication will flash in red.) 6) Quality of still pictures ª Concerning the remaining tape time indication on the screen ≥The remaining tape time is indicated in minutes. (When it reaches less than 3 minutes, the indication starts flashing.) ≥During a 15-second or shorter recording, the remaining tape time indication may not be displayed or the remaining tape time may not be displayed correctly. ≥In some cases, the remaining tape time indication may display remaining tape time that is 2 to 3 minutes shorter than the actual remaining tape time. ª [POWER SAVE] [OFF]: When 5 minutes passes without any operation, the standby mode will be automatically set. In the standby mode, [;] blinks and it takes more time than usual to start recording after you press the recording start/stop button. [5 MINUTES]: When 5 minutes passes without any operation, the Camcorder automatically turns off to protect the tape or to prevent the battery from running down. When you want to use the Camcorder, turn it on again. ≥In the following cases, the power may not turn off even when [POWER SAVE] >> [5 MINUTES] is set. ≥When connected to the AC outlet (When using the AC adaptor) 29 LSQT1091
-
 1
1 -
2
-
3
-
4
-
5
-
6
-
7
-
8
-
9
-
10
-
11
-
12
-
13
-
14
-
15
-
16
-
17
-
18
-
19
-
20
-
21
-
22
-
23
-
 24
24 -
 25
25 -
 26
26 -
 27
27 -
 28
28 -
 29
29 -
 30
30 -
 31
31 -
 32
32 -
 33
33 -
 34
34 -
35
-
36
-
37
-
38
-
39
-
40
-
41
-
42
-
43
-
44
-
45
-
46
-
47
-
48
-
49
-
50
-
51
-
52
-
53
-
54
-
55
-
56
-
57
-
58
-
59
-
60
-
61
-
62
-
63
-
64
-
65
-
66
-
67
-
68
-
69
-
70
-
71
-
72
-
73
-
74
-
75
-
76
-
77
-
78
-
79
-
80
-
81
-
82
-
83
-
84
-
85
-
86
-
87
-
88
 |
 |
