Panasonic SAHT730 Technical Guide - Page 13
Control Unit Repair SA-HT730 / SA-HT930 Strategy
 |
View all Panasonic SAHT730 manuals
Add to My Manuals
Save this manual to your list of manuals |
Page 13 highlights
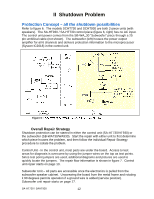
Figure 7 - Repair Information Control Unit Repair (SA-HT730 / SA-HT930) Strategy SC-HT730 / SC-HT930 Repair Strategy for a shutdown (F61) symptom: These two units differ in power output so the 'HT930 has an additional board in the subwoofer. Troubleshooting of the control unit is almost identical for both models. Shutdown can be either in the control unit or subwoofer. Refer to figure 8. In the control unit, diagnostic troubleshooting is quickly done from the top of the main board by cutting jumper wires to isolate the problem. Cutting specific jumpers on the board to stop the shutdown problem from reaching Micro IC2018 is a fast way to determine if the problem is in the subwoofer or the control Figure 8 - Cut Jumper wire Concept unit. Use figure 9 to cut additional jumper wires to isolate the problem to an exact circuit. Thereafter, repairs are done from the bottom where the parts are located. SA-HT730 / SAHT930 13
-
 1
1 -
2
-
3
-
4
-
5
-
6
-
7
-
 8
8 -
 9
9 -
 10
10 -
 11
11 -
 12
12 -
 13
13 -
 14
14 -
 15
15 -
 16
16 -
 17
17 -
 18
18 -
19
-
20
-
21
-
22
-
23
 |
 |
