Panasonic SAHT730 Technical Guide - Page 5
Power-On Start-Up Sequence - Where is the problem? - sa ht730 cable
 |
View all Panasonic SAHT730 manuals
Add to My Manuals
Save this manual to your list of manuals |
Page 5 highlights
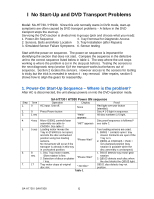
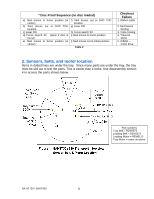
I No Start-Up and DVD Transport Problems Model: SA-HT730 / HT930. Since this unit normally starts in DVD mode, start-up symptoms are often caused by DVD transport problems - A failure in the DVD transport stops the start up. Servicing the DVD section is divided into 6 groups (pick and choose what you need): 1. Power-On Sequence 4. Tray Removal for Diagnostic Access 2. Sensors, Belts and Motor Location 5. Tray Installation (after Repairs) 3. Simulated Sensor Failure Symptoms 6. Sensor testing Start with the power-on sequence. The power-on sequence is important for identifying the section that does not start. Compare the sequence in the defective unit to the correct sequence listed below in table 1. The step where the unit stops working is where the problem is (or in the step just before). Testing the sensors is the next diagnostic step (section 6) if the transport works but behaves out of sequence. Section 2 locates the sensors. However access to the sensors for testing is tricky but the trick is revealed in section 4 - tray removal. After repairs, section 5 shows how to align the gears for reassembly. 1. Power-On Start-Up Sequence - Where is the problem? After AC is disconnected, the unit always powers on into the DVD operation mode. Step 1. 2. 3. 4. 5. 6. 7. Time 0 0 1 sec 4 sec 5 sec 8 sec. 17 SA-HT730 / HT930 Power ON sequence Operation Display Proof AC input. Unit off. None Red light over pwr button (standby). Press Power button Disc # 1-5 light in sequence. "Hello" All disc numbers 1-5 light. appears Micro IC8001 controls laser Disc proof sequence is followed * assembly via cable to "INIT" appears see table 2. CN2004. See table 2. Loading motor moves the Two loading sensors are used: Tray in (if S9001 is not open) 1. S9001 = contacts open / tray and into the disc unchucked closed. Contacts are open if the position using two loading sensors. "Please Wait" Tray is in. 2. Q9001 at CN2011/6 = 0Vdc = No movement will occur if the non-clamped position (tray transport is already in this tray rotation is possible when the in unchucked position. disc assembly is unclamped.) 1. Disc Tray motor rotates. 1. S9102 detects tray motor gear Slow rotation is first. 2. Detection of discs on platter "Please Wait" rotation. 2. Q9103 detects each disc when / tray. the disc blocks the Q9103 light. Tray motor stops at original disc slot. " No Disc" S9101 also detects tray rot. position. Table 1 SA-HT730 / SAHT930 5
-
 1
1 -
 2
2 -
 3
3 -
 4
4 -
 5
5 -
 6
6 -
 7
7 -
 8
8 -
 9
9 -
 10
10 -
 11
11 -
12
-
13
-
14
-
15
-
16
-
17
-
18
-
19
-
20
-
21
-
22
-
23
 |
 |
