Panasonic SDRH40P Sd Video Camera - Multi Language - Page 77
Selecting the scenes by date to, Select [YES], then press the joystick.
 |
View all Panasonic SDRH40P manuals
Add to My Manuals
Save this manual to your list of manuals |
Page 77 highlights
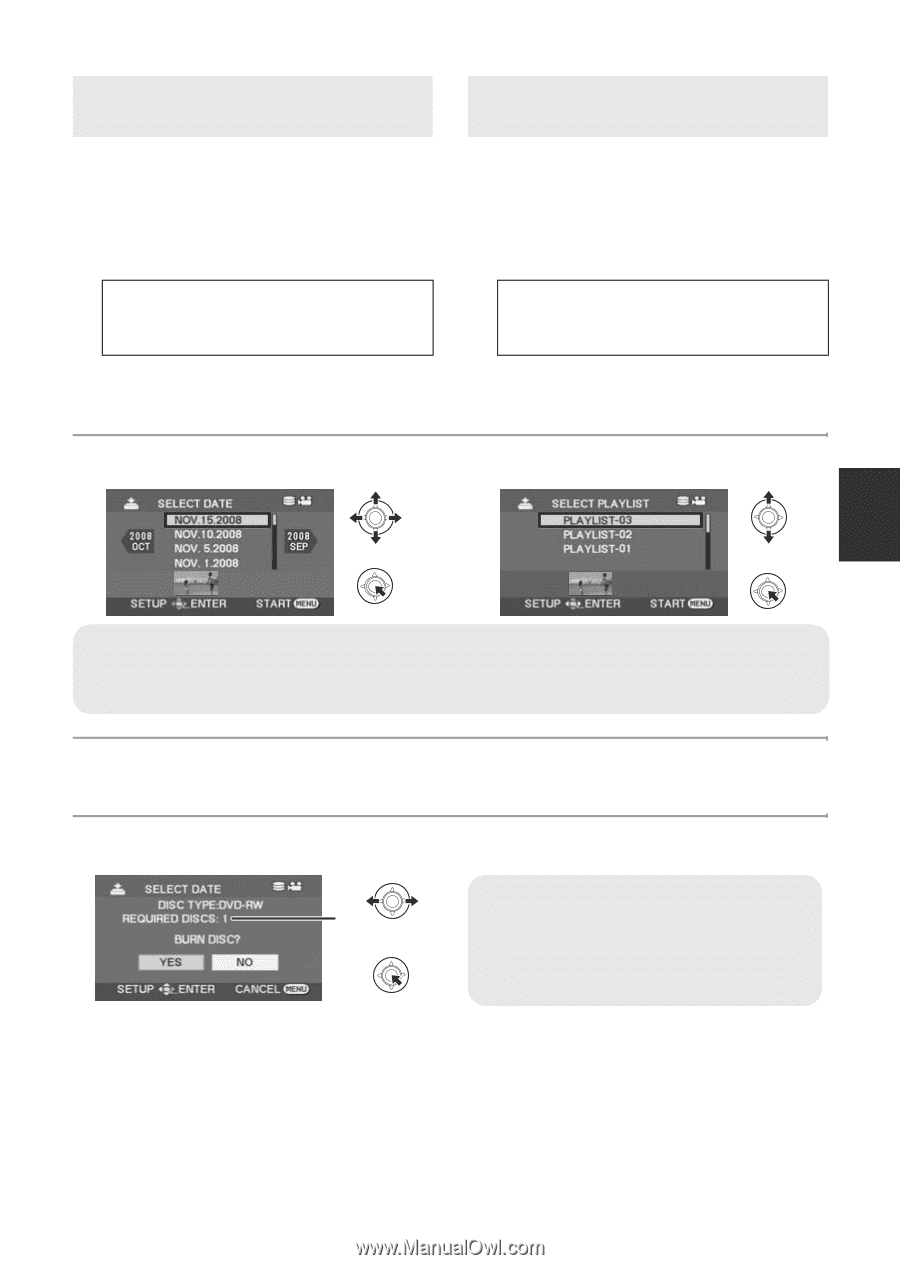
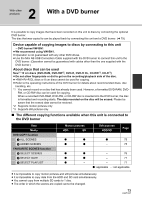
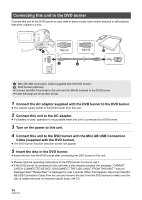
4 Selecting the scenes by date to copy to discs [HDD] [SD] Scenes recorded with this unit are selectively copied by date to DVD discs. 1 Select menus with the following procedures. [BURN DISC] # [HDD] or [SD CARD] # [VIDEO] # [FAVOURITE SCENES] # [SELECT DATE] ≥ Press the MENU button in the middle of the menu operation to return to the initial menu screen. 5 Selecting the scenes by playlist to copy to discs [HDD] Playlists created on the HDD of this unit are copied to DVD discs. 1 Select menus with the following procedures. [BURN DISC] # [HDD] # [VIDEO] # [FAVOURITE SCENES] # [SELECT PLAYLIST] ≥ Press the MENU button in the middle of the menu operation to return to the initial menu screen. 2 Select the date/playlist to be copied and then press the MENU button. The selected date/playlist is encircled by a red frame. ≥ To unselect the date/playlist, press the joystick again. ≥ Up to 50 dates can be set in succession. 3 When the confirmation message appears Select [YES], then press the joystick. 4 Select [YES], then press the joystick. A The number of discs necessary for A copying by disc type. ≥ When 2 or more discs are necessary for copying, follow the on-screen instructions to switch discs. ≥ When a recorded DVD-RAM or DVD-RW disc is inserted in the DVD burner, a message confirming whether the contents of the disc can be erased or not is displayed. After confirming that the data can be erased, select [YES]. ≥ When a message appears indicating copying is complete, then press the joystick. It is possible to create another set with the same contents. Follow the instructions on the screen. To finish, eject the disc and disconnect the Mini AB USB Connection Cable. ≥ Press the MENU button in the middle of the operation to return to the initial menu screen. 77 LSQT1337
-
 1
1 -
2
-
3
-
4
-
5
-
6
-
7
-
8
-
9
-
10
-
11
-
12
-
13
-
14
-
15
-
16
-
17
-
18
-
19
-
20
-
21
-
22
-
23
-
24
-
25
-
26
-
27
-
28
-
29
-
30
-
31
-
32
-
33
-
34
-
35
-
36
-
37
-
38
-
39
-
40
-
41
-
42
-
43
-
44
-
45
-
46
-
47
-
48
-
49
-
50
-
51
-
52
-
53
-
54
-
55
-
56
-
57
-
58
-
59
-
60
-
61
-
62
-
63
-
64
-
65
-
66
-
67
-
68
-
69
-
70
-
71
-
 72
72 -
 73
73 -
 74
74 -
 75
75 -
 76
76 -
 77
77 -
 78
78 -
 79
79 -
 80
80 -
 81
81 -
 82
82 -
83
-
84
-
85
-
86
-
87
-
88
-
89
-
90
-
91
-
92
-
93
-
94
-
95
-
96
-
97
-
98
-
99
-
100
-
101
-
102
-
103
-
104
-
105
-
106
-
107
-
108
-
109
-
110
-
111
-
112
-
113
-
114
-
115
-
116
-
117
-
118
-
119
-
120
-
121
-
122
-
123
-
124
-
125
-
126
-
127
-
128
 |
 |