Panasonic WJ-ND400/1000 Operating Instructions - Page 120
Settin, the HDD's Operation Mode, ently to open the front cover.
 |
View all Panasonic WJ-ND400/1000 manuals
Add to My Manuals
Save this manual to your list of manuals |
Page 120 highlights
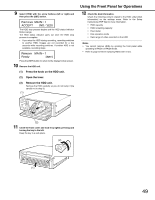
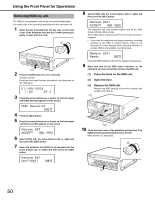
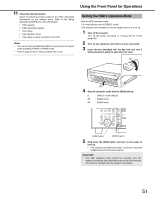
11 Check the disk information. Check the following content related to the HDD under [Disk information] on the settings menu. Refer to the Setup Instructions (PDF file) for more information. • HDD capacity • HDD remaining capacity • Hour meter • Disk operation mode • Date range of video recorded on the HDD Note: • You cannot remove individual HDDs by opening the front panel while operating in RAID5 or RAID6 mode. • Refer to page 53 when replacing HDDs with errors. Using the Front Panel for Operations Setting the HDD's Operation Mode Sets the HDD operation mode. The initial setting is set to [SINGLE mode]. This setting is not necessary to use the single mode as it is set up. 1 Turn off the recorder. Turn off the power according to "Turning Off the Power (page 39)". 2 Turn on any extension units first if any are connected. 3 Insert the key (included) into the key hole and turn it while pressing in gently to open the front cover. (1) (2) 4 Sets the operation mode with the [RAID] switch. S : SINGLE mode (default) R5 : RAID5 mode R6 : RAID6 mode [USE] button [RAID] switch 5 Hold down the [USE] button and turn on the power to boot up. • The settings are enabled at bootup. Continue to press the [USE] button until the buzzer sounds. Important: • The HDD operation mode cannot be changed once the system is operating. Recorded data may not be read correctly if the mode is changed after the system is operating. 51
-
 1
1 -
2
-
3
-
4
-
5
-
6
-
7
-
8
-
9
-
10
-
11
-
12
-
13
-
14
-
15
-
16
-
17
-
18
-
19
-
20
-
21
-
22
-
23
-
24
-
25
-
26
-
27
-
28
-
29
-
30
-
31
-
32
-
33
-
34
-
35
-
36
-
37
-
38
-
39
-
40
-
41
-
42
-
43
-
44
-
45
-
46
-
47
-
48
-
49
-
50
-
51
-
52
-
53
-
54
-
55
-
56
-
57
-
58
-
59
-
60
-
61
-
62
-
63
-
64
-
65
-
66
-
67
-
68
-
69
-
70
-
71
-
72
-
73
-
74
-
75
-
76
-
77
-
78
-
79
-
80
-
81
-
82
-
83
-
84
-
85
-
86
-
87
-
88
-
89
-
90
-
91
-
92
-
93
-
94
-
95
-
96
-
97
-
98
-
99
-
100
-
101
-
102
-
103
-
104
-
105
-
106
-
107
-
108
-
109
-
110
-
111
-
112
-
113
-
114
-
 115
115 -
 116
116 -
 117
117 -
 118
118 -
 119
119 -
 120
120 -
 121
121 -
 122
122 -
 123
123 -
 124
124 -
 125
125 -
126
-
127
-
128
-
129
-
130
-
131
-
132
-
133
-
134
-
135
-
136
-
137
-
138
-
139
-
140
-
141
-
142
-
143
-
144
-
145
-
146
-
147
-
148
-
149
-
150
-
151
-
152
-
153
-
154
-
155
-
156
-
157
-
158
-
159
-
160
-
161
-
162
-
163
-
164
-
165
-
166
-
167
-
168
-
169
-
170
-
171
-
172
-
173
-
174
-
175
-
176
-
177
-
178
-
179
-
180
-
181
-
182
-
183
-
184
-
185
-
186
-
187
-
188
-
189
-
190
-
191
-
192
-
193
-
194
-
195
-
196
-
197
-
198
-
199
-
200
-
201
-
202
-
203
-
204
-
205
-
206
-
207
-
208
-
209
-
210
-
211
-
212
-
213
-
214
-
215
-
216
-
217
-
218
-
219
-
220
-
221
-
222
-
223
-
224
-
225
-
226
-
227
-
228
-
229
-
230
-
231
-
232
-
233
 |
 |
