Panasonic WJHD309 WJHD309 User Guide - Page 123
User Regist.] Registration of a user who, operates this unit, User Name, Password, Level, Priority
 |
View all Panasonic WJHD309 manuals
Add to My Manuals
Save this manual to your list of manuals |
Page 123 highlights
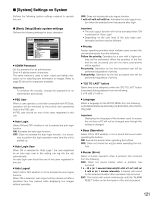
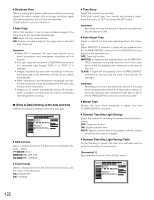
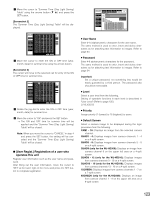
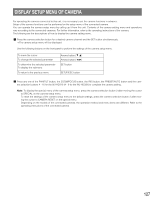
z Move the cursor to "Summer Time (Day Light Saving) Table" using the arrows button (C D) and press the SET button. [Screenshot 2] The "Summer Time (Day Light Saving) Table" will be displayed. SETUP MENU Basic Setup Time & Date User Regist. User Edit User Delete Host Regist. Host Edit Host Delete User Level Save/Load M1aSiwntieOtOcnFhaNeFnrce 24 -- RDecoJrdUinNg M DDispla--y M 03EveYnt 0 1 -- ComYm -- HSch0e0duleM H Sys--temM LIVE 2 I 3I ON DOOaFNtFe TOimFFe -- D F2o--4rmDDat F-o- rmDat J --UN -- M M M M --03 -- Y Y Y Y --01 -- H H H H -- M -- M 0M0MMM.DD.YY O-- FFM 4 ONJAN --. OFF -- D01 -.D -- M24 -- 10Y: 10-- : 1H0 A--M M M -- Y -- H -- SMET 5I AOuNto A2d4jusDt TJiUmNe MOAFFSTE--R TDime-- M M 03 -- Y Y 01 -- H H 6I I 7 SOOuFNmF me--r-- TimDDe(D--a-- y SOuNmme2r4TimDe(JDUaNy OFF -- D -- LMMight----SavYYing)---- H H LMight03SavYing0)T1ablHe M -- Y -- H 0O0FFM -1- 0 :M00 -A- UTMO -- M 00 SEMTUP -- M 8 ON OFF --- D D --- M M --- Y Y --- H H --- M M 9 ON OFF 24 -- D JUN M D -- M 03 -- Y Y 01 -- H H 00 -- M M ON -- D -- M -- Y -- H -- M 10 OFF -- D -- M -- Y -- H -- M OK CANCEL x Move the cursor to enter the ON or OFF time (year, month, date) for summer time using the arrows button. [Screenshot 3] The cursor will move to the selected cell for entry of the ON or OFF time for summer time. SETUP MENU Basic Setup Time & Date User Regist. User Edit User Delete Host Regist. Host Edit Host Delete User Level Save/Load M1aSiwntieOtOcnFhaNeFnrce 24 -- RDecoJrdUinNg M DDispla--y M 03EveYnt 0 1 -- ComYm -- HSch0e0duleM H Sys--temM LIVE 2 I 3I ON DOOaFNtFe TOimFFe -- D F2o--4rmDDat F-o- rmDat J --UN -- M M M M --03 -- Y Y Y Y --01 -- H H H H -- M -- M 0M0MMM.DD.YY O-- FFM 4 ONJAN --. OFF -- D01 -.D -- M24 -- 10Y: 10-- : 1H0 A--M M M -- Y -- H -- SMET 5I AOuNto A2d4jusDt TJiUmNe MOAFFSTE--R TDime-- M M 03 -- Y Y 01 -- H H 6I I 7 SOOuFNmF me--r-- TimDDe(D--a-- y SOuNmme2r4TimDe(JDUaNy OFF -- D -- LMMight----SavYYing)---- H H LMight03SavYing0)T1ablHe M -- Y -- H 0O0FFM -1- 0 :M00 -A- UTMO -- M 00 SEMTUP -- M 8 ON OFF --- D D --- M M --- Y Y --- H H --- M M 9 ON OFF 24 -- D JUN M D -- M 03 -- Y Y 01 -- H H 00 -- M M ON -- D -- M -- Y -- H -- M 10 OFF -- D -- M -- Y -- H -- M OK CANCEL c Rotate the jog dial to enter the ON or OFF time (year, month, date) for summer time. v Move the cursor to "OK" and press the SET button. → The ON and OFF time for summer time will be applied and the "Summer Time (Day Light Saving) Table" will be closed. Note: When you move the cursor to "CANCEL" in step 4 and press the SET button, the setting will be canceled and the "Summer Time (Day Light Saving) Table" will be closed. G [User Regist.] Registration of a user who operates this unit Register user information such as the user name and password. After filling out the user information, move the cursor to "SET" at the lower right of the menu and press the SET button to complete registration. SETUP MENU Maintenance Switcher Recording Display Event Comm Schedule System LIVE Basic Setup Time & Date User Regist. User Edit User Delete Host Regist. Host Edit Host Delete User Level Save/Load I User Name I User Password I Level I Priority I Default Screen I Camera Partitioning LV1 1 CAM1 CAM1 View/Operate CAM9 View/Operate CAM2 View/Operate CAM10 View/Operate CAM3 View/Operate CAM11 View/Operate CAM4 View/Operate CAM12 View/Operate CAM5 View/Operate CAM13 View/Operate CAM6 View/Operate CAM14 View/Operate CAM7 View/Operate CAM15 View/Operate CAM8 View/Operate CAM16 View/Operate SET 8 User Name Enter 4-14 alphanumeric characters for the user name. The same method is used to enter, insert and delete characters as for attaching text information to images. Refer to page 54. 8 Password Enter 4-8 alphanumeric characters for the password. The same method is used to enter, insert and delete characters as for attaching text information to images. Refer to page 54. Important: Set a unique password, not something that would be easily guessed by a third person. The password also should be memorable. 8 Level Select a user level from the following. Setting of operable functions in each level is described in "User Level" (Refer to page 125). LV1/LV2/LV3 8 Priority Assign priority (1 (lowest) to 16 (highest)) to users. 8 Default Screen Select a camera image to be displayed during the login procedure from the following. CAM1 - 16: Displays an image from the selected camera channel. QUAD1 - 4: Displays images from camera channels 1 - 4 on a 4-split screen. QUAD5 - 8: Displays images from camera channels 5 - 8 on a 4-split screen. QUAD9 (only for the WJ-HD309): Displays an image from camera channel 9 on the upper left area on a 4-split screen. QUAD9 - 12 (only for the WJ-HD316): Displays images from camera channels 9 - 12 on a 4-split screen. QUAD13 - 16 (only for the WJ-HD316): Displays images from camera channels 13 - 16 on a 4-split screen. 7SCREEN: Displays images from camera channels 1 - 7 on a 7-split screen. 9SCREEN (only for the WJ-HD309): Displays an image from camera channel 1 - 9 on the upper left area on a 9-split screen. 123
-
 1
1 -
2
-
3
-
4
-
5
-
6
-
7
-
8
-
9
-
10
-
11
-
12
-
13
-
14
-
15
-
16
-
17
-
18
-
19
-
20
-
21
-
22
-
23
-
24
-
25
-
26
-
27
-
28
-
29
-
30
-
31
-
32
-
33
-
34
-
35
-
36
-
37
-
38
-
39
-
40
-
41
-
42
-
43
-
44
-
45
-
46
-
47
-
48
-
49
-
50
-
51
-
52
-
53
-
54
-
55
-
56
-
57
-
58
-
59
-
60
-
61
-
62
-
63
-
64
-
65
-
66
-
67
-
68
-
69
-
70
-
71
-
72
-
73
-
74
-
75
-
76
-
77
-
78
-
79
-
80
-
81
-
82
-
83
-
84
-
85
-
86
-
87
-
88
-
89
-
90
-
91
-
92
-
93
-
94
-
95
-
96
-
97
-
98
-
99
-
100
-
101
-
102
-
103
-
104
-
105
-
106
-
107
-
108
-
109
-
110
-
111
-
112
-
113
-
114
-
115
-
116
-
117
-
 118
118 -
 119
119 -
 120
120 -
 121
121 -
 122
122 -
 123
123 -
 124
124 -
 125
125 -
 126
126 -
 127
127 -
 128
128 -
129
-
130
-
131
-
132
-
133
-
134
-
135
-
136
-
137
-
138
-
139
-
140
-
141
-
142
-
143
-
144
-
145
-
146
-
147
-
148
-
149
-
150
-
151
-
152
-
153
-
154
-
155
-
156
-
157
-
158
-
159
-
160
-
161
-
162
-
163
-
164
 |
 |
