Panasonic WJHD309 WJHD309 User Guide - Page 130
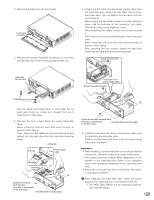
When replacing the hard disk drive without, turning off the power of the unit.
 |
View all Panasonic WJHD309 manuals
Add to My Manuals
Save this manual to your list of manuals |
Page 130 highlights
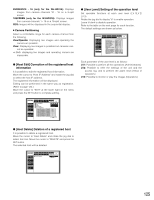
When replacing the hard disk drive without turning off the power of the unit. z Close the SETUP MENU after selecting "ON" for "HDD Safety Mode" of "Disk Info" on the "Maintenance" menu. → The HDD SAFETY MODE window will be displayed. G When replacing the built-in hard disk of the extension unit With displaying the HDD SAFETY MODE window, start replacing the built-in hard disk of the optional extension unit. Refer to the operating instructions of the optional extension unit for the descriptions of how to replace the hard disk. x The procedures are different between the replacement of the hard disk of the unit and the replacement of the hard disk of the optional extension unit. When replacing the built-in hard disk of the unit Move the cursor to "REMOVE" using the arrows button and press the SET button. The "REMOVE" indication will change to "REMOVING". The power supply to the front panel will be cut and the unit cannot be operated with the front panel. c After completing the replacement of the hard disk, move the cursor to "OFF" using the arrows button and press the SET button. → The unit will restart and the HDD DISK MENU will be displayed automatically. v Perform the settings for the disk according to your needs. Refer to page 133 for further information. Detach the cable from the front panel and start replacing the built-in hard disk. Start from step 2 on page 128 to replace the built-in hard disk. Important: Detach the cable from the front panel after confirming that "REMOVING" is displayed. Otherwise, it may cause malfunction. The "REMOVING" indication will return to "REMOVE" by attaching the cable to the front panel. The power will be supplied to the front panel and the unit can be operated with the front panel. 130
-
 1
1 -
2
-
3
-
4
-
5
-
6
-
7
-
8
-
9
-
10
-
11
-
12
-
13
-
14
-
15
-
16
-
17
-
18
-
19
-
20
-
21
-
22
-
23
-
24
-
25
-
26
-
27
-
28
-
29
-
30
-
31
-
32
-
33
-
34
-
35
-
36
-
37
-
38
-
39
-
40
-
41
-
42
-
43
-
44
-
45
-
46
-
47
-
48
-
49
-
50
-
51
-
52
-
53
-
54
-
55
-
56
-
57
-
58
-
59
-
60
-
61
-
62
-
63
-
64
-
65
-
66
-
67
-
68
-
69
-
70
-
71
-
72
-
73
-
74
-
75
-
76
-
77
-
78
-
79
-
80
-
81
-
82
-
83
-
84
-
85
-
86
-
87
-
88
-
89
-
90
-
91
-
92
-
93
-
94
-
95
-
96
-
97
-
98
-
99
-
100
-
101
-
102
-
103
-
104
-
105
-
106
-
107
-
108
-
109
-
110
-
111
-
112
-
113
-
114
-
115
-
116
-
117
-
118
-
119
-
120
-
121
-
122
-
123
-
124
-
 125
125 -
 126
126 -
 127
127 -
 128
128 -
 129
129 -
 130
130 -
 131
131 -
 132
132 -
 133
133 -
 134
134 -
 135
135 -
136
-
137
-
138
-
139
-
140
-
141
-
142
-
143
-
144
-
145
-
146
-
147
-
148
-
149
-
150
-
151
-
152
-
153
-
154
-
155
-
156
-
157
-
158
-
159
-
160
-
161
-
162
-
163
-
164
 |
 |
