Panasonic WVNP1000 WVNP1000 User Guide - Page 49
Con the Camera Settings such as Image Quality, Brightness, etc., Con the settings
 |
View all Panasonic WVNP1000 manuals
Add to My Manuals
Save this manual to your list of manuals |
Page 49 highlights
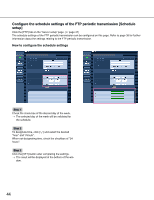
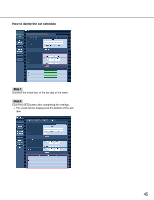
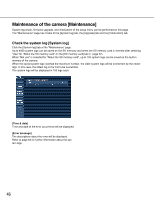
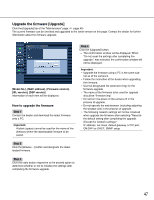
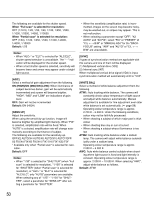
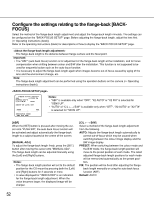
Configure the Camera Settings such as Image Quality, Brightness, etc. The following are descriptions of how to configure the settings such as image quality, brightness, privacy zone and flange-back length, etc. The settings can be configured in the following methods. • Configure the settings using a PC The setting can be configured on the [Camera] tab of the "Camera setup" page. Refer to page 23 for further information. • Configure the settings using the operation buttons on the camera The settings can be configured on the "CAMERA SETUP" page displayed on a video monitor connected to the video output connector. Refer to the operating instructions (book) for further information. Note: The illustrations below are the examples of the setup pages to be displayed on a video monitor. Configure the settings relating to the camera operations [CAMERA SETUP] Configure the settings relating to camera operations. The settings can be configured on the "CAMERA SETUP" page. Refer to the operating instructions (book) or page 25 for descriptions of how to display the "CAMERA SETUP" page. CAMERA SETUP page **CAMERA SETUP** 1/2 CAMERA ID OFF ALC/ELC ALC SHUTTER OFF AGC ON(HIGH) SENS UP OFF SYNC INT WHITE BAL ATW1 DNR HIGH BW MODE PRIVACY ZONE OFF EL-ZOOM OFF **CAMERA SETUP** 2/2 STABILIZER OFF RET TOP END [CAMERA ID] Select "ON" or "OFF" to determine whether to enable or disable the camera title display. When "ON" is selected, the set camera title will be displayed. Refer to page 56 for descriptions of how to edit the camera title. Default: OFF Number of characters for the camera ID: 16 charac- ters [ALC/ELC] Select the light control method from the following according to the lens in use. Refer to page 57 for descriptions of how to compensate backlight. ALC: Auto backlight compensation controls light amount according to brightness of subjects. When using an ALC lens, select this parameter. ALC+: Auto backlight compensation and the electronic shutter control light amount according to brightness of subjects. When shooting bright subjects using an ALC lens, select this parameter. Note: When shooting under fluorescent lamps, flicker may occur. ELC: When using a fixed iris lens, select this parameter. Default: ALC [SHUTTER] Select the shutter speed. The following will be available by changing the shutter speed. When a fast shutter speed (up to 1/10000) is set, the camera can shoot a fast motion of a subject without outof focus blur. When shooting under fluorescent lamps (operating at 60 Hz), flicker may occur. When the faster shutter speed is set, flicker may be caused more frequently. By setting the shutter speed to "1/60" or "1/120", flicker caused by fluorescent lamps can be diminished. 49
-
 1
1 -
2
-
3
-
4
-
5
-
6
-
7
-
8
-
9
-
10
-
11
-
12
-
13
-
14
-
15
-
16
-
17
-
18
-
19
-
20
-
21
-
22
-
23
-
24
-
25
-
26
-
27
-
28
-
29
-
30
-
31
-
32
-
33
-
34
-
35
-
36
-
37
-
38
-
39
-
40
-
41
-
42
-
43
-
 44
44 -
 45
45 -
 46
46 -
 47
47 -
 48
48 -
 49
49 -
 50
50 -
 51
51 -
 52
52 -
 53
53 -
 54
54 -
55
-
56
-
57
-
58
-
59
-
60
-
61
-
62
-
63
-
64
-
65
-
66
-
67
-
68
-
69
-
70
 |
 |
