Panasonic WVNS202A WVNS202A User Guide - Page 17
Wire without making a hole in the ceiling, Step 9, Important
 |
View all Panasonic WVNS202A manuals
Add to My Manuals
Save this manual to your list of manuals |
Page 17 highlights
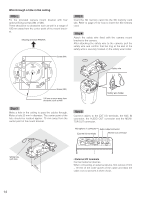
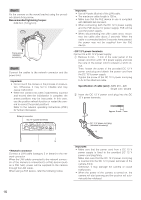
Step 9 After completing the cable connections, attach the provided decorative cover. q Align the indication "OPEN" of the decorative cover to the decorative cover guide of the mount bracket. w Rotate the decorative cover clockwise until the indication "LOCK" reaches the decorative cover guide of the mount bracket. LOCK OPEN Decorative cover guide LOCK OPEN LOCK OPEN Decorative cover (standard accessory) LOCK OPEN Important: Make sure that no cable is pinched by the decorative cover. Wire without making a hole in the ceiling Step 1 Install the camera by following step 1 and steps 3 - 8 of the "Wire through a hole in the ceiling" section ( pages 14 16). It is unnecessary to make a hole in the ceiling as described in step 2 of the "Wire through a hole in the ceiling" section. Step 2 Remove the tab on the rear of the decorative cover that is blocking the wiring hole. Attach the decorative cover by following step 9 of the "Wire through a hole in the ceiling" section ( Wire through the wiring hole of the decorative cover. pages 14 - 16). OPEN LOCK LOCK OPEN 17
-
 1
1 -
2
-
3
-
4
-
5
-
6
-
7
-
8
-
9
-
10
-
11
-
 12
12 -
 13
13 -
 14
14 -
 15
15 -
 16
16 -
 17
17 -
 18
18 -
 19
19 -
 20
20 -
 21
21 -
 22
22 -
23
-
24
-
25
-
26
-
27
-
28
 |
 |
