Pentax PC-30 PC-30 Manual - Page 3
aeacia00
 |
View all Pentax PC-30 manuals
Add to My Manuals
Save this manual to your list of manuals |
Page 3 highlights
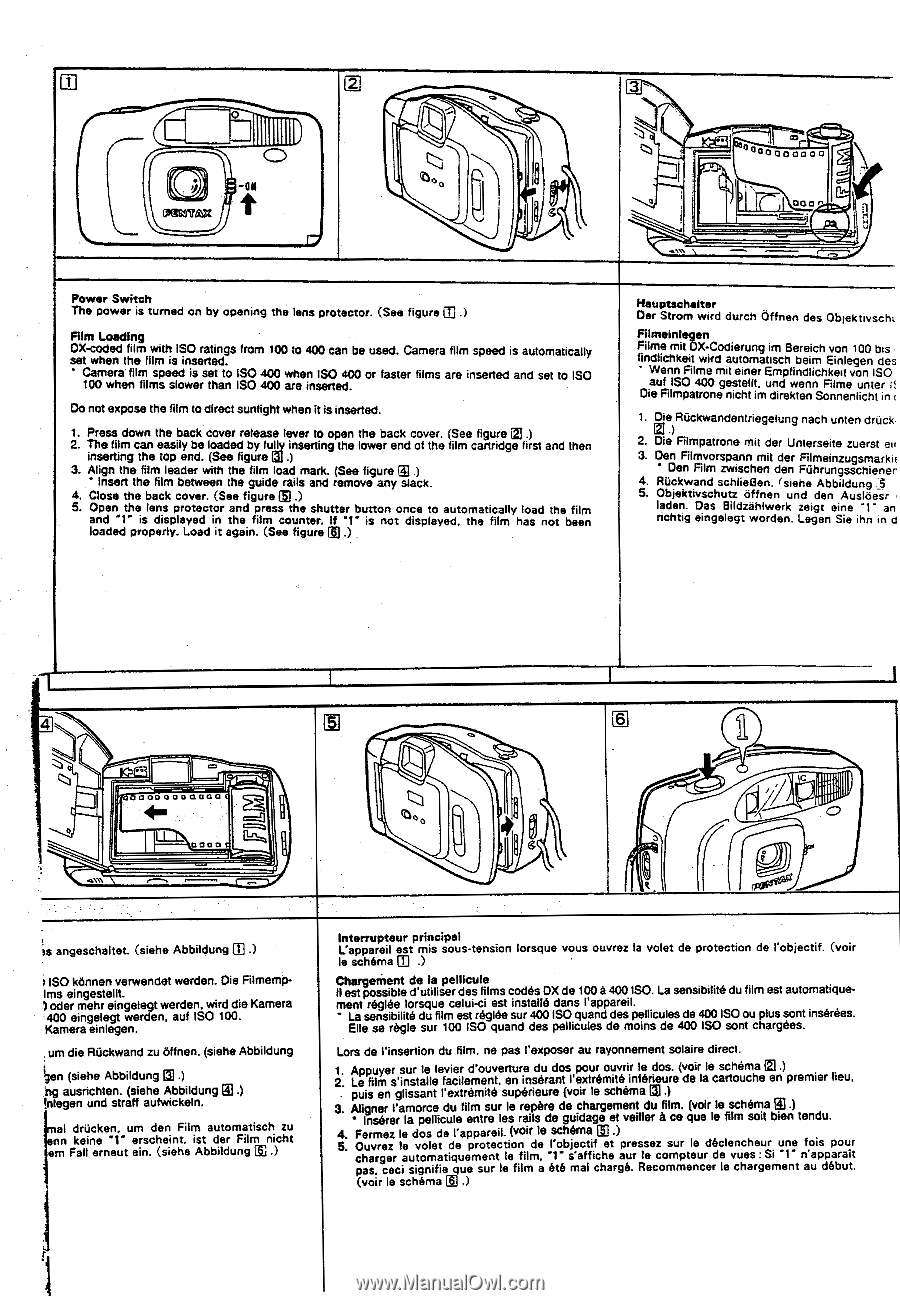
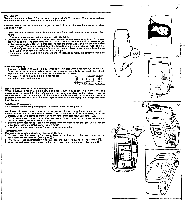
w 30304•26)X O -ON OS a aeacia00 ace Power Switch The power is turned on by opening the lens protector. (See figure Film Loading OX-coded film with ISO ratings set when the film is inserted. from 100 to 400 can be used. Camera film speed is automatically Camera' film speed is set to 100 when films slower than ISO ISO 4OO 4OO when ISO 400 are inserted. or faster films are inserted and set to ISO Do not expose the film to direct sunlight when it is inserted. 1. 2. Press down the back cover release The film can easily be loaded by full lever to open the back cover. (See figure al i) inserting the lower end of the film cartridge first and then inserting the top end. (See figure lFal .) 3. Align the film leader with the film load mark. (See figure al .) • Insert the film between the guide rails and remove any slack. 4. Close the back cover. (See figure .) 5. laOonapddene'1dth'perioslpedenisrslpyp.larLoyoteeadcdtiointratahgneadinfp.ilrm(eSsesceotufhigneutesrrhe.uM Itfte"r1b' uisttonnotondcisepltaoyaedu.totmheatifcilamllyhlaosadnothtebfeilemn Hauptschalter Der Strom wird durch offnen des Objektivschi. Filmeinlegen Filme mit OX-Codierung im Bereich von 100 bus • f'inWdliecnhnkeFiitlmweirdmiatuetionmeraEtimscphfinbdeliimchEkeinitlevgoennISdOes auf ISO 4OO gestellt, und wenn Fame unter Die Filmpatrone nicht im direkten Sonnenlicht in 1. Die Fhickwandentriegelung nach unten druck, .) 2. Die Filmpatrone mit der Unterseite zuerst eir 3. Den Filmvorspann mit der Filmeinzugsmarkii • Den Film zwischen den F5hrungsschiener 4. 5. Rtickwand schlieBen. (siehe Abbildung .3 Objektivschutz offnen und den Ausloesr laden. Das Bildzahlwerk zeigt eine '1' an richtig eingelegt worden. Logan Sie the in d IL 000000,2000 anon or ii rc_rainy is angeschaltet. (siehe Abbildung [1] .) ISO kannen verwendet werden. Die FilmempIms eingestellt. ) oder mehr eingelegt werden. wird die Kamera 4OO eingelegt werden, auf ISO 100. Kamera einlegen. um die Rilckwand zu Offnen. (siehe Abbildung .) (siehe Abbildung hg ausrichten. (siehe Abbildung .) Integen und straff aufwickeln. fnal drucken, um den Film automatisch zu enn keine '1" erscheint, ist der Film nicht em Fall erneut ein. (siehe Abbildung .) Interrupteur principal L'appareil est mis sous-tension lorsque vous ouvrez la volet de protection de l'objectif. (voir le schema 03 .) Chargeritent de la pellIcule II est possible d'utiliser des films codes DX de 100 a 4OO ISO. La sensibilite du film est automatiquement reglee lorsque celui-ci est install') dans l'appareil. " La sensibilite du film est reglee sur 400 ISO quand des pellicules de 400 ISO ou plus sont inserees. Elle se regle sur 100 ISO quand des pellicules de moins de 400 ISO sont chargees. Lors de ('insertion du film. ne pas l'exposer au rayonnement solaire direct. ai 1. 2. ALeppfiulmyesr 'isnusrtalellelefvaiceirledm'oeunvte, retnuriensdeuradnotsl'epxoturer mouitveriirnlfeerdieousr.e(vdoeirlalecascrthoeumchaeFZe1n.)premier lieu, puis en glissant l'extremite superieure (voir le schema 3. Aligner l'amorce du film sur le • Inviter la pellicule entre les repere de chargement du rails de guidage et veiller film. a ce (voir le schema .) que le film soit bien tendu. 4. Fermez le dos de l'appareil. (volt le schema m .) 5. Ouvrez le volet de protection de l'objectif et pressez sur le declencheur une fois pour charger automatiquement le film, "1" s'affiche our le compteur de vues : Si "1- n'apparait pas. ceci signifie que sur le film a ate mal chargé. Recommencer le chargement au debut. (voir le schema .)
-
 1
1 -
 2
2 -
 3
3 -
 4
4 -
 5
5 -
 6
6 -
 7
7
 |
 |