Pentax PC-30 PC-30 Manual - Page 6
t:wail, BSIMIIIHE, illtifiiE4.61:41, ftlYi
 |
View all Pentax PC-30 manuals
Add to My Manuals
Save this manual to your list of manuals |
Page 6 highlights
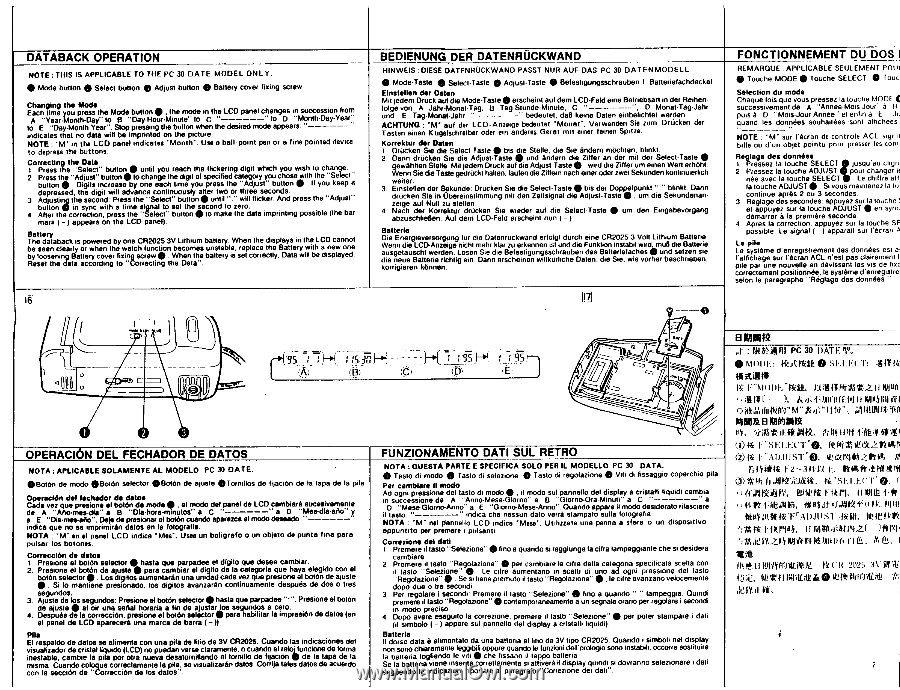
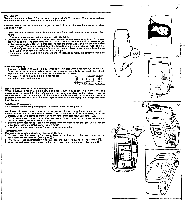
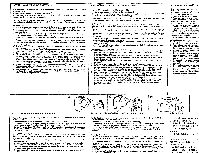
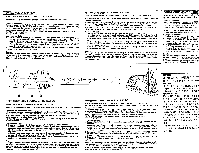
•0 DATABACK OPERATION NOTE: THIS IS APPLICABLE TO THE PC 30 DATE MODEL ONLY. 0 • • Mode button S Select button Adjust button Battery cover fixing screw Changing the Mode Each lime you press the Mode button • , the mode in the LCD panel changes in succession from A "Year-Month-Day" to 0 "Day-Hour-Minute" to C " "to I) "Month-Day-Year" to E "Day-Month-Year". Slop pressing the button when the desired mode appears. " indicates that no data will be imprinted on the picture. NOTE : in the LCD panel indicates "Month". Use a bell-point pen or a fine pointed device to depress the buttons. • Correcting the Data 1 Press the "Select" button until you reach the flickering digit which you wish to change. 2. Press the "Adjust" button • to change the digit of specified category you chose with the "Select" button 0 Digits increase by one each lime you press the "Adjust" button 0 . II you keep it depressed, the digit will advance continuously after two or three seconds. 3 bAudtjtuosntin•g the second: Press the "Select'. button • until ":" will in sync with a lime signal to set the second to zero. flicker. And press the "Adjust" 4 After the correction, press the "Select" button • to make the data imprinting possible (the bar mark ( - ) appears on the LCD panel). Battery The databack is powered by one CR2025 3V Lithium battery. When the displays in the LCD cannot be seen clearly or when the watch function becomes unstable, replace the Battery with a new one by loosening Battery cover fixing screw 0 . When the battery is set correctly, Data will be displayed. Reset the data according to "Correcting the Data". 16' BEDIENUNG DER DATENRUCKWAND HINWEIS : DIESE DATENRUCKWAND PASST NUR AUF DAS PC 30 DA T E N MODELL. 0 Mode-Taste 0 Select-Taste 0 Adjust-Taste 0 Befesligungsschrauben I. Batteriefachdeckel 0 Einstellen der Oaten Mit jedem Druck auf die Mode-Taste erscheint auf dem LCD-Feld eine Betriebsarl in der Reihen- lolge von A Jahr-Mona)-Tag, B Tag-Stunde-Minute, C " ", D Monat-Tag-Jahr und E Tag-Mona)-Jahr " " bedeutet, dal) keine Daten einbelichlet warden ACHTUNG : "NI' auf der LC D-Anzeige bedeutet "Monet", Verwenden Sie zum DrUcken der Tasten einen Kugelschreiber oder ein anderes Gerat mit einer feinen Spitze. Korrektur der Oaten 1. DrOcken Sie die Select-Taste • bis die Stolle, die Sie andern mdchten, blinkt. 2 Dann drOcken Sie die Adjust-Taste • und andern die Ziffer an der mit der Select-Taste 0 gewahllen Stolle. Mit jedem Druck auf die Adjust -Taste • , wird die Ziffer urn einen Wert erhOhl. Wweeintenr,Sie die Taste gedriickt halten, tauten die Ziffern nach einer oder zwei Sekunden kontinuierlich 3 Einstellen der Sekunde: Dnicken Sie die Select-Taste 0 bis der Doppelpunkl ":" blink!. Dann drucken Sie in Ubereinstimmung mit den Zeitsignal die Adjust-Taste • , urn die Sekundenanzeige auf Null zu stellen. 4. Nach der Korrektur drUcken Sie wieder auf die Select-Taste 0 um den Eingabevorgang abzuschlieBen. Aul dem LCD-Feld erscheint nun ( - ) Batted. Die Energieversorgung fin die Datennickwand ertolgl durch eine CR2025 3 Volt Lithium Batterie. Wenn die LCD-Anzeige nicht mehr klar zu erkennen ist und die Funktion instabil wird, muB die Batlerie ausgelauscht werden. Lbsen Sie die Befestigungsschrauben des Ballerielaches • und setzen sie die neue Batterie richtig ein. Dann erscheinen willkarliche Daten, die Sie, wie vorher beschrieben, korrigieren ktinnen. FONCTIONNEMENT DU DOS I REMAROUE APPLICABLE SEULEMENT POUF • Touche MODE Touche SELECT 0 Toucl Selection du mode Chaque lois qua vous pressez la louche MODE successivement de A "Annee-Mois-Jour' a f) puffs a D - Mois-JourAnnee" el entin A E • Jo quand les donnees souhaitees soot allichees NOTE : "M" sur l'ocran de controle ACL siynif ladle ou d'un objet pointu pour presser les corn, Reglage des donnees 1 Pressez la louche SELECT jusqu'au clignc 2 Pressez la louche ADJUST pour changer lc nee avec la louche SELECT Le chitin!, alfi la louche ADJUST 0 . Si vous mainlenez la loi continue apres 2 ou 3 secondes 3. Reglage des secondes: appuyez sur la touche et appuyez sur la touche ADJUST • en synci demarrer a la premiere seconde. 4. Apres la correction. appuyez sur la touche SE possible. Le signal ( - ) apparail sur recran A Le pile Le systeme d'enregistrement des donnees est al l'atfichage sur l'ecran ACL nest pas clairemenl li pile par une nouvelle en devissant les vie de Inca correclement positionnee, le systems d'enregistrei salon le paragraphs "Reglage des donnees " 001 SIC O 95 (A) OPERACION DEL FECHADOR DE DATOS NOTA : APLICABLE SOLAMENTE AL MODELO PC 30 DATE. 0 Boten de modo 0BotOn selector 0BotOn de ajuste OTornillos de Need:in de to tape de la pila Operachttn del %chador de datos Cada yet clue presione el botran de mode • , el modo del panel de LCD cambiare sucesivamente de A "Alto-mes-die" a B "Die-hors-minutos" a C " " a D "Mes-dla-ano" y a E "Dia-mes-ano". Deje de presionar el boldn cuando aparezca el modo deseado. "----" indica que no se imprimirin datos en la lotogralia. NOTA : "M" en el panel LCD indica 'Mee. Usee un boligrefo o un objeto de punts fine pare pulsar los botones. Correcclim de datos 1. Presione el bot6n selector 0 haste que parpadee el digit° que desee cambiar. 2. Presione el boten de ajuste • pare cambiar el digilo de la categorla que haya elegido con et bottin selector • . Los digitos aumentaran una unidad cads vez que presione el Won de ajuste • . Si lo mantiene presionado, los clIgilos avanzaran continuamente despues de dos o tres segundos. 3. Ajuste de los segundos: Presione el boleti selector haste que parpadee ":". Presione el boten de ajuste • al oir una sena' horaria a lin de ajustar los segundos a cero. 4. Despues de la correcciOn, presione el bolero selector • parehabilitar la impresien de datos (en el panel de LCD aparecera una marca de barra (- )). Plea El respaldo de datos se aliments con una pita de litio de 3V CR2025. Cuando las indicaciones del visualizadof de cristal liquid° (LCD) no puedan verse claramenle, 0 cuando el rob !undone de forma Testable, cambie Is pita por otra nueva desatornillando el tornillo de fijaciOn • de la tape de la misma Cuando coloque correctamente la pila, se visualizaran datos. Corrija tales datos de acuerdo con la section de "Correction de los datos". eOrr (0) (p) iE FUNZIONAMENTO DATI SUL RETRO NOTA : QUESTA PARTE E SPECIFICA SOLO PER IL MODELLO PC 30 DATA. 0 Tasto di modo 0 Tasto di selezione • Tasto di regolazione • Viti di fissaggio coperchio pita Per cambial" II modo Ad ogni pressione del tasto di modo 0 , it model sul pannello del display a cristalli liquidi cambia inn sustc: e,s,sione da A "Anno-Mese-Giorno" a B "Giorno-Ora-Minuti" a G" " a D "Mere-Giorno-Anno" a E "Giorno-Mese-Anno". Ouando appare modo desiderato rilasciare i ta " indica che nessun dato verra slampato suite lotogralia. NOTA : id" nal pannello LCD indica 'Mese'. Utilizzate una panne a sfera o un dispositivo appuntito per premere i pulsenti. Correzione del data 1 Premere it tasto "Selezione" 0 lino a quando si raggiunge la cifra lampeggiante che sr desidera cambiare. 2 Premere it testa "Regolazione" 0 per cambiare la Ora della caleg.oria specificata scella con • , ii last° "Selezione" • . Le titre aumentano in scan' di uno ad ogni pressione del last° "Regolazione"0 . Se si bene premuto it testa "Regolazione" le care avanzano velocemenle dopo due o ere secondi 3 Per regolare i secondi: Premere it lasto "Selezione" 0 lino a quando ":" lampeggia. Ouindi premere d last° "Regolazione" 0 contemporaneamente a un segnale orario per regolare i secondi in modo precis°. 4 Dupo avere eseguito la correzione, premere 0 taslb "Selezione" 0 per poter stampare i dati (il simbolo ( - ) appare sul pannello del display a crislalli liquidi). Batteria II dorso data it alimentato da una batleria al litio da 3V tipo CR2025. Orlando i simboli net display non sono chiaramente Ieggibili oppure quando le funzioni dell'orologio sono inslabth, occorre soslituire la bacteria togliendo le viii 0 che lissano it lappo batteria Se la batteria viene inserita corretlamente si atlivera il display quinch si dovranno selezionare i dati seguendo le indicazioni riporlale al paragrafo "Correzione dei dati". B MUIR : ritPAIII PC 30 DATE Ni!. 0 MODE: MAAR 0 SEI.ECT: 1414.1/i pi I: "moDE"riiiit, wpft. [tot II mo- t:wail 0ifk PAW)" m" h,)*:"11fv " Mitt: 'f.(t P411117B3cSIMIIIHE VittILO.Altk, (ION illtifiiE4.61:41 (≥) R "s 4.1* Ite4(plifii,..?_tA F2 -3011 F., PIK#TitiCitN I.ECT "0. ().6-416eilitY, MIR 4 -tikrl. II With 14t t1.Pz1 P4II. uf ,PiKti.(14*„ #IIIIJ: r AWL S WIER/it, -!fltM -)ftlYi! ,ii2,112!_fl.Mti Milli el. I E Mit I krtit I& -114 it -2025 3V Orli WAIritrib:itt 0 „
-
 1
1 -
 2
2 -
 3
3 -
 4
4 -
 5
5 -
 6
6 -
 7
7
 |
 |