Pfaff 332 Owner's Manual
Pfaff 332 Manual
 |
View all Pfaff 332 manuals
Add to My Manuals
Save this manual to your list of manuals |
Pfaff 332 manual content summary:
- Pfaff 332 | Owner's Manual - Page 1
CPFAFFD INSTRUCTION B00K - Pfaff 332 | Owner's Manual - Page 2
a PFAFF 332-260 Automatic - - the sewing machine with unlimited possibilities. This instruction book will help you understand the machine and give you valuable tips to make sewing more fun for you. Even if you are on experienced seamstress, you will find this book a valuable guide to easy sewing - Pfaff 332 | Owner's Manual - Page 3
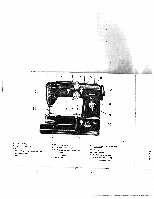
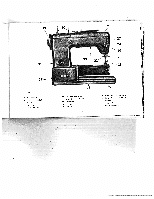
8 Stitch length stop control 9 Stitch length (forward-reverse) lever 10 Light switch 11 Drop feed control 12 Needle plate 13 free arm cover sewing hook) (enclosing transverse rotary 14 Needle 15 Upper tension 16 SewlighI swing-out fever 17 Needle position lever (C) 19 20 21 22 18 Stitch - Pfaff 332 | Owner's Manual - Page 4
R 7383 19 Balance wheel 20 Collapsible 5pOol pins 21 Top cover 22 Face cover 23 Presser bar lever 24 Needle threader lever 25 Automatic needle threader 26 Sewing foot 27 Snap-out workplate 28 Free arm 3 29 Receptacle for foot control plug 30 Receptacle for power cord plug 31 Sewlight 32 Needle - Pfaff 332 | Owner's Manual - Page 5
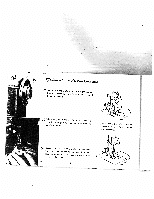
Ceaticn Make sure stop motion fore you begin sewing by white arrow). knob 6 is tightened be (clockwise as indicated 0 tbWuyrhnbelniatectvkoewarrayrrooduwyh)o.auve(ctooutunrtner-thcelobckawlainsceeaws hseheolwan, Never run a threaded machine unless you have fabric under the presser foot. Raise - Pfaff 332 | Owner's Manual - Page 6
will nor mally draw one stitch tight before making another. On a sewing ma chine, this is done automatically by take-up lever d. chine under I t The machine will feed the material under the sewing foot automatically. All you have to do is guide the work. Never try to hasten feeding by pushing or - Pfaff 332 | Owner's Manual - Page 7
$nq-Cs.t tOorkvtae Your PFAFF Automatic has a snap-out workplate which can be raised to give you a full size work area for flat sewing and embroi dery. To raise larger work surface. To further increase the sewing area, attach the workptate extension which is in the carrying case. Swing out the collapsible - Pfaff 332 | Owner's Manual - Page 8
the motor label (110 V) corresponds to the volt age in your home. (Check other appliances). Push plug I of power cord into receptacle 2 on bock of machine, and plug 3 (at other end of cord) into wall outlet 4. Conned plug of foot control cord 5 with receptacle at balancewheel end of - Pfaff 332 | Owner's Manual - Page 9
stitch length). Control e stops stitch on length desired. R6629 Forward Sewing A Set eon number that indicates stitch length you want(1-5; the higher longer the stitch). Turn fright as far as it will go. 5th dc Reverse Sewing sa Turn f left as far as it will go. (The reverse stitches will - Pfaff 332 | Owner's Manual - Page 10
. To change needle position, press ever C down and mov, into: Notch I - The needle is at the extreme left of the needle plate slot in straight sewing and swings to the right in zigzag stitching. Notch 2- The needle is centered is the needle plate slot in straight - Pfaff 332 | Owner's Manual - Page 11
packed. If embroidery design disregard them. dial shows no symbol for lever C or control D, con pea poi fou For such them. designs C and D will operate automatically. Do not touch len sett dis 10 R7072 - Pfaff 332 | Owner's Manual - Page 12
"r.roswPieanrttbedorenxsiigDsn,n,yoyotouculmemaaray,ysifesetDtthitiesssdoeimtaleawbeoxhavacettll"yo2w"a.etr",2s"o;yobr,etiwf yeoeun Machine Setting: A 3, B 4, C 2 R 7095 AEcpfplsooaeeeancBuntathttgrriiengatbnrhognenufAcmisteislthdeebeonwvoeobgnranpfttenhard"iitti1mnhinas("eeg1.acdd,ero3Wiypnf - Pfaff 332 | Owner's Manual - Page 13
/9 Oin?in th 2o6in Hold balance wheel a and turn stop motion knob b all the way to the left (counter-clockwise). Place spool of thread on right-hand spool pin. The bobbin thread should always be the same size as that used on the spool, or a little finer. Pull thread from spool and lead it clockwise - Pfaff 332 | Owner's Manual - Page 14
machine. Having wound a few turns, break off end of thread and continue winding at a faster pace. 0 Bobbin winder will stop automatically when bobbin is full. If you don't wont a full bobbin, press out lever i when sufficient amount of thread has been wound. You may continue sewing - Pfaff 332 | Owner's Manual - Page 15
_________ .9 Dnwrtin i9idt 73c66in into 3 o 6 m6 n Case 0 As shown in illustration 1, hold bobbin in left hand so that the thread end falls from the top down toward you, and insert bobbin into bobbin case. Hold the bobbin firmly in the bobbin case and pull the thread into the case slot. Pull the - Pfaff 332 | Owner's Manual - Page 16
D9 n.stin th 7 c 6 in 3 6 Casz Make sure the needle is still in its highest position. With thumb arid forefinger of left hand, lift latch k and turn bobbin case until slot at end of latch points up. Then place it on center stud I of hook. I I. In replacing the bobbin case, it is best that it - Pfaff 332 | Owner's Manual - Page 17
iftuwn? /l4?e?1 Typos of Fabrics Mercerized Cotton Silk Needle Size an '7h&'a? $i.c Or Fine Fabrics 80 such as georgette, chiffon, batiste, to voile, lawn, silk. ioo 0 to 000 twist 60 or 70 ar sy 13 The appearance of the finished seam is dependent n< Lightweight Fabrics 70 such - Pfaff 332 | Owner's Manual - Page 18
R 6798 Dit,1tant 9acts 4&14t /Ve&2ks On PFAFF Automatic sewing machines, System 130R, flat-shank needles are used for all ordinary sewing and embroidery work. The needle system is stamped on The needle plate. Genuine Pfaff needles, System 130, are available from every Pfoff dealer. Bent or blunt - Pfaff 332 | Owner's Manual - Page 19
on spool pin I and lead thread end through holes in thread guides 2 and 3 and through both thread retainer openings 4 (see slots at left of thread guides 8 and 9, and then into the slot at left of needle clamp 10. Then thread needle, front to back. PFAFF's Automatic needle threader will do this - Pfaff 332 | Owner's Manual - Page 20
R 7378 19 - Pfaff 332 | Owner's Manual - Page 21
the lower hole Pus of the ascending take-up lever d is in line with the bottom edge of the top cover. Now lower its the sewing foot and - 1ev With your left hand push threader engaging lever p up until threader prong $1 penetrates needle eye. Keep lever p in this position. Sir Hold - Pfaff 332 | Owner's Manual - Page 22
point when you thread the needle, pull about four inches of thread through the needle eye before you begin sewing. V R $390 9kJ 7 awinj 14 the '4 13cn6t '7hea' A Hold needle thread lightly in your plate slot. Place both threads back under sewing foot before you put fabric into machine. 21 - Pfaff 332 | Owner's Manual - Page 23
: Upper tension too tight or lower tension too loose. V A R 7374 To check whether the tensions are correctly balanced, take a closely woven piece of fabric and sew a few straight and zigzag seams. If the straight stitches are tightly drawn in on both sides of the fobric (see seam sketch Ill), the - Pfaff 332 | Owner's Manual - Page 24
Bobbin should tension rarely needs be a little tighter than adjusting, except for for ordinary sewing. embroidery Adtustment when it is mode by the small screw (x) on the bobbin case the number, the greater the tension. 'Ii For ordinary sewing, the upper tension should be set between 3 and 5. - Pfaff 332 | Owner's Manual - Page 25
to the right as far as it will go. To sew backwards, turn lever f toward the left as far as left arid fin the forward sewing position as far as it will go. Sew a few stitches and regulate , 4 1ac4ine The machine feed is dropped for darning, hoop embroidery and button sewing. To lower feed below - Pfaff 332 | Owner's Manual - Page 26
it is too tight, use a screw driver. Tilt the foot sideways and pull it down. Slip on new foot and tighten screw c. R7086 t Remove the sewing foot. Attach darning foot from the rear. Hold spring clip b so that it is behind the needle set screw, and tighten screw c. Attach darning hook - Pfaff 332 | Owner's Manual - Page 27
performance are dependent on regular and proper cleaning and oiling. Use Pfaff sewing machine oil only. Never lubricate machine with animal or vegetable oils. Remove all lint before oiling. All moving and rotating parts require regular lubrication. It is advis able to establish a pattern - Pfaff 332 | Owner's Manual - Page 28
can be reached easily by removing the top cover. Oil should be applied sparingly. Excessive quantities of oil may soil the work and cause machine sluggishness. One or two drops of oil usually will suffice. Before you remove the top cover, set lever E be- tween 5 and 7. To pull cover up. - Pfaff 332 | Owner's Manual - Page 29
4 5esøliqht 9aai The 25-waft sewlight is recessed under the machine arm. Lever u swings out the light to illuminate a larger working area. To change the light bulb: Swing slots. Press bulb in and turn right. Press the button on the front of the machine base to switch the sewlight on and off. - Pfaff 332 | Owner's Manual - Page 30
3 e1i '7n.%ion d Your PFAFF 332 Automatic is equipped with a 30-watt electric motor (Type PE 332), which is housed in the machine base and drives the main shaft attention, except that the brushes should be replaced after 400 hours of service. Idler r should be set just far enough left that it - Pfaff 332 | Owner's Manual - Page 31
Needle incorrectly inserted. Wrong needle. Needle bent. Machine threaded improperly. Needle too fine or too thick system is stamped on needle plate. Insert new needle. Check and correct threading as instructed. Use correct needle and thread. 2. Needle Thread Breaks Cause: The above mentioned may - Pfaff 332 | Owner's Manual - Page 32
the bobbin, cover and through thread but lead guide h. Release upper tension by setting ii on "0" and remove thread. 3. Machine Feeds Improperly Cause: Feed dog set too low and does not rise up enough above needle plate level. Remedy: Have your Pfaff dealer make the necessary adjustment. 31 1 I - Pfaff 332 | Owner's Manual - Page 33
motor belt by adjusting idler. Clean and oil hook raceway. Use only Piaff sewing machine oil - never salad oil or glycerine. Stop bobbin winder. Unwind and remove thread is still jammed, call your Pfaff dealer for help. Thread iamming can be avoided by following the instructions on pages 4 and 5. 32 - Pfaff 332 | Owner's Manual - Page 34
Length: 2 -4 Edge Stitcher No. 41 350. Sew parallel rows of straight or zigzag stitches at various distances from the fabric edge by using ad justable seam guide No. 53077 and the edge stitcher (without quilting gauge). The seam guide is fastened to the machine bed with the long thumb screw. R7104 - Pfaff 332 | Owner's Manual - Page 35
R 7171 41242 flp Flat Felled Seams Machine Setting: E -o C-2 8-0 D -0 or 2 (oplional) Stitch Length: 1-2 Flatfelled seams are used to durably ioin two pieces of fabric. They are made in two operations. Flat felled seams - Pfaff 332 | Owner's Manual - Page 36
widest zigzag stitch so the hem has a rolled shell effect. 11246 R 6083 Hemming Machine Setting: E-O C-2 B-O D-O or 2 to 4 (optional) Stitch Length: 2 -4 The hemmer foot is indispensable if you want to sew a uniform hem. You can hem with straight orzigzag stitches, depending on the type - Pfaff 332 | Owner's Manual - Page 37
) 3 -4 Overcasting prevents frayed edges. Sew edge with the needle taking one stitch into the fabric and the other over its edge. You may overcast edges 4 after fabric is cut and before the pieces are joined. R 6070 44088 Butt Seaming Machine Setting: E -0 B-0 Stitch Length: C-2 0-3 or - Pfaff 332 | Owner's Manual - Page 38
, taking one stitch into lace and fabric and the other into lace only. V 4O88 R 7161 Inserting Lace Machine Setting: E -0 B-0 C-2 D - I to 3 Stitch Length: 1 -2 Pin or baste lace on fabric. Sew to gether with needle taking one stitch into fabric alone and one into the lace. Carefully trim excess - Pfaff 332 | Owner's Manual - Page 39
be used j for tricot fabrics. Cut patch so that its grain will match the rest of the fabric. Place the potch over the damaged area. Sew it down with zigzag stitch of medium length. R 7156 I For additional strength stitch over corners twice. Turn over and trim close i to seams. 38 - Pfaff 332 | Owner's Manual - Page 40
cording foot. Followthe pattern and hold the filler thread lightly. 46121 R 7162 Shirring Machine Setting: E -0 C -2 B-O D 1 /-2 2to2 Stitch Length: 2 to rather than on top of the fabric. Fabric and filler thread both are guided in the groove of the foot. Width of zigzag depends on the thickness - Pfaff 332 | Owner's Manual - Page 41
R 7163 6612! 61 Applique Work Machine Setting: E -o B-O Stitch Length Minimum C-2 D-V/to3 Pin or baste applique on fabric and overcast edges. Appliques also can be attached with a satin stitch or any embroidery design. R 7167 40 R 7155 - Pfaff 332 | Owner's Manual - Page 42
4612! Openwork Embroidery Machine Setting: E -o B-O Stitch Length: C-2 D-Oand 21/a Minimum prresosentwwwrasoigorohkvfte-sresatmitaticblnlhrostitlriidanteccehresyidn.wgiLltiheanter'ases R7179 .4 When you finish modern design, sewing, cut out outline flowers every other square. To or free - Pfaff 332 | Owner's Manual - Page 43
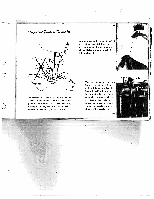
PFAFF 332 Automatic. Scalloped edges can be used effectively as trimming on numerous articles. The illustrations left show how scalloping adds sparkle to a child's collar. Here's how to do it. First, trace collar pattern on a doubled piece of fabric. Set machine 'V and guide needle along traced - Pfaff 332 | Owner's Manual - Page 44
,eahfcneaihactdfecufk.ms,essersatotorisnterhcfeeohasewrindtnehkallgel,t, needle cannot be threaded with the Automatic needle threader. Hemstitching is very simple (see sketch). I Sew first row en the left of the area to be hemstitched. 2 Step machine when needle is in tabric on the right. 3 Liti - Pfaff 332 | Owner's Manual - Page 45
on medium and heavy fabrics. Use zigzag foot No. 44088 with blindstitch guide No. 46669, which you can buy at your Pfaff store, Attach the guide so that its vertical flange goes through the sewing foot slot, Use a No.70 needle, a loose upper tension and thin thread. Next follow this procedure: Turn - Pfaff 332 | Owner's Manual - Page 46
R 6064 Sewing Buttonholes Machine Setting: E -0 B -0 C1 Stitch a filler R 6088 cord through the hole in left toe of foot. length, loosely under To get the correct stitch sew on a piece of scrap material. In making buttonholes in soft or woven fabrics, it is advantageous to place a piece of - Pfaff 332 | Owner's Manual - Page 47
fan satin stitch. Attach foot No. 51016 and adjust slide mdi cator on buttonhole gauge to length of button hole desired. lnsertfillercord through foot and sew first row, leaving the needle on the right side of the filler cord. Lift foot turn fabric clockwise using needle as a pivot. Lower foot, take - Pfaff 332 | Owner's Manual - Page 48
45720 R 7160 Button Sewing Machine Setting: E -o B-0 c-I D-Oand3to4 Drop Machine Feed sDthuoerne'bttuhbteteotnahfrrseaeaiwddinttogakseefow-outpo. nAleblviugetnrtoinbssu,attthoointos kshso,igenhyeeeessdt loperaiwrninitl.gl sPelwnatcietehr your Pfaff. the button right hole Make under when D is - Pfaff 332 | Owner's Manual - Page 49
arm of your PFAFF 332 when you darn sleeves and socks. Machine Setting: E -0 B -0 C -2 D -0 Remove presser foot and drop machine feed. Use feed plate to the machine, slip its spring into the slot in the front edge of the needle plate, as illustrated. Attach darning foot as instructed on page - Pfaff 332 | Owner's Manual - Page 50
Tubular Articles Machine Setting: E-0 8-0 C-.2 0-0 Dropfeed. You need no darning hoop to mend sleeves, trouser legs or socks on your PFAFE 332. Simply slip them . Long rips may be darned with the normal sewing foot and without hoop. Raise machine feed and use forward and reverse stitch lever. Small - Pfaff 332 | Owner's Manual - Page 51
procedure below is primarily used for block letters. Raise feed and set . 14 machine for satin stitch. Attach cord stitcher and sew outlines of monogram. Watch that seams do not overlap at oints of letters. Ask delight in the countless creative possibilities which it adds to your Automatic. 50 - Pfaff 332 | Owner's Manual - Page 52
l/ and 5 /64-inch double-needle holders, and System 130 R flat-shank needles in 3/35 and 7 /o4-inch needle holders. To attach cording plate refer to instructions on page 48 for mounting feed cover plate. 51 - Pfaff 332 | Owner's Manual - Page 53
Threading Diagram for Two Needles tsYhooreuthardrueeapddpsethrorotreeungssheiopntahrehaatteesndsaiaostnh.tihredy disc are woyInniotchucrreoccarodosreirdndtgidhnuegscitzbsseo.obiytbokiuneewpteosnnisttsi.osTnhoasplsieegwhintlfytihllefeodlrocuconordrddriyinn.ggF. - Pfaff 332 | Owner's Manual - Page 54
make them, no machine parts have to be changed. If any of the other designs ore sewn with two needles, the needle plate, machine feed and sewing foot must be changed sewn with different color threads. The sewing abilities of your PFAFF Automatic are practically unlimited. Interesting effects can - Pfaff 332 | Owner's Manual - Page 55
) and is avail able at your Pfaff store. The third thread is led to the needle with the second thread. You can sew the same pattern with three needles that you can make with two needles using the regulation machine parts. R 7175 Automatic Embroidery Interesting design effects are easy to - Pfaff 332 | Owner's Manual - Page 56
The Transverse Spool Holder To ensure that the transverse machine. stphoeotlhhreoaldderwiwllhuicnhwiisndpoervteonflythferosmtanadcarrodsse-qwuoiupnmdenspt ooofl.youuser ahspotTslheinooneltdi,.snabpsWiatenottsranoiupcttlhrclhepatpetqcoihtdnhuere.tefii2irsor.espmnpdPro.ilronyoefWgs. - Pfaff 332 | Owner's Manual - Page 57
the Automatic Needle Threader Drawing Up the Bobbin Thread Correct Tension Regulation Regulating the Thread Tension . Stitch Length Regulation Dropping the Machine Feed Changing the Sewing Foot The Darning Foot Care and Maintenance Sewlight Facts Adjusting the Motor Belt Tension Trouble Shooting - Pfaff 332 | Owner's Manual - Page 58
I I A. C. WEBER & CO., JNC. Di3tributor • Chicago
-
 1
1 -
 2
2 -
 3
3 -
 4
4 -
 5
5 -
 6
6 -
 7
7 -
8
-
9
-
10
-
11
-
12
-
13
-
14
-
15
-
16
-
17
-
18
-
19
-
20
-
21
-
22
-
23
-
24
-
25
-
26
-
27
-
28
-
29
-
30
-
31
-
32
-
33
-
34
-
35
-
36
-
37
-
38
-
39
-
40
-
41
-
42
-
43
-
44
-
45
-
46
-
47
-
48
-
49
-
50
-
51
-
52
-
53
-
54
-
55
-
56
-
57
-
58
 |
 |
CPFAFFD
INSTRUCTION
B00K