Pfaff 360 Owner's Manual - Page 17
Vee?te
 |
View all Pfaff 360 manuals
Add to My Manuals
Save this manual to your list of manuals |
Page 17 highlights
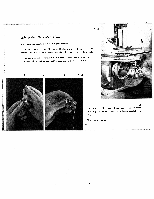
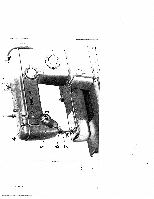
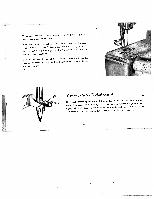
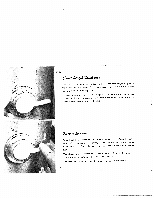
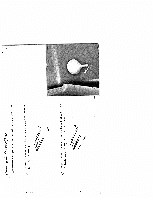
R8008 I Ceatin9 the 1 'Vee?te 'heae Before you begin make sure that the needle is at its highest position, i.e. that the lower hole of the ascending take-up lever d is in line with the bottom edge of the top cover. Now lower the sewing footand-- With your left hand push needle threader control down until threader prong w (see opposite page) penetrates needle eye. Keep control in this position. Hold thread loosely and lead it from left around the small pin, then place it behind hook of threader prong. Release control slightly until prong w reverses and pulls thread through needle eye. Jerk control down again so the thread loop will fall off the prong. Pull thread through needle eye and release control. R8013 2 R8009 3 R8010 4
-
 1
1 -
2
-
3
-
4
-
5
-
6
-
7
-
8
-
9
-
10
-
11
-
 12
12 -
 13
13 -
 14
14 -
 15
15 -
 16
16 -
 17
17 -
 18
18 -
 19
19 -
 20
20 -
 21
21 -
 22
22 -
23
-
24
-
25
-
26
-
27
-
28
-
29
-
30
-
31
-
32
-
33
-
34
-
35
-
36
-
37
-
38
-
39
-
40
-
41
-
42
-
43
-
44
-
45
-
46
-
47
-
48
-
49
-
50
-
51
-
52
-
53
-
54
-
55
 |
 |

Ceatin9
the
1
’Vee?te
‘heae
Before
you
begin
make
sure
that
the
needle
is
at
its
highest
position,
i.e.
that
the
lower
hole
of
the
ascending
take-up
lever
d
is
in
line
with
the
bottom
edge
of
the
top
cover.
Now
lower
the
sewing
footand——
With
your
left
hand
push
needle
threader
control
down
until
threader
prong
w
(see
opposite
page)
penetrates
needle
eye.
Keep
control
in
this
position.
Hold
thread
loosely
and
lead
it
from
left
around
the
small
pin,
then
place
it
behind
hook
of
threader
prong.
Release
control
slightly
until
prong
w
reverses
and
pulls
thread
through
needle
eye.
Jerk
control
down
again
so
the
thread
loop
will
fall
off
the
prong.
Pull
thread
through
needle
eye
and
release
control.
R8008
I
R8013
2
R8009
3
R8010
4