Pfaff SMARTER BY 155 Anniversary Edition Manual - Page 17
Inserting the bobbin, Presser foot pressure, standard value 2. In most cases, you do not need
 |
View all Pfaff SMARTER BY 155 Anniversary Edition manuals
Add to My Manuals
Save this manual to your list of manuals |
Page 17 highlights
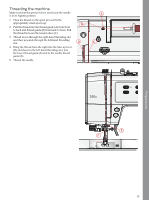
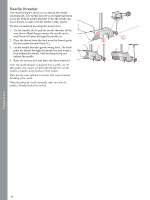
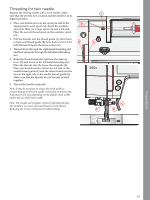
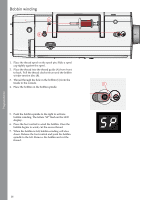
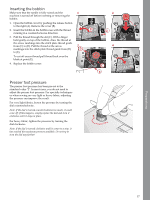
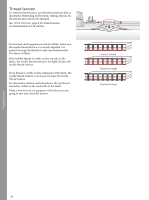
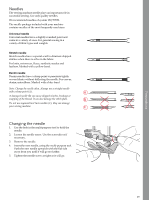
Preparations Inserting the bobbin Make sure that the needle is fully raised and the machine is turned off before inserting or removing the bobbin. 1. Open the bobbin cover by pushing the release button to the right (A). Remove the cover (B). 2. Insert the bobbin in the bobbin case with the thread running in a counterclockwise direction. 3. Pull the thread through the slit (C). With a finger held gently on top of the bobbin, draw the thread at the arrow markings into the stitch plate thread guide from (C) to (D). Pull the thread at the arrow markings into the stitch plate thread guide from (D) to (E). To cut off excess thread pull thread back over the blade at point (E). 4. Replace the bobbin cover. Presser foot pressure The presser foot pressure has been pre-set to the standard value "2". In most cases, you do not need to adjust the presser foot pressure. For specialty techniques or when sewing on very light or heavy fabric, adjusting the pressure can improve the result. For very light fabrics, loosen the pressure by turning the dial counterclockwise. Note: If the dial is turned counterclockwise too much, it could come off. If this happens, simply replace the dial and turn it clockwise until it stays in place. For heavy fabric, tighten the pressure by turning the dial clockwise. Note: If the dial is turned clockwise until it comes to a stop, it has reached the maximum pressure available. Do not try to turn the dial any further! 17
-
 1
1 -
2
-
3
-
4
-
5
-
6
-
7
-
8
-
9
-
10
-
11
-
 12
12 -
 13
13 -
 14
14 -
 15
15 -
 16
16 -
 17
17 -
 18
18 -
 19
19 -
 20
20 -
 21
21 -
 22
22 -
23
-
24
-
25
-
26
-
27
-
28
-
29
-
30
-
31
-
32
-
33
-
34
-
35
-
36
 |
 |