Pfaff SMARTER BY 155 Anniversary Edition Manual - Page 23
Sewing, Select a stitch, Stitch adjustments
 |
View all Pfaff SMARTER BY 155 Anniversary Edition manuals
Add to My Manuals
Save this manual to your list of manuals |
Page 23 highlights
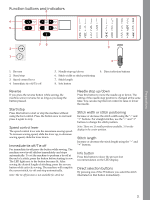
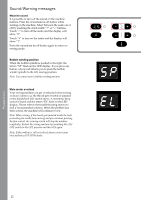
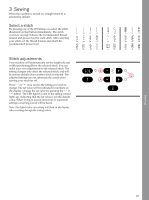
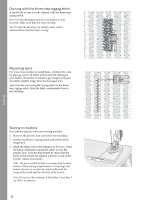
Sewing 3 Sewing When the machine is turned on, straight stitch 01 is selected by default. Select a stitch By pressing one of the 27 buttons you select the stitch illustrated on that button immediately. The stitch overview on page 8 shows the recommended thread tension and presser foot for each stitch. After selecting your stitch, set the thread tension and attach the recommended presser foot. Stitch adjustments Your machine will automatically set the length (A) and width/positioning (B) for the selected stitch. You can make your own adjustments to the selected stitch. The setting changes only affect the selected stitch, and will be reset to default when another stitch is selected. The adjusted settings are not automatically saved when turning your machine off. Press "-" or "+" once next to the setting you wish to change. The set value will be indicated in numbers on the display. Change the set value by pressing the "-" or "+" button. The LED light (C) next to the setting control lights up, indicating that the set value is not the default value. When trying to exceed minimum or maximum settings a warning sound will be heard. Note: The default value of a setting will flash on the display when scrolling through the setting values. 23
-
 1
1 -
2
-
3
-
4
-
5
-
6
-
7
-
8
-
9
-
10
-
11
-
12
-
13
-
14
-
15
-
16
-
17
-
 18
18 -
 19
19 -
 20
20 -
 21
21 -
 22
22 -
 23
23 -
 24
24 -
 25
25 -
 26
26 -
 27
27 -
 28
28 -
29
-
30
-
31
-
32
-
33
-
34
-
35
-
36
 |
 |
