Pfaff SMARTER BY 155 Anniversary Edition Manual - Page 21
Function buttons and indicators, Reverse, Start/stop, Speed control lever, Immediate tie-off/Tie-off
 |
View all Pfaff SMARTER BY 155 Anniversary Edition manuals
Add to My Manuals
Save this manual to your list of manuals |
Page 21 highlights
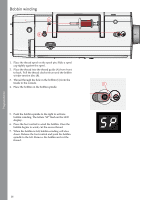
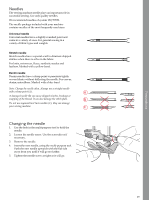
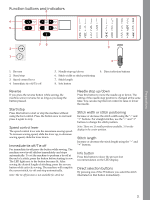
Function buttons and indicators Preparations 1. Reverse 2. Start/stop 3. Speed control lever 4. Immediate tie-off/Tie-off 5. Needle stop up/down 6. Stitch width or stitch positioning 7. Stitch length 8. Info button 9. Direct selection buttons Reverse If you press the reverse button while sewing, the machine sews in reverse for as long as you keep the button pressed. Start/stop Press this button to start or stop the machine without using the foot control. Press the button once to start and press it again to stop. Speed control lever The speed control lever sets the maximum sewing speed. To increase sewing speed, slide the lever up, to decrease sewing speed, slide the lever down. Immediate tie-off/Tie-off For immediate tie-off press the button while sewing. The machine sews tie-off stitches immediately and stops automatically. To set the machine to perform a tie-off at the end of a stitch, press the button before starting to sew. The LED light next to the button becomes lit. After sewing the desired length of stitching, press the reverse button while actively sewing. The machine will complete the current stitch, tie-off and stop automatically. Note: The tie-off function is not available for stitch 12. Needle stop up/down Press this button to move the needle up or down. The setting of the needle stop position is changed at the same time. You can also tap the foot control to raise or lower the needle. Stitch width or stitch positioning Increase or decrease the stitch width using the "-" and "+" buttons. For straight stitches, use the "-" and "+" buttons to change the stitch position. Note: There are 15 needle positions available. 3.0 on the display is the center position. Stitch length Increase or decrease the stitch length using the "-" and "+" buttons. Info button Press this button to show the presser foot recommendation on the LED display. Direct selection buttons By pressing one of the 27 buttons you select the stitch illustrated on that button immediately. 21
-
 1
1 -
2
-
3
-
4
-
5
-
6
-
7
-
8
-
9
-
10
-
11
-
12
-
13
-
14
-
15
-
 16
16 -
 17
17 -
 18
18 -
 19
19 -
 20
20 -
 21
21 -
 22
22 -
 23
23 -
 24
24 -
 25
25 -
 26
26 -
27
-
28
-
29
-
30
-
31
-
32
-
33
-
34
-
35
-
36
 |
 |
