Pfaff creative 1371 Owner's Manual - Page 109
Binding, edges, non-woven, Edge-binding, binder
 |
View all Pfaff creative 1371 manuals
Add to My Manuals
Save this manual to your list of manuals |
Page 109 highlights
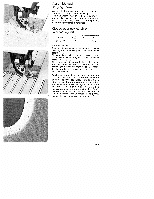
______ Binding edges with non-woven tape prog LzL__ Fold ready-made bias binding lengthwise anc shape-press. Push the folded binding over the fabri( edge and baste it in place, if required. Then se it on with straight stitches (Fig. 1). Edge-binding with the binder Sewing foot: Program: Stitch length: Program: Stitch-width: Stitch length: Binder (special accessory) 00 2.5 mm, (Fig. a) or 10 2.5 mm 1.5 mm, (Fig. b) Remove sewing foot and screw on binder. Inserl the bias tape in the scroll of the binder and pul it out to the rear. Set the binder in such a way that the needle enters 1 to 1.5 mm from the turned-ir bias edge. Sew a number of stitches along the bias tape. Place the raw edge in the groove of the bin' der. During sewing, the bias tape is wrapped auto matically over the material edges. Sew the bias tape on with the above mentioned program or a program of your own selection. Straight material edges are the simplest to bind (Fig. 2). 1: 94
-
 1
1 -
2
-
3
-
4
-
5
-
6
-
7
-
8
-
9
-
10
-
11
-
12
-
13
-
14
-
15
-
16
-
17
-
18
-
19
-
20
-
21
-
22
-
23
-
24
-
25
-
26
-
27
-
28
-
29
-
30
-
31
-
32
-
33
-
34
-
35
-
36
-
37
-
38
-
39
-
40
-
41
-
42
-
43
-
44
-
45
-
46
-
47
-
48
-
49
-
50
-
51
-
52
-
53
-
54
-
55
-
56
-
57
-
58
-
59
-
60
-
61
-
62
-
63
-
64
-
65
-
66
-
67
-
68
-
69
-
70
-
71
-
72
-
73
-
74
-
75
-
76
-
77
-
78
-
79
-
80
-
81
-
82
-
83
-
84
-
85
-
86
-
87
-
88
-
89
-
90
-
91
-
92
-
93
-
94
-
95
-
96
-
97
-
98
-
99
-
100
-
101
-
102
-
103
-
 104
104 -
 105
105 -
 106
106 -
 107
107 -
 108
108 -
 109
109 -
 110
110 -
 111
111 -
 112
112 -
 113
113 -
 114
114 -
115
-
116
-
117
-
118
-
119
-
120
-
121
 |
 |
