Pfaff hobby serger Owner's Manual - Page 6
Itnsiun
 |
View all Pfaff hobby serger manuals
Add to My Manuals
Save this manual to your list of manuals |
Page 6 highlights
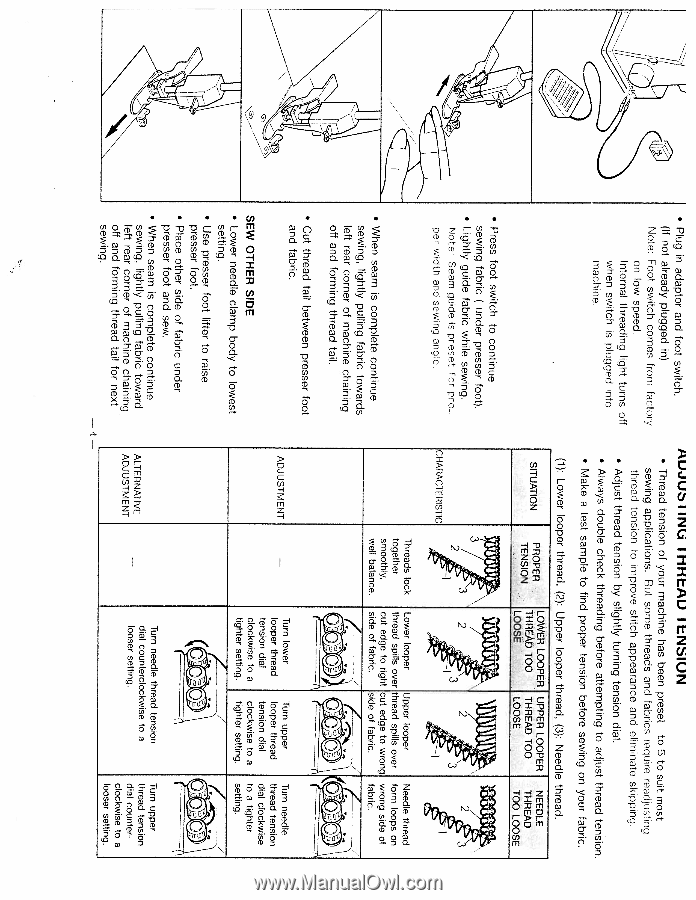
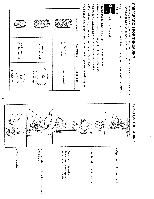
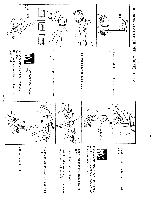
• Plug in adaptor and foot switch. (If not already plugged in) Note: Foot switch comes from factory on low speed. Internal threading light turns ott when switch is plugged into machine. • Press foot switch to continue sewing fabric ( under presser foot). • Lightly guide fabric while sewing. Note: Seam guide is preset for proocr width and sewing angle. MLJJUIIrIU IMHLAU ItNSIUN • Thread tension of your machine has been preset to 5 to suit most sewing applications. But some threads and fabrics require readjusting thread tension to improve stitch appearance and eliminate skipping. • Adjust thread tension by slightly turning tension dial. • Always double check threading before attempting to adjust thread tension. • Make a test sample to find proper tension before sewing on your fabric. (1): Lower looper thread, (2): Upper looper thread, (3): Needle thread. SITUATION LOWER LOOPER UPPER LOOPER THREAD TOO THREAD TOO LOOSE LOOSE NEEDLE THREAD TOO LOOSE '3l377 CHARACTERISTIC • When seam is complete continue sewing, lightly pulling fabric towards left rear corner of machine chaining off and forming thread tail. • Cut thread tail between presser foot and fabric. ADJUSTMENT SEW OTHER SIDE • Lower needle clamp body to lowest setting. • Use presser foot lifter to raise presser foot. • Place other side of fabric under presser foot and sew. • When seam is complete continue sewing, lightly pulling fabric toward ALTERNATIVE left rear corner of machine chaining ADJUSTMENT off and forming thread tail for next sewing. 4 - - Threads lock together smoothly, well balance. Lower looper Upper looper thread spills over thread spills over cut edge to right cut edge to wrong side of fabric, side of fabric, Needle thread form loops on wrong side of fabric. - Turn lower Turn upper Turn needle looper thread looper thread thread tension tension dial tension dial dial clockwise clockwise to a clockwise to a to a tighter tighter setting. tighter setting. setting. / 1- " Turn needle thread tension dial counterclockwise to a looser setting. Turn upper thread tension dial counter clockwise to a looser setting.
-
 1
1 -
 2
2 -
 3
3 -
 4
4 -
 5
5 -
 6
6 -
 7
7 -
 8
8 -
 9
9 -
 10
10 -
 11
11 -
 12
12 -
13
-
14
 |
 |