Pfaff powerquilter p3 Manual - Page 23
Bobbin Winder and Bobbins
 |
View all Pfaff powerquilter p3 manuals
Add to My Manuals
Save this manual to your list of manuals |
Page 23 highlights
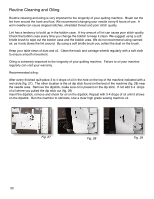
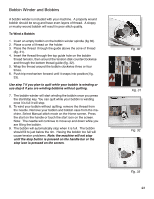
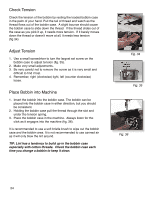
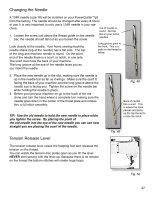
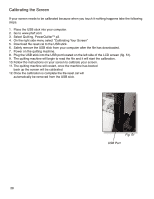
Bobbin Winder and Bobbins A bobbin winder is included with your machine. A properly wound bobbin should be snug and have even layers of thread. A sloppy or mushy wound bobbin will result in poor stitch quality. To Wind a Bobbin 1. Insert an empty bobbin on the bobbin winder spindle (fig 30). 2. Place a cone of thread on the holder. 3. Place the thread through the guide above the cone of thread (fig. 31). 4. Insert the thread through the top guide hole on the bobbin thread tension, then around the tension disk counterclockwise and through the bottom thread guide (fig. 32). 5. Wrap the thread around the bobbin clockwise three or four times. 6. Push trip mechanism forward until it snaps into position( fig. 33). Use step 7 if you plan to quilt while your bobbin is winding or use step 8 if you are winding bobbins without quilting. 7. The bobbin winder will start winding the bobbin once you press the start/stop key. You can quilt while your bobbin is winding once it is full it will stop. 8. To wind your bobbin without quilting, remove the thread from the needle. Remove your bobbin and bobbin case from the machine. Select Manual stitch mode on the Home screen. Press the start on the handle or touch the start icon on the screen. Note: The needle will continue to move up and down while you are filling the bobbin. 9. The bobbin will automatically stop when it is full. The bobbin should fill to just below the rim. Having the bobbin too full will cause tension problems. Note: the machine will not stop until the stop button is pressed on the handle bar or the stop icon is pressed on the screen. Fig. 30 Fig. 31 Fig. 32 Fig. 33 23
-
 1
1 -
2
-
3
-
4
-
5
-
6
-
7
-
8
-
9
-
10
-
11
-
12
-
13
-
14
-
15
-
16
-
17
-
 18
18 -
 19
19 -
 20
20 -
 21
21 -
 22
22 -
 23
23 -
 24
24 -
 25
25 -
 26
26 -
 27
27 -
 28
28 -
29
-
30
-
31
-
32
-
33
-
34
 |
 |
