Pfaff powerquilter p3 Manual - Page 8
Attaching Handle Bars, Attaching LCD Touch Screen
 |
View all Pfaff powerquilter p3 manuals
Add to My Manuals
Save this manual to your list of manuals |
Page 8 highlights
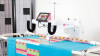
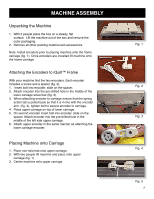
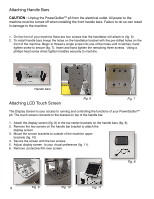
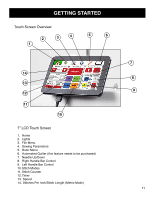
Attaching Handle Bars CAUTION - Unplug the PowerQuilterTM p3 from the electrical outlet. All power to the machine must be turned off when installing the front handle bars. Failure to do so can result in damage to the machine. 1. On the front of your machine there are four screws that the handlebar will attach to (fig. 6). 2. To install handle bars lineup the holes on the handlebar bracket with the pre-drilled holes on the front of the machine. Begin to thread a single screw into one of the holes until it catches, hand tighten screw to secure (fig. 7). Insert and hand tighten the remaining three screws. Using a phillips head screw driver tighten handles securely to machine. Handle bars Attaching LCD Touch Screen Fig. 6 Fig. 7 The Display Screen is your access to running and controlling the functions of your PowerQuilterTM p3. The touch screen connects to the bracket on top of the handle bar. 1. Attach the display screen (fig. 8) to the top center brackets on the handle bars (fig. 9). 2. Remove the two screws on the handle bar bracket to attach the display screen. 3. Mount the screen brackets to outside of the machine upper brackets (fig. 10). 4. Secure the screen with the two screws. 5. Adjust display screen to your visual preference (fig. 11). 6. Remove protective film over screen. Fig. 8 8 Fig. 9 Fig. 10 Fig. 11
-
 1
1 -
2
-
 3
3 -
 4
4 -
 5
5 -
 6
6 -
 7
7 -
 8
8 -
 9
9 -
 10
10 -
 11
11 -
 12
12 -
 13
13 -
14
-
15
-
16
-
17
-
18
-
19
-
20
-
21
-
22
-
23
-
24
-
25
-
26
-
27
-
28
-
29
-
30
-
31
-
32
-
33
-
34
 |
 |
