Pfaff powerquilter p3 Manual - Page 7
Machine Assembly - accessories
 |
View all Pfaff powerquilter p3 manuals
Add to My Manuals
Save this manual to your list of manuals |
Page 7 highlights
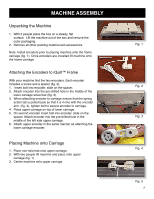
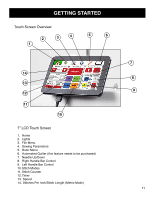
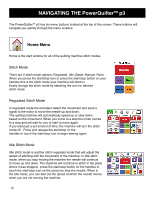
MACHINE ASSEMBLY Unpacking the Machine 1. With 2 people place the box on a steady, flat surface. Lift the machine out of the box and remove the outer packaging. 2. Remove all other packing material and accessories. Note: Install encoders prior to placing machine onto the frame carriage (fig. 1). Once encoders are installed lift machine onto the frame carriage. Attaching the Encoders to iQuilt™ Frame With your machine find the two encoders. Each encoder includes a screw and a spacer (fig. 2). 1. Insert bolt into encoder, slide on the spacer. 2. Attach encoder into the pre-drilled hole in the middle of the lower carriage wheel bar (fig. 3) 3. When attaching encoder to carriage ensure that the spring action tab is pulled back so that it is in line with the encoder arm. (fig. 4), tighten bolt to secure encoder to carriage. 4. Place upper carriage on top of lower carriage. 5. On second encoder insert bolt into encoder, slide on the spacer. Attach encoder into the pre-drilled hole in the middle of the left side upper carriage. 6. Attach upper encoder in the same manner as attaching the lower carriage encoder. Placing Machine onto Carriage 1. Place non-skid mat onto upper carriage. 2. With two people lift machine and place onto upper carriage (fig. 1). 3. Center machine onto upper carriage. Fig. 1 Fig. 2 Fig. 3 Fig. 4 Fig. 5 7
-
 1
1 -
 2
2 -
 3
3 -
 4
4 -
 5
5 -
 6
6 -
 7
7 -
 8
8 -
 9
9 -
 10
10 -
 11
11 -
 12
12 -
13
-
14
-
15
-
16
-
17
-
18
-
19
-
20
-
21
-
22
-
23
-
24
-
25
-
26
-
27
-
28
-
29
-
30
-
31
-
32
-
33
-
34
 |
 |
