Philips DS3881W User Manual - Page 13
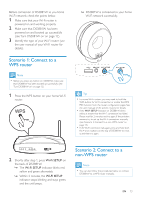
Scenario 1: Connect to a WPS router, WPS
 |
View all Philips DS3881W manuals
Add to My Manuals
Save this manual to your list of manuals |
Page 13 highlights
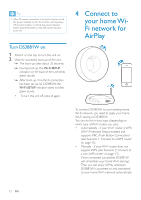
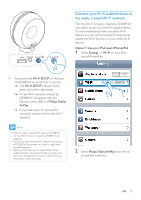
Before connection of DS3881W to you home Wi-Fi network, check the points below. 1 Make sure that your Wi-Fi router is powered on and working properly. 2 Make sure that DS3881W has been powered on and booted up successfully (see 'Turn DS3881W on' on page 12). 3 Identify the type of your Wi-Fi router (see the user manual of your Wi-Fi router for details). Scenario 1: Connect to a WPS router Note •• Before you press any button on DS3881W, make sure that DS3881W has been booted up successfully (see 'Turn DS3881W on' on page 12). 1 Press the WPS button on your home Wi-Fi router. WPS »» DS3881W is connected to your home Wi-Fi network successfully. Tip •• For some Wi-Fi routers, you may need to hold the WPS button for Wi-Fi connection or enable the WPS PBC function from the router configuration pages. See the user manuals of the specific routers for details. •• If the Wi-Fi SETUP indicator on DS3881W blinks yellow, it means that the Wi-Fi connection has failed. Please wait for 2 minutes and try again. If the problem remains, try to set up the Wi-Fi connection manually (see 'Scenario 2: Connect to a non-WPS router' on page 13). •• If the Wi-Fi connection fails again, press and hold both the + and - buttons on the top of DS3881W to reset it, and then try again. 2 Shortly after step 1, press Wi-Fi SETUP on the back of DS3881W. »» The Wi-Fi SETUP indicator blinks red, yellow and green alternately. »» Within 2 minutes, the WI-FI SETUP indicator stops blinking and stays green, and the unit beeps. Scenario 2: Connect to a non-WPS router Note •• You can also follow the procedures below to connect DS3881W to a WPS router manually. EN 13
-
 1
1 -
2
-
3
-
4
-
5
-
6
-
7
-
 8
8 -
 9
9 -
 10
10 -
 11
11 -
 12
12 -
 13
13 -
 14
14 -
 15
15 -
 16
16 -
 17
17 -
 18
18 -
19
-
20
-
21
-
22
-
23
-
24
-
25
-
26
-
27
-
28
 |
 |
