Philips DS3881W User Manual - Page 18
Restore your Wi-Fi enabled device, back to your existing home Wi-Fi, setting
 |
View all Philips DS3881W manuals
Add to My Manuals
Save this manual to your list of manuals |
Page 18 highlights
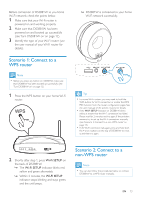
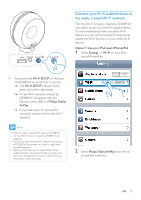
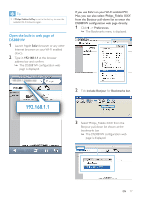
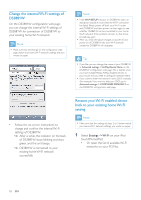
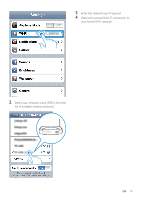
Change the internal Wi-Fi settings of DS3881W On the DS3881W configuration web page, you can change the internal Wi-Fi settings of DS3881W for connection of DS3881W to your existing home Wi-Fi network. Note •• Make sure that the settings on the configuration web page match your home Wi-Fi network settings that you wrote on paper. Note •• If the WI-FI SETUP indicator on DS3881W does not stay green steadily, it means that the Wi-Fi connection has failed. Please power off both your Wi-Fi router and DS3881W and then power on them again to see whether DS3881W can be connected to your home Wi-Fi network. If the problem remains, try the above procedures again. •• After you finish the above changes or power-off and power-on of DS3881W, the new Wi-Fi network created by DS3881W will disappear. Tip •• If you like, you can change the name of your DS3881W in Advanced settings -> AirPlay Device Name on the DS3881W configuration web page.This is helpful when you have multiple Philips AirPlay-enabled devices in your house and you need to distinguish between them. •• If you want to enter the network name (SSID) manually (for example, if you want to hide your SSID), go to Advanced settings -> CONFIGURE MANUALLY on the DS3881W configuration web page. • Follow the on-screen instructions to change and confirm the internal Wi-Fi settings of DS3881W. »» After a while, the indicator on the back of DS3881W stops blinking and stays green, and the unit beeps. »» DS3881W is connected to your existing home Wi-Fi network successfully. Restore your Wi-Fi enabled device back to your existing home Wi-Fi setting Note •• Make sure that the settings at steps 2 to 3 below match your home Wi-Fi network settings you wrote on paper. 1 Select Settings -> Wi-Fi on your iPod touch/iPhone/iPad. • Or open the list of available Wi-Fi networks on your PC/Mac. 18 EN
-
 1
1 -
2
-
3
-
4
-
5
-
6
-
7
-
8
-
9
-
10
-
11
-
12
-
 13
13 -
 14
14 -
 15
15 -
 16
16 -
 17
17 -
 18
18 -
 19
19 -
 20
20 -
 21
21 -
 22
22 -
 23
23 -
24
-
25
-
26
-
27
-
28
 |
 |
