Philips DVDR3475 User manual - Page 29
Ctimer Recording
 |
UPC - 609585128989
View all Philips DVDR3475 manuals
Add to My Manuals
Save this manual to your list of manuals |
Page 29 highlights
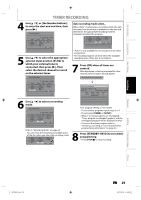
Introduction Connections Basic Setup TIMER RECORDING 4 Use [K / L] or [the Number buttons] to enter the start and end time, then press [B]. Timer Programming Date Date JAN/02 E1/E2 E1 MON JAN/01 11:00AM Start End E1/E2 NewSPtraorgt ram End 12 : 00AM - - : - - Mode SP SP 2 : 00 1/1 5 Use [K / L] to select the appropriate external input position (E1/E2) to which your external tuner is connected, then press [B]. Then select the desired channel to record on the external tuner. Timer Programming Date Date JAN/02 E1/E2 E1 MON JAN/01 11:00AM Start End E1/E2 NewSPtraorgt ram End 12 : 00AM 1 : 00AM Mode SP SP 1 : 00 1/1 Auto recording mode select... When "Auto" is selected as a recording mode, the unit calculates how much time is available on the disc and determines the appropriate recording mode to complete recording the program. Date JAN/02 E1/E2 E1 NewSPtraorgt ram 12 : 00AM Mode Auto End 1 : 00AM Auto 0 : 00 1/1 • "Auto" is only available for one program in the timer program list. • The recording may be cut short when the available recording space of the disc is too limited. 7 Press [OK] when all items are entered. After displaying a warning message for a few seconds, timer program list will appear. Press STANDBY-ON to Timer Standby mode. Timer Programming JAN/ 2/07 12:00 AM E1 SP SP (1:00) MON JAN/01 11:00AM Date JAN/02 Start End 12:00AM 1:00AM New Program E1/E2 E1 6 Use [K / L] to select a recording mode. Timer Programming Date Date JAN/02 E1/E2 E1 MON JAN/01 11:00AM Start End E1/E2 NewSPtraorgt ram End 12 : 00AM 1 : 00AM Mode SP SP 1 : 00 1/1 Refer to "Recording Mode" on page 24. • You can check the remaining recordable space of the disc when you select the recording mode. Date JAN/02 E1/E2 E1 Start 12 : 00AM Mode SP End 1 : 00AM SP 1 : 00 1/1 Your program setting is now stored. • To set another program, repeat steps 2 to 7. • To exit, press [TIMER] or [SETUP]. • When 2 or more programs are overlapped, "Timer program overlapped" appears, and the overlapped program will be displayed in blue. • To correct the timer program refer to "Checking, canceling, or correcting the timer programming information" on page 30. 8 Press [STANDBY-ON y] to set a timer programming. • Press [STOP C] to stop recording. Recording Playback Editing Function Setup Others E7E4AUD.indd 29 EN 29 2007/05/16 14:56:24
-
 1
1 -
2
-
3
-
4
-
5
-
6
-
7
-
8
-
9
-
10
-
11
-
12
-
13
-
14
-
15
-
16
-
17
-
18
-
19
-
20
-
21
-
22
-
23
-
 24
24 -
 25
25 -
 26
26 -
 27
27 -
 28
28 -
 29
29 -
 30
30 -
 31
31 -
 32
32 -
 33
33 -
 34
34 -
35
-
36
-
37
-
38
-
39
-
40
-
41
-
42
-
43
-
44
-
45
-
46
-
47
-
48
-
49
-
50
-
51
-
52
-
53
-
54
-
55
-
56
-
57
-
58
-
59
-
60
-
61
-
62
-
63
-
64
-
65
-
66
-
67
-
68
-
69
-
70
-
71
-
72
-
73
-
74
-
75
-
76
-
77
-
78
-
79
-
80
-
81
-
82
-
83
-
84
-
85
-
86
-
87
-
88
-
89
-
90
-
91
-
92
-
93
-
94
-
95
-
96
 |
 |
