Philips DVDR615 Quick start guide - Page 1
Philips DVDR615 Manual
 |
UPC - 037849945629
View all Philips DVDR615 manuals
Add to My Manuals
Save this manual to your list of manuals |
Page 1 highlights
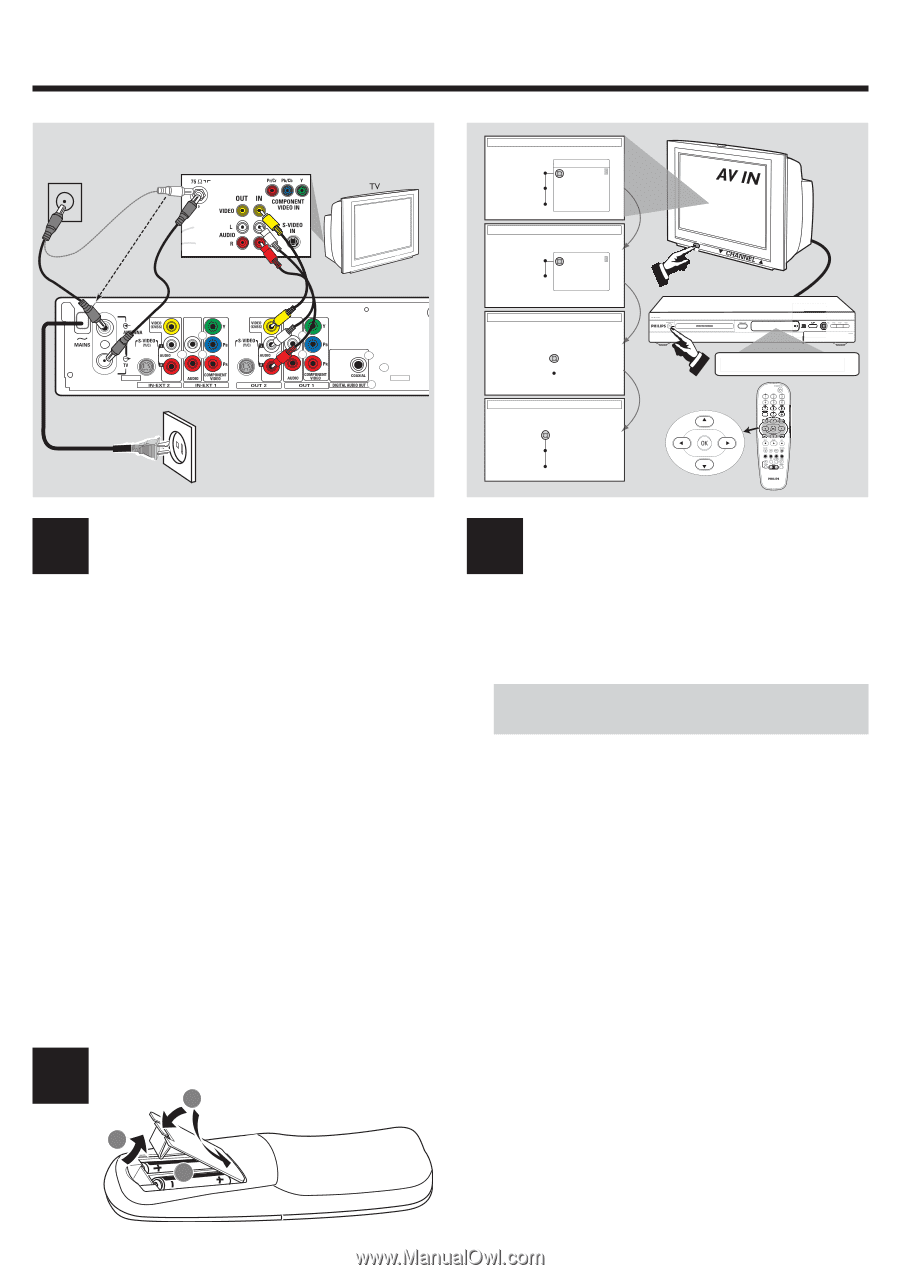
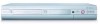
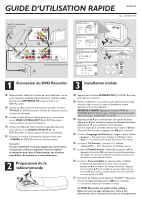
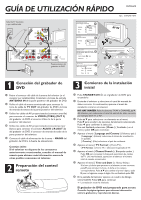
QUICK USE GUIDE ANTENNA/ CABLE SIGNAL 1 2 43 DVD recorder back panel 5 LANGUAGE AND COUNTRY Select Language and Country Language Country Done Menu English Spanish French 4 TV FORMAT Select your TV format TV format Done 5 4:3 Panscan 4:3 Letterbox 16:9 6 CHANNEL SEARCH Automatic channel search will find and store all channels. Make sure to connect the Antenna. Search Channels Start Skip Search TIME AND DATE 7 Please check the Date and if incorrect, navigate right to correct the Date. Time 09:00 AM Date 06.30.2004 Done OK 8 DVDR615 12nc: 3139 246 14341 2 1.3 CH- CH+ 1 IS THE TV ON? 3 CH+ CH- 1 Connect DVD recorder 3 Start first installation 1 Remove the antenna cable plug from your TV (or Satellite Receiver/Cable Box.) Connect it to the ANTENNA input jack at the back of the DVD recorder. 2 Use the supplied antenna cable to connect the DVD recorder's TV output jack to the antenna input jack at the back of your TV set. 3 Use the supplied AV cables (yellow plug) to connect the DVD recorder's VIDEO (CVBS) (OUT 2) jack to the Video In jack at the back of your TV set. 4 Use the supplied AV cables (red/white plugs) to connect the DVD recorder's AUDIO L/R (OUT 2) jack to the audio input jack at the back of your TV set. 5 Connect the power cable from the DVD recorder's ~ MAINS to the power supply. Helpful Hint: If your TV does not have the above-mentioned connectors, please refer to the user manual for more information on others possible connection to your TV set. 2 Prepare the remote control 3 1 2 1 Press STANDBY-ON 2 on the DVD recorder to switch it on. 2 Switch on the TV set and select the correct video in channel, the First Installation menu appears on the TV. NO PICTURE! Press the TV/AV button or CHANNEL 3 4 button on the TV to select the correct video in channel, for example, 'EXT', '0', or 'AV'. 3 Press 3 4 to select an item in the menu. Press 2 to access the selected item's options. Press 1 to confirm your selection. When you complete, select { Done } in the menu and press OK to continue. 4 { Language and Country } menu appears. { Language } - select on-screen display language. { Country } - select country of your residence. 5 { TV Format } menu appears. { TV Format } - select TV screen display. 6 { Channel Search } menu appears. Press OK to start automatic TV channel search. Once the TV channel search complete, the total number of channels found appears. 7 { Time and Date } menu appears. If the time and date shown on the TV are not correct, press 2 to enter the respective time/date field. Press 3 4 to change the first digit and press 2 to go to the next digit field. Once complete, press OK to confirm. 8 YesDVD introduction dialog appears. Press OK to exit. ➜ The first installation is now complete. The DVD recorder is ready for use! See next page for basic recording and playback.
-
 1
1 -
 2
2 -
 3
3 -
 4
4 -
 5
5 -
 6
6
 |
 |