Philips DVDR615 Quick start guide - Page 2
Start manual recording, Start Playback - user manual
 |
UPC - 037849945629
View all Philips DVDR615 manuals
Add to My Manuals
Save this manual to your list of manuals |
Page 2 highlights
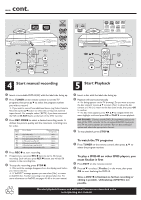
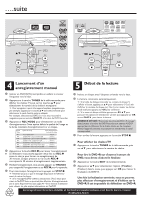
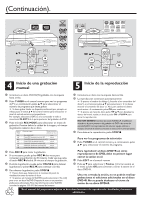
... cont. 1.3 3 4 CH- CH+ { 0 } CH+ CH- 1 ALL 1.3 1 2 3 4 EDIT SUPER VIDEO CH- CH+ OK CH+ CH- PLAY 2 4 Start manual recording 5 Start Playback 1 Insert a recordable DVD+R(W) with the label side facing up. 2 Press TUNER on the remote control to see the TV programs, then press 3 4 to select the program number you wish to record. ➜ If you wish to record from additional device (e.g.Video Cassette Recorder,) press 3 4 button to select the corresponds external input channel. For example, select { EXT2 } if you have connected the VCR to IN-EXT2 jacks at the back of the DVD recorder. 3 Press REC MODE to select a desired recording mode. It defines the picture quality and the maximum recording time for a disc. Record Mode M1 M2 M2x M3 M4 M6 M8 Picture Quality Maximum Recording Time per Disc High quality (HQ) DVD quality-Standard Play (SP) DVD quality-Standard Play Plus (SP+) S-VHS quality-Long Play (LP) VHS quality-Extended Play (EP) VHS quality-Super Long Play (SLP) VHS quality-Super Extended Play (SEP) 1 hour 2 hours 2.5 hours 3 hours 4 hours 6 hours 8 hours 4 Press REC 0 to start recording. G If required, you can press REC 0 twice to start a 30-minute recording. Each time you press REC 0 button, you will add 30 minutes to the recording time. 6 To stop the recording, press STOP 9. ➜ Wait until the message disappears from the display panel before you remove the disc. ➜ If YesDVDTM message appears, you can select { Yes } to create an YesDVD disc. Further recording is not allowed after this. For more information on YesDVD, see pages 41~43 in the user manual. 1 Insert a disc with the label side facing up. 2 Playback will start automatically. ➜ If a dialog appears on the TV showing { Do you want to access the disc content? }, press 3 4 to select { Yes } to show the disc content or { No } to return to the last active mode, then press OK to confirm ➜ If a disc menu appears, press 1 2 3 4 to navigate within the menu, highlight a title and press OK or PLAY 2 to start playback. NO SOUND! Connect the AUDIO L/R (red/white) jacks at the back of the DVD recorder to the correspond AUDIO input jacks on a TV set, stereo system or receiver. Turn on the connected system and select the appropriate channel. 3 To stop playback, press STOP 9. To watch the TV programs 1 Press TUNER on the remote control, then press 3 4 to select the program number. To play a DVD+R on other DVD players, you must finalize it first 1 Press EDIT on the remote control. 2 Press 3 4 to select { Finalize } in the menu, then press OK to start finalizing the DVD+R. Once a DVD+R is finalized, no further recording or editing is possible. Unfinalizing a DVD+R is not possible. Detailed playback features and additional functions are described in the accompanying user manual.
-
 1
1 -
 2
2 -
 3
3 -
 4
4 -
 5
5 -
 6
6
 |
 |