Philips LC4341 User Guide - Page 7
On trackball remote control LC4345 - fig. 3, Notes, fig. 4, Data source connections, Video source - lamps
 |
UPC - 037849911808
View all Philips LC4341 manuals
Add to My Manuals
Save this manual to your list of manuals |
Page 7 highlights
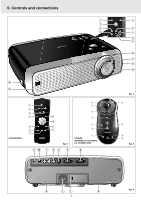
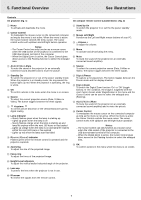
5. Functional Overview See illustrations On trackball remote control (LC4345) - (fig. 3) Connections (fig. 4) Data source connections 1 On/off button To switch the remote control on and off. Note: The remote control will always use some power, even when not in use. Therefore it is advised to always switch off the remote control after use. 2 Cursor Control To manipulate the mouse cursor on the connected computer as long as the menu is not active. When the menu is active the Cursor Control controls the menu cursor. Notes: - The Cursor Control can only function as a mouse cursor when the USB socket of the projector is connected to the USB downstream terminal of the computer. - When the Digital Zoom is active, the Cursor Control gives direct access to the Panning function to select the enlarged area. a Audio out Output socket to connect to the Line Input sockets of an amplifier or stereo system. b USB (upstream) Input socket to connect a PC or Apple Macintosh computer equipped with a USB downlink connection. g Data in Input socket to connect to the Data out terminal of a computer. Video source connections a Audio out Output socket to connect to the Line Input sockets of an amplifier or stereo system. 3 OK To confirm actions in the menu when the menu is on screen. When the menu is not on screen the - / - - buttons function as the Left and Right mouse buttons of your PC. 4 Menu To activate and deactivate the menu. c Audio in L/R Input sockets to connect to the Audio out sockets of a video recorder (S-VHS, PAL, NTSC, SECAM). d Video Input socket to connect to the Video out socket of a video recorder, Laser Disc player, video camera or TV with AV output socket (PAL, NTSC, SECAM). 5 Stand by On To switch the projector in or out the the power standby mode. 6 - Volume + To adjust the volume. 7 Source To select the current projection source (Data, S-Video or Video). The button toggles between the three signals. 8 D(igital)-Freeze To capture a moving picture. The button toggles between the 'Freeze' mode and the normal display situation. e S-Video Input socket to connect to the S-Video out socket of a S-VHS video recorder, a VCR, Laser Disc player, video camera or TV with AV output socket. Other connections f Data out To connect to an external monitor (or a second projector). The image projected is simultaneously shown on the monitor. h Lamp compartment 9 D(igital)-Zoom To switch the Digital Zoom function 'On' or 'Off' (toggle button). In 'On' condition, the image is magnified with the zoom factor chosen under Magnification in the menu and the Cursor Control can be used to select the enlarged area (Panning). 0 A(udio)/V(ideo) Mute To mute the sound of the projector (or an externally connected sound amplifier) and to mute the picture. i Lock slit To insert an optional locking device (Kensington lock). j Power To connect the projector to the mains. k Dust filter ! Back-light button To switch on the button illumination. The back-light will automatically switch off after 5 seconds. 7
-
 1
1 -
 2
2 -
 3
3 -
 4
4 -
 5
5 -
 6
6 -
 7
7 -
 8
8 -
 9
9 -
 10
10 -
 11
11 -
 12
12 -
13
-
14
-
15
-
16
-
17
-
18
-
19
-
20
-
21
-
22
-
23
 |
 |
