Philips LC4433 User Guide - Page 8
Philips - philip projector
 |
View all Philips LC4433 manuals
Add to My Manuals
Save this manual to your list of manuals |
Page 8 highlights
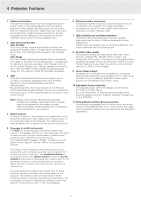
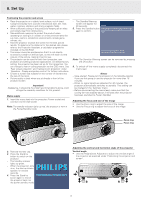
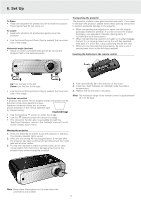
6. Set Up Positioning the projector and screen • Place the projector on a stable, level surface, out of direct sunlight and away from sources of excessive dust, dirt, heat, water, moisture, vibration and strong magnetic fields. • Allow sufficient cooling of the product by keeping all air inlets and outlets clear from obstructions. • Take additional measures to protect the product when operating (or storing) it in unclean or smoky environments like e.g. bars, casino's, production environments, arcade game centres, etc. • Face the projector towards the screen for the best picture results. To determine the distance for the desired size, please refer to the Projection Assistant, a calculation programme included on the CD-ROM. • The screen should be positioned so that it is not directly touched by sunlight or artificial light, as this will wash out the colours of the picture, making it hard to see. • The projector can be used for both front projection, rear projection and ceiling projection applications. As default factory setting, the projector has been set up for front projection. You can change to rear or ceiling projection via the OSD menu. See 'Rear screen projection' and 'Ceiling-mount projection' under 'Operation - Display and picture control' for further instructions. • Choose a screen size suitable for the number of viewers and the size of the room. • Picture quality is best when you sit directly in front of the projector screen. Important! Negligence in observing the install recommendations above could infringe the warranty conditions for this product. Mains supply 1. Insert the mains lead into the projectors Power socket and connect it to the wall socket. Note: The standby indicator lights up red, the projector is now in the Power/Standby mode. - The Standby Warning screen will appear for 20 seconds. Warning 5. Press the Standby button If the projector is switched off you have to wait again to confirm. 1 minute before you can switch on the projector again. Press stand-by key again to confirm. Press OK key to remove this warning. Note: The Stand by Warning screen can be removed by pressing the OK button. 6. To switch off the mains supply completely, disconnect the mains lead. Notes: - Save energy! Please put the projector in the Standby position if you are not going to use the projector for more than 15 minutes. - When no signal inputs are detected for 30 minutes, the projector automatically switches to standby. This setting can be changed in the 'Settings' menu. - Before disconnecting the mains lead, make sure that the cooling fan has stopped (about 3 minutes after the projector has been switched to Power Standby). Adjusting the focus and size of the image • Use the Zoom ring to adjust the size of the image. • Use the Focus ring to adjust the focus of the image. Stabnyd A MVute Volume Lamp RC Keystone Stabnyd A MVute Volume Lamp RC Keystone Menu OK Zoom ring Focus ring Menu OK 2. Remove the lens cap. 3. Press the Stand by button to switch on the projector. - The Standby indicator lights up green. PHILIPS - When the projection lamp is on, the start-up screen appears for several seconds. 4. Press the Stand by Multimedia Projectors button again to switch the projector back into the power standby mode. Adjusting the vertical and horizontal angle of the projector Vertical angle • Use the Height/Level Adjusters to adjust the vertical angle of the projector as specified under 'Positioning the projector and screen'. A B A B 8
-
 1
1 -
2
-
 3
3 -
 4
4 -
 5
5 -
 6
6 -
 7
7 -
 8
8 -
 9
9 -
 10
10 -
 11
11 -
 12
12 -
 13
13 -
14
-
15
-
16
-
17
-
18
-
19
-
20
-
21
-
22
-
23
 |
 |