Philips TAB7908 User manual - Page 11
Wall mount
 |
View all Philips TAB7908 manuals
Add to My Manuals
Save this manual to your list of manuals |
Page 11 highlights
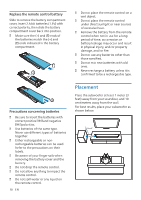
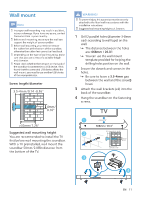
Wall mount Note • Improper wall mounting may result in accident, injury or damage. If you have any query, contact Consumer Care in your country. • Before wall mounting, make sure the wall can support the weight of your soundbar. • Before wall mounting, you need not remove the rubber feet at the bottom of the soundbar, otherwise the rubber feet cannot be fixed back. • Depending on the type of wall mounting, make sure that you use screws of a suitable length and diameter. • Please check whether the USB port on the back of the soundbar is connected to a USB device. If it is found that the connected USB device affects the wall-mount, you need to use another USB device of the appropriate size. Screw length/diameter 3.5-4mm/0.14 -0.16" 4mm/ 0.16" >32mm/1.26" Suggested wall mounting height You are recommended to install the TV first before wall mounting the soundbar. With a TV preinstalled, wall mount the soundbar 50mm/2.0'' in distance from the bottom of the TV. WARNING! • To prevent injury, this apparatus must be securely attached to the floor/wall in accordance with the installation instructions. • Suggested wall mounting height: ≤ 1.5 meters. 1 Drill 2 parallel holes (diameter 3-8mm each according to wall type) on the wall. » The distance between the holes are: 668mm / 26.3" » You can use the wall mount template provided for helping the drilling holes position on the wall. 2 Secure the dowels and screws in the holes. » Be sure to leave a 3.5-4mm gap between the wall and the screw's head. 3 Attach the wall brackets (x2) into the back of the soundbar. 4 Hang the soundbar on the fastening screws. 1 ~50mm/2.0" 668mm / 26.3" 3.5-4mm/0.14 -0.16" 2 4mm/ 0.16" >32mm/1.26" 3 4 EN 11
-
 1
1 -
2
-
3
-
4
-
5
-
 6
6 -
 7
7 -
 8
8 -
 9
9 -
 10
10 -
 11
11 -
 12
12 -
 13
13 -
 14
14 -
 15
15 -
 16
16 -
17
-
18
-
19
-
20
-
21
-
22
-
23
-
24
 |
 |
