Philips TAB7908 User manual - Page 14
Connect to power, Pair up with the subwoofer
 |
View all Philips TAB7908 manuals
Add to My Manuals
Save this manual to your list of manuals |
Page 14 highlights
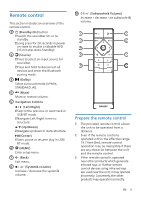
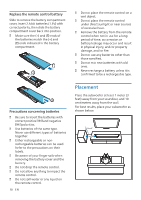
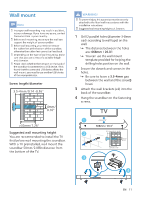
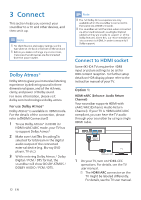
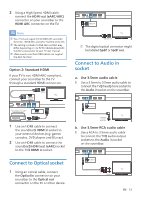
Connect to power • Before connecting the AC power cord, ensure you have completed all other connections. • Risk of product damage! Ensure that the power supply voltage corresponds to the voltage printed on the back or the underside of the unit. 1 Connect the mains cable to the AC~ socket of the soundbar and then into a mains socket. 2 Connect the mains cable to the AC~ socket of the subwoofer and then into a mains socket. 1 AC~ * 2 2 Power cord quantity and plug type vary by regio1ns. 3 3 Pair up with the subwoofer Automatic pairing Plug the soundbar and the subwoofer into the mains sockets and then press on the unit or remote control to switch the unit to ON mode. The subwoofer and soundbar will be paired automatically. 14 EN Solid » Determine the status based on the wireless subwoofer indicator. LED State Fast blink Constant on Slow blink Status Subwoofer in pairing mode Connected / Pairing successful Pairing failed Tips • Do not press Pair button on the rear of the subwoofer, except for manual pairing. Manual pairing If no audio from the wireless subwoofer can be heard, manually pair up the subwoofer. 1 Unplug both the soundbar and the subwoofer from the mains sockets again, then plug them in again after 3 minutes. 2 Press and hold the Pair button on the rear of the subwoofer for 3 seconds. » The indicator on the subwoofer will rapidly blink. 3 Then press on the soundbar or remote control to switch the soundbar ON. » The indicator on the subwoofer will become solid when successful. 4 If the indicator still keeps blinking, repeat step 1-3. Tips • The subwoofer should be within 6 m of the soundbar in an open area (the closer the better). • Remove any objects between the subwoofer and the soundbar. • If the wireless connection fails again, check if there is a conflict or strong interference (e. g. interference from an electronic device) around the location. Remove these conflicts or strong interferences and repeat the above procedures.
-
 1
1 -
2
-
3
-
4
-
5
-
6
-
7
-
8
-
 9
9 -
 10
10 -
 11
11 -
 12
12 -
 13
13 -
 14
14 -
 15
15 -
 16
16 -
 17
17 -
 18
18 -
 19
19 -
20
-
21
-
22
-
23
-
24
 |
 |
