Pioneer 575 Owner's Manual - Page 12
Getting started, Using the Auto MCACC setup for, optimal surround sound
 |
UPC - 770680057594
View all Pioneer 575 manuals
Add to My Manuals
Save this manual to your list of manuals |
Page 12 highlights
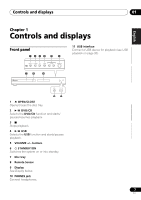
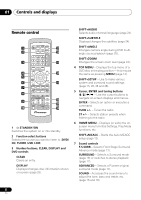
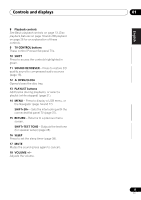
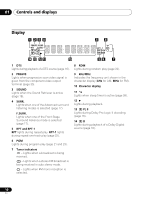
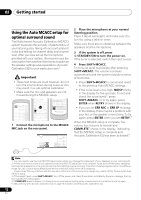
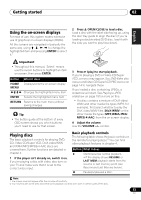
02 Getting started Using the Auto MCACC setup for optimal surround sound The Multichannel Acoustic Calibration (MCACC) system measures the acoustic characteristics of your listening area, taking into account ambient noise and testing for channel delay and channel level. After you have set up the microphone provided with your system, the receiver uses the information from a series of test tones to optimize the speaker settings and equalization (Acoustic Calibration EQ) for your particular room.1 Important • These test tones are loud; however, do not turn the volume down during setup as this may result in a sub-optimal calibration. • Make sure the mic and speakers are not moved during the MCACC setup. STANDBY TUNER SOUND /ON DVD CD (FM/AM) RETRIEVER USB LINE OPEN/CLOSE PLAYLIST 1 2 31 AUDIO SUBTITLE 4 5 62 ANGLE ZOOM 7 8 93 CLEAR TOP MENU DISPLAY 0 TUNE MENU SETUP ST HOME MENU ENTER SR ST RETURN MCACC TUNE TEST TONE F.S.SURR SURROUND ADVANCED SOUND TV CONTROL SLEEP INPUT CHANNEL VOLUME MUTE SHIFT VOLUME 1 Connect the microphone to the MCACC MIC jack on the rear panel. OPTICAL LINE 1 DIGITAL IN MCACC SETUP MIC COMPONENT PR VIDEO VIDEO PB IN Y CONTROL VIDEO OUT 2 Place the microphone at your normal listening position. Place it about ear height, and make sure it is level by using a table or chair. Make sure there are no obstacles between the speakers and the microphone. 3 If the system is off, press STANDBY/ON to turn the power on. If the tuner is selected, switch the input source. 4 Press SHIFT+MCACC. Try to be as quiet as possible after pressing SHIFT+MCACC. The volume increases automatically and the system outputs a series of test tones. • Press SHIFT+MCACC to cancel and revert to the previous Auto MCACC settings. • If the noise level is too high, NOISY blinks in the display for five seconds. To exit and check the noise levels2, press SHIFT+MCACC, or to try again, press ENTER when RETRY shows in the display. • If you see an ERR MIC or ERR SP message in the display, there may be a problem with your mic or the speaker connections. To try again, press ENTER when you see RETRY.3 When the MCACC setup is complete, the volume level returns to normal and COMPLETE4 shows in the display, indicating that the MCACC setup is complete and Acoustic Calibration EQ has been activated.5 Note 1 You only need to use the Auto MCACC setup once (unless you change the placement of your speakers or your room layout). 2 • If the room environment is not optimal for the Auto MCACC setup (too much ambient noise, echo off the walls, obstacles blocking the speakers from the microphone) the final settings may be incorrect. Check for household appliances (air conditioner, fridge, fan, etc.), that may be affecting the environment and switch them off if necessary. • Some older TVs may interfere with the operation of the mic. If this seems to be happening, switch off the TV during the Auto MCACC setup. 3 If this doesn't work, press SHIFT+MCACC, turn off the power, and check the problem indicated by the error message, then try the Auto MCACC setup again. 4 If COMPLETE doesn't appear, it is likely an error occurred during the setup. Please check all connections and try again. 5 See Listening with Acoustic Calibration EQ on page 18 to switch on/off Acoustic Calibration EQ. 12 En
-
 1
1 -
2
-
3
-
4
-
5
-
6
-
 7
7 -
 8
8 -
 9
9 -
 10
10 -
 11
11 -
 12
12 -
 13
13 -
 14
14 -
 15
15 -
 16
16 -
 17
17 -
18
-
19
-
20
-
21
-
22
-
23
-
24
-
25
-
26
-
27
-
28
-
29
-
30
-
31
-
32
-
33
-
34
-
35
-
36
-
37
-
38
-
39
-
40
-
41
-
42
-
43
-
44
-
45
-
46
-
47
-
48
-
49
-
50
-
51
-
52
-
53
-
54
-
55
-
56
-
57
-
58
-
59
-
60
-
61
-
62
-
63
-
64
-
65
-
66
-
67
-
68
-
69
-
70
-
71
-
72
-
73
-
74
-
75
-
76
-
77
-
78
-
79
-
80
-
81
-
82
-
83
-
84
-
85
-
86
-
87
-
88
-
89
-
90
-
91
-
92
-
93
-
94
-
95
-
96
-
97
-
98
-
99
-
100
-
101
-
102
 |
 |
