Pioneer 575 Owner's Manual - Page 36
Other connections, About HDMI, Using this unit with a Pioneer, Flat Panel TV - av
 |
UPC - 770680057594
View all Pioneer 575 manuals
Add to My Manuals
Save this manual to your list of manuals |
Page 36 highlights
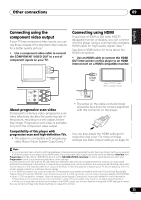
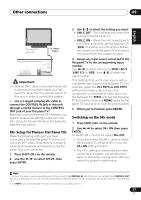
09 Other connections Switching the HDMI audio setting To listen to audio from the HDMI interconnect, make sure you've specified the HDMI audio output setting. 1 Switch the system into standby. 2 Press SHIFT+SETUP and use / to choose HDMI OUT then press ENTER. 3 Use / to choose the setting you want then press ENTER. • AUDIO ON1 - Audio signals are output through the HDMI interconnect • AUDIO OFF - Switches off HDMI audio Resetting the HDMI connection If you get an error message (the display shows HDMI ERR) or if the screen goes blank (for example, after changing the resolution), check the troubleshooting guide on page 46. If this doesn't solve the problem, follow the steps below to reset the HDMI connection. 1 Switch the system into standby. 2 Press SHIFT+SETUP and use / to choose HDMI INI then press ENTER. The system will restart and the HDMI settings are automatically reset to the factory defaults. See Video Output settings on page 30 for more on these settings. About HDMI HDMI (High Definition Multimedia Interface) supports both video and audio on a single digital connection for use with DVD players, DTV, set-top boxes, and other AV devices. HDMI was developed to provide the technologies of High Bandwidth Digital Content Protection (HDCP) as well as Digital Visual Interface (DVI) in one specification. HDCP is used to protect digital content transmitted and received by DVIcompliant displays. HDMI has the capability to support standard, enhanced, or high-definition video plus standard to multichannel surround-sound audio. HDMI features include uncompressed digital video, a bandwidth of up to 2.2 gigabytes per second (with HDTV signals), one connector (instead of several cables and connectors), and communication between the AV source and AV devices such as DTVs. HDMI, the HDMI logo and High-Definition Multimedia Interface are trademarks or registered trademarks of HDMI Licensing LLC. Using this unit with a Pioneer Flat Panel TV If you have a Pioneer flat panel TV2, you can use an SR+ cable3 to connect it to this unit and take advantage of various convenient features, such as controlling this unit via the flat panel TV's remote sensor, automatic video input switching of the flat panel TV, and automatic volume muting on the flat panel TV. Note 1 Audio output from the HDMI terminal is 2 channel linear PCM only. 2 This system is compatible with all Pioneer flat panel TVs from 2003 onward. 3 The 3-ringed SR+ cable from Pioneer is commercially available under the part number ADE7095. Contact the Pioneer Customer Support division for more information on obtaining an SR+ cable. 36 En
-
 1
1 -
2
-
3
-
4
-
5
-
6
-
7
-
8
-
9
-
10
-
11
-
12
-
13
-
14
-
15
-
16
-
17
-
18
-
19
-
20
-
21
-
22
-
23
-
24
-
25
-
26
-
27
-
28
-
29
-
30
-
 31
31 -
 32
32 -
 33
33 -
 34
34 -
 35
35 -
 36
36 -
 37
37 -
 38
38 -
 39
39 -
 40
40 -
 41
41 -
42
-
43
-
44
-
45
-
46
-
47
-
48
-
49
-
50
-
51
-
52
-
53
-
54
-
55
-
56
-
57
-
58
-
59
-
60
-
61
-
62
-
63
-
64
-
65
-
66
-
67
-
68
-
69
-
70
-
71
-
72
-
73
-
74
-
75
-
76
-
77
-
78
-
79
-
80
-
81
-
82
-
83
-
84
-
85
-
86
-
87
-
88
-
89
-
90
-
91
-
92
-
93
-
94
-
95
-
96
-
97
-
98
-
99
-
100
-
101
-
102
 |
 |
