Pioneer AVH-280BT Owner s Manual - Page 7
Precaution, Basic operation - remote
 |
View all Pioneer AVH-280BT manuals
Add to My Manuals
Save this manual to your list of manuals |
Page 7 highlights
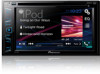
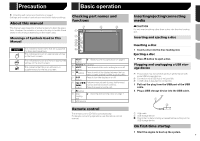
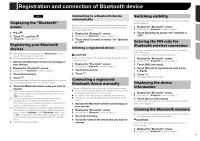
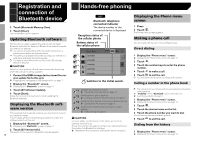
Precaution Basic operation Checking part names and functions on page 7 Settings and recorded contents are reset to the factory settings. About this manual This manual uses diagrams of actual screens to describe operations. However, the screens on some units may not match those shown in this manual depending on the model used. Meanings of Symbols Used in This Manual 000BT HOLD This indicates model name that are supported the described operations. This indicates to touch an appropriate soft key on the touch screen. This indicates to touch and hold an appropriate soft key on the touch screen. This indicates that there is a reference or supplementary for the key or screen. Checking part names and functions 7 1 2 3 4 5 6 8 9 1 RESET button Resetting the microprocessor on page 6 2 Volume (+/-) button 3 MUTE button Press to switch the mute setting to on or off. 4 button Press to switch the display between the top menu screen and the current source screen. 5 DISP button Press to turn the display on or off. 6 TRK ( /) button Performs manual seek tuning, fast forward, reverse and track search controls. Press to answer or end a call. 7 button 8 Discloading slot Inserting and ejecting a disc on page 7 9 LCD screen Remote control The remote control CD-R33 is sold separately. For details concerning operations, see the remote control manual. Inserting/ejecting/connecting media CAUTION Do not insert anything other than a disc into the disc-loading slot. Inserting and ejecting a disc Inserting a disc 1 Insert a disc into the disc-loading slot. Ejecting a disc 1 Press button to eject a disc. Plugging and unplugging a USB storage device p This product may not achieve optimum performance with some USB storage devices. p Connection via a USB hub is not possible. p A USB cable is required for connection. 1 Pull out the plug from the USB port of the USB cable. 2 Plug a USB storage device into the USB cable. 1 2 1 USB cable 2 USB storage device Check that no data is being accessed before pulling out the USB storage device. On first-time startup 1 Start the engine to boot up the system. 7
-
 1
1 -
 2
2 -
 3
3 -
 4
4 -
 5
5 -
 6
6 -
 7
7 -
 8
8 -
 9
9 -
 10
10 -
 11
11 -
 12
12 -
13
-
14
-
15
-
16
-
17
-
18
-
19
-
20
-
21
-
22
-
23
-
24
-
25
-
26
-
27
-
28
-
29
-
30
-
31
-
32
-
33
-
34
-
35
-
36
-
37
-
38
-
39
-
40
-
41
-
42
-
43
-
44
-
45
-
46
-
47
-
48
-
49
-
50
-
51
-
52
-
53
-
54
-
55
-
56
-
57
-
58
-
59
-
60
-
61
-
62
-
63
-
64
-
65
-
66
-
67
-
68
-
69
-
70
-
71
-
72
-
73
-
74
-
75
-
76
-
77
-
78
-
79
-
80
-
81
-
82
-
83
-
84
-
85
-
86
-
87
-
88
-
89
-
90
-
91
-
92
-
93
-
94
-
95
-
96
-
97
-
98
-
99
-
100
-
101
-
102
-
103
-
104
-
105
-
106
-
107
-
108
-
109
-
110
-
111
-
112
-
113
-
114
-
115
-
116
-
117
-
118
-
119
-
120
-
121
-
122
-
123
-
124
-
125
-
126
-
127
-
128
-
129
-
130
-
131
-
132
-
133
-
134
-
135
-
136
-
137
-
138
-
139
-
140
-
141
-
142
-
143
-
144
-
145
-
146
-
147
-
148
 |
 |
