Pioneer AVIC-D1 Installation Manual - Page 19
Appendix - screen problems
 |
UPC - 012562739496
View all Pioneer AVIC-D1 manuals
Add to My Manuals
Save this manual to your list of manuals |
Page 19 highlights
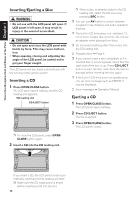
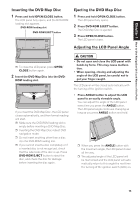
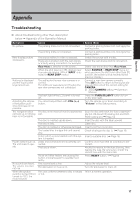
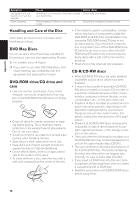
Appendix Appendix Troubleshooting ➲ About troubleshooting other than description below ➞ Appendix of the Operation Manual Symptom No picture. Rear display picture disappears. Nothing is displayed and the touch panel keys cannot use. Adjusting the volume of navigation guidance and beep is not possible. The navigation does not boot up or CD playback is not possible. Power doesn't turn on. The unit doesn't operate. No sounds are heard. The volume level will not rise. When the ignition switch is turned ON (or turned to ACC), the motor sounds. Cause The parking brake cord is not connected. The parking brake is not applied. The source without a video is selected. There was a problem with the rear display or a faulty wiring connection, for example. Rear View is selected on the screen. When the shift lever is in [R], displays rear view camera images. (When "NAVI" is selected in REAR DISP menu.) The setting for the rear view camera is incorrect. The shift lever was placed in [R] when the rear view camera was not connected. The back light of the LCD panel is turned off. You cannot adjust them with VOL (+,-) button. The disc is not inserted into the appropriate slot. The disc is inserted upside down. The disc is dirty. The disc is cracked or otherwise damaged. The loaded disc is a type this unit cannot play. A disc which is incompatible with this system is inserted. Leads and connectors are incorrectly connected. The fuse is blown. Noise and other factors are causing the built-in microprocessor to operate incorrectly. The volume level is low. The attenuator or mute is on. This unit confirms whether a disc is loaded or not. Action (See) Connect a parking brake cord, and apply the parking brake. Connect a parking brake cord, and apply the parking brake. Switch the source with a video. Check the rear display and its connection. Select view mode other than Rear View. Select SOURCE in REAR DISP menu.(or when you move the shift lever other than [R] position, the screen will be returned to the previous display.) Connect a rear view camera correctly. Press AV button to return to the source display and then select the correct setting for CAMERA. ➲ About CAMERA setting ➞ Operation Manual Press the P.ADJ/B.LIGHT button to turn on the back light. Turn the volume up or down according to "Volume" in the Setting menu. Eject the disc and insert the disc to appropriate slot.(➞ About CD loading slot and DVDROM loading slot ➞ Page 14) Insert the disc with the label upward. Clean disc. Insert a normal, round disc. Check what type the disc is. (➞ Page 18) Insert a suitable disc. (➞ Page 18) Confirm once more that all connections are correct. Rectify the reason for the fuse blowing, then replace the fuse. Be very sure to install the correct fuse with the same rate. Press RESET button. (➞ Page 8) Adjust the volume level. Turn the attenuator or mute off. This is a normal operation. 17
-
 1
1 -
2
-
3
-
4
-
5
-
6
-
7
-
8
-
9
-
10
-
11
-
12
-
13
-
 14
14 -
 15
15 -
 16
16 -
 17
17 -
 18
18 -
 19
19 -
 20
20 -
 21
21 -
 22
22 -
 23
23 -
 24
24 -
25
-
26
-
27
 |
 |
