Pioneer AVIC N3 Owner's Manual - Page 116
Other Functions
 |
UPC - 012562783222
View all Pioneer AVIC N3 manuals
Add to My Manuals
Save this manual to your list of manuals |
Page 116 highlights
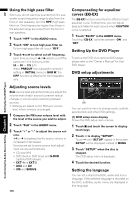
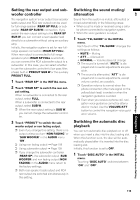
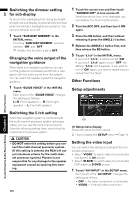
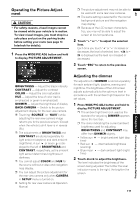
AV Switching the dimmer setting for sub-display To prevent the sub-display from being too bright at night, the sub-display is automatically dimmed when the vehicle's headlights are turned on. You can turn dimmer on or off. 1 Touch "SUB DISP DIMMER" in the INITIAL menu. Touching "SUB DISP DIMMER" switches between "ON" and "OFF". ❒ Initially, this function is set to OFF. Changing the voice output of the navigation guidance When there is a navigation guidance, you can mix the guidance voice/beep sound from a navigation with the audio sound from this system. You can select the speaker output the navigation guidance. 1 Touch "GUIDE VOICE" in the INITIAL menu. Each touch of the "GUIDE VOICE" changes the settings as follows: L+R (Front speakers) - R (Front right speaker) - L (Front left speaker) 1 Touch the source icon and then touch "SOURCE OFF" to turn source off. When the source icon is not displayed, you can display it by touching the screen. 2 Turn the ACC OFF, and then turn it ON again. 3 Press the EQ button, and then without releasing it press the ANGLE (-) button. 4 Release the ANGLE (-) button first, and then release the EQ button. 5 Touch "5.1ch" in the INITIAL menu. If you touch "5.1ch", it will be turned "ON". If you touch "5.1ch" again to turn "OFF" the setting, "5.1ch" will disappear. If you want to turn it "ON" again, you have to repeat the procedure from the Step1. Other Functions Setup adjustments Customizing the Audio Source Setting Chapter 8 Other Functions Switching the 5.1ch setting When the navigation system is combined with the multi-channel processor system (sold separately), you can use the multi-channel sound. Enter the following setting when combining the multi-channel processor system. (1) (1) Setup menu display Shows the setup function names. ➲ How to display the SETUP menu ➞ Page 74 • DO NOT enter this setting before you connect the multi-channel processor system. (If this setting is entered, the RCA will output maximum volume for the multi-channel processor system.) Pioneer is not responsible for any damage to the speaker equipment caused by ignoring this warning. 114 Setting the video input You can switch the setting according to the connected component. • Select "VIDEO" to watch video of a connected component as AV source. • Select "M-DVD" to watch video of a connected DVD player as S-DVD source. 1 Touch "AV INPUT" in the SETUP menu. Each touch of the "AV INPUT" changes the settings as follows: • OFF - No video component is connected • VIDEO - External video component
-
 1
1 -
2
-
3
-
4
-
5
-
6
-
7
-
8
-
9
-
10
-
11
-
12
-
13
-
14
-
15
-
16
-
17
-
18
-
19
-
20
-
21
-
22
-
23
-
24
-
25
-
26
-
27
-
28
-
29
-
30
-
31
-
32
-
33
-
34
-
35
-
36
-
37
-
38
-
39
-
40
-
41
-
42
-
43
-
44
-
45
-
46
-
47
-
48
-
49
-
50
-
51
-
52
-
53
-
54
-
55
-
56
-
57
-
58
-
59
-
60
-
61
-
62
-
63
-
64
-
65
-
66
-
67
-
68
-
69
-
70
-
71
-
72
-
73
-
74
-
75
-
76
-
77
-
78
-
79
-
80
-
81
-
82
-
83
-
84
-
85
-
86
-
87
-
88
-
89
-
90
-
91
-
92
-
93
-
94
-
95
-
96
-
97
-
98
-
99
-
100
-
101
-
102
-
103
-
104
-
105
-
106
-
107
-
108
-
109
-
110
-
 111
111 -
 112
112 -
 113
113 -
 114
114 -
 115
115 -
 116
116 -
 117
117 -
 118
118 -
 119
119 -
 120
120 -
 121
121 -
122
-
123
-
124
-
125
-
126
-
127
-
128
-
129
-
130
-
131
-
132
-
133
-
134
-
135
-
136
-
137
-
138
-
139
-
140
-
141
-
142
-
143
-
144
-
145
-
146
-
147
-
148
-
149
-
150
-
151
-
152
-
153
-
154
-
155
-
156
-
157
-
158
-
159
-
160
 |
 |