Pioneer AVIC N3 Owner's Manual - Page 117
Setting for rear view camera, Selecting the video of rear dis
 |
UPC - 012562783222
View all Pioneer AVIC N3 manuals
Add to My Manuals
Save this manual to your list of manuals |
Page 117 highlights
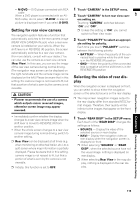
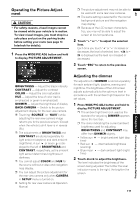
AV • M-DVD - DVD player connected with RCA cable When a DVD player is connected with an AVBUS cable, do not select "M-DVD" or else no picture is displayed even if you select S-DVD. Setting for rear view camera The navigation system features a function that automatically switches to the rear camera image (REAR VIEW CAMERA IN jack) when a rear view camera is installed on your vehicle. When the shift lever is in REVERSE (R) position, the screen automatically switches to a rear view camera. (For more details, consult with your dealer.) You can also use the camera as a rear view camera (Rear View). In this case, you can see the image of the rear view camera during normal driving. (The navigation map screen can be displayed on the right-hand side and the camera image can be displayed on the left.) Please be aware that in this setting, the camera image is not resized to fit, but that a portion of what is seen by the camera is not viewable. • Pioneer recommends the use of a camera which outputs mirror reversed images, otherwise screen image may appear reversed. • Immediately confirm whether the display changes to a rear view camera image when the shift lever is moved to REVERSE (R) from another position. • When the whole screen changes to a rear view camera image during normal driving, switch to another setting. ❒ Rear View can be displayed at all times (e.g. when monitoring an attached trailer, etc.) as a split screen where map information is partially displayed. Please be aware that in this setting, camera image is not resized to fit, but that a portion of what is seen by the camera is not viewable. ❒ Initially, this function is set to OFF. 1 Touch "CAMERA" in the SETUP menu. 2 Touch "CAMERA" to turn rear view cam- era setting on. Touching "CAMERA" switches between "ON" and "OFF". ❒ Unless this setting is "ON", you cannot switch to Rear View mode. 3 Touch "POLARITY" to select an appropri- ate setting for polarity. Each time you touch "POLARITY" switches between the following polarity: • BATTERY - When the polarity of the con- nected lead is positive while the shift lever is in the REVERSE (R) position • GND - When the polarity of the connected lead is negative while the shift lever is in the REVERSE (R) position Selecting the video of rear display When the navigation screen is displayed on front, you can select to show either the navigation screen or the selected source on the rear display. ❒ The map screen navigation images output to the rear display differ from standard NTSC format images. Therefore, their quality will be inferior to the images that appear on the front display. 1 Touch "REAR DISP" in the SETUP menu. Each touch of the "REAR DISP" changes the settings as follows: • SOURCE - Display the video of the selected source on rear display • NAVI- Display the navigation video on rear display when the navigation screen is displayed on front ❒ When selecting "SOURCE" in "REAR DISP", when the selected source have not the visual image, nothing is displayed on rear display. ❒ When selecting Rear View in the map display, nothing is displayed on the rear display. Other Functions Chapter 8 Customizing the Audio Source Setting 115
-
 1
1 -
2
-
3
-
4
-
5
-
6
-
7
-
8
-
9
-
10
-
11
-
12
-
13
-
14
-
15
-
16
-
17
-
18
-
19
-
20
-
21
-
22
-
23
-
24
-
25
-
26
-
27
-
28
-
29
-
30
-
31
-
32
-
33
-
34
-
35
-
36
-
37
-
38
-
39
-
40
-
41
-
42
-
43
-
44
-
45
-
46
-
47
-
48
-
49
-
50
-
51
-
52
-
53
-
54
-
55
-
56
-
57
-
58
-
59
-
60
-
61
-
62
-
63
-
64
-
65
-
66
-
67
-
68
-
69
-
70
-
71
-
72
-
73
-
74
-
75
-
76
-
77
-
78
-
79
-
80
-
81
-
82
-
83
-
84
-
85
-
86
-
87
-
88
-
89
-
90
-
91
-
92
-
93
-
94
-
95
-
96
-
97
-
98
-
99
-
100
-
101
-
102
-
103
-
104
-
105
-
106
-
107
-
108
-
109
-
110
-
111
-
 112
112 -
 113
113 -
 114
114 -
 115
115 -
 116
116 -
 117
117 -
 118
118 -
 119
119 -
 120
120 -
 121
121 -
 122
122 -
123
-
124
-
125
-
126
-
127
-
128
-
129
-
130
-
131
-
132
-
133
-
134
-
135
-
136
-
137
-
138
-
139
-
140
-
141
-
142
-
143
-
144
-
145
-
146
-
147
-
148
-
149
-
150
-
151
-
152
-
153
-
154
-
155
-
156
-
157
-
158
-
159
-
160
 |
 |