Pioneer AVIC N3 Owner's Manual - Page 65
Touch Navigation Background or AV - reset
 |
UPC - 012562783222
View all Pioneer AVIC N3 manuals
Add to My Manuals
Save this manual to your list of manuals |
Page 65 highlights
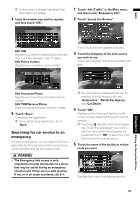
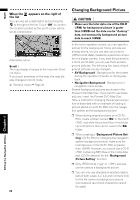
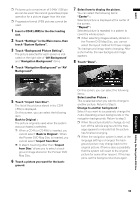
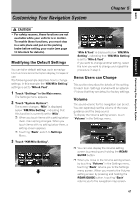
NAVI ❒ Pictures up to a maximum of 2 048×1 536 pixels can be used. We cannot guarantee proper operation for a picture bigger than this size. ❒ Progressive format JPEG pictures cannot be used. 1 Insert a CD-R (-RW) to the disc loading slot. 2 Touch "Settings" in the Main menu, then touch "System Options". 3 Touch "Background Picture Setting". The picture selected for each screen is indicated on the right side of "AV Background" and "Navigation Background" items. 4 Touch "Navigation Background" or "AV Background". 7 Select how to display the picture. You can select the following items: "Center" : Selected picture is displayed at the center of the screen. "Repeat" : Selected picture is repeated in a pattern to cover the whole screen. ❒ When selecting images already stored on the Pioneer DVD Map Disc, you cannot select the layout method for those images. The background image starts changing. After a short while, the new background image appears. 8 Touch "Done". 5 Touch "Import from Disc". The list of the pictures stored in the CD-R (-RW) is displayed. On this screen, you can select the following item: Back to Original : The picture originally used when the system was purchased is selected. ❒ When a CD-R (or CD-RW) is inserted, you cannot select "Back to Original". When the Pioneer DVD Map Disc is inserted, you cannot select "Import from Disc". ❒ In step 5, touching other than "Import from Disc" allows you to select a background image stored on the Pioneer DVD Map Disc. 6 Touch a picture you want for the back- ground. On this screen, you can select the following items: Select another Picture : This is selected when you want to change to another picture. Return to Step 5. Change to another background : Select if you want to successively change the Audio Operating screen backgrounds or the navigation backgrounds. Return to step 3. ❒ When the picture starts to change, do not turn off the vehicle engine until the message appears to indicate that the picture has finished changing. ❒ When the navigation system is reset, or the language setting is changed, the background picture may change back to the original picture. (There is also a possibility that the system will revert to the original picture for some other reason). If this happens, set the background picture again. Chapter 4 Editing the Navigation Utilities 63
-
 1
1 -
2
-
3
-
4
-
5
-
6
-
7
-
8
-
9
-
10
-
11
-
12
-
13
-
14
-
15
-
16
-
17
-
18
-
19
-
20
-
21
-
22
-
23
-
24
-
25
-
26
-
27
-
28
-
29
-
30
-
31
-
32
-
33
-
34
-
35
-
36
-
37
-
38
-
39
-
40
-
41
-
42
-
43
-
44
-
45
-
46
-
47
-
48
-
49
-
50
-
51
-
52
-
53
-
54
-
55
-
56
-
57
-
58
-
59
-
 60
60 -
 61
61 -
 62
62 -
 63
63 -
 64
64 -
 65
65 -
 66
66 -
 67
67 -
 68
68 -
 69
69 -
 70
70 -
71
-
72
-
73
-
74
-
75
-
76
-
77
-
78
-
79
-
80
-
81
-
82
-
83
-
84
-
85
-
86
-
87
-
88
-
89
-
90
-
91
-
92
-
93
-
94
-
95
-
96
-
97
-
98
-
99
-
100
-
101
-
102
-
103
-
104
-
105
-
106
-
107
-
108
-
109
-
110
-
111
-
112
-
113
-
114
-
115
-
116
-
117
-
118
-
119
-
120
-
121
-
122
-
123
-
124
-
125
-
126
-
127
-
128
-
129
-
130
-
131
-
132
-
133
-
134
-
135
-
136
-
137
-
138
-
139
-
140
-
141
-
142
-
143
-
144
-
145
-
146
-
147
-
148
-
149
-
150
-
151
-
152
-
153
-
154
-
155
-
156
-
157
-
158
-
159
-
160
 |
 |
