Pioneer BDP 320 Owner's Manual - Page 19
Getting Started
 |
UPC - 012562955124
View all Pioneer BDP 320 manuals
Add to My Manuals
Save this manual to your list of manuals |
Page 19 highlights
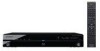
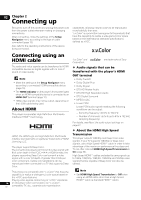
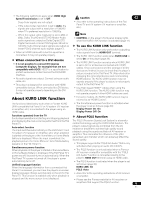
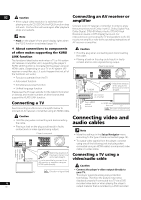
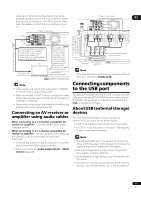
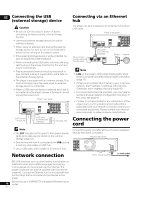
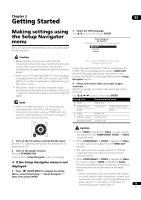
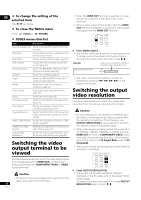
Chapter 3 03 Getting Started Making settings using the Setup Navigator menu Be sure to perform these settings when using the player for the first time. 3 Select the OSD language. Use / to select, then press ENTER. Setup Navigator BD PLAYER Please select the on-screen display language. Caution • Before turning on the power, check that the connections between the player and other devices are correct. Also, turn on the power of the devices connected to the player before turning on the player's power. • When using a Pioneer Flat Panel TV or front projector compatible with the KURO LINK function, set KURO LINK to On on the connected device before turning on the player's power. • The screen in step 10 and test tones are output simultaneously according to the settings in steps 4 to 7. Lower the volume of the devices connected with the player. Note • When a Pioneer Flat Panel TV or front projector compatible with the KURO LINK function is connected to the player using an HDMI cable, the player is automatically set to the optimum picture quality for the connected device. TOP MENU TOOLS Audio, subtitle and BDMV/DVD-Video menu language will also be set. When a Pioneer Flat Panel TV that is compatible with KURO LINK is connected to this player's HDMI OUT terminal, language settings are imported from the Pioneer Flat Panel TV's language settings before Setup Navigator begins. 4 Select and set the video and audio output terminals. Select the actually connected video and audio output terminals. Use to select, then press ENTER. Setting item Output terminal name Video HDMI HDMI OUT COMPONENT VIDEO OUT COMPONENT VIDEO VIDEO VIDEO Audio HDMI HDMI OUT DIGITAL AUDIO DIGITAL OUT ANALOG AUDIO AUDIO OUT HOME MENU ENTER RETURN 1 Turn on the TV's power and switch the input. See the TV's operating instructions for instructions on operating the TV. 2 Turn on the player's power. Press STANDBY/ON. Check that the Setup Navigator menu is displayed. If the Setup Navigator menu is not displayed Press HOME MENU to display the Home Menu, select Initial Setup Setup Navigator Start, then press ENTER. Caution • When HDMI is selected for Video, no video signals are output from the COMPONENT VIDEO or VIDEO output terminals. • When COMPONENT or VIDEO is selected at Video, no video signals are output from the HDMI OUT terminal. • The video and audio signals output from the set output terminals are output synchronously (lip synchronization). • When COMPONENT or VIDEO is selected at Video, no sound is output if HDMI is selected at Audio. Follow the procedure below to redo the connections, then select the proper connection at the setup screen. - When connecting using component video cables or a video cable to watch the picture, connect to an AV receiver or amplifier, or a TV using either analog audio cables (7.1 channels or 2 channels), an optical digital audio cable (page 17). 19 En
-
 1
1 -
2
-
3
-
4
-
5
-
6
-
7
-
8
-
9
-
10
-
11
-
12
-
13
-
 14
14 -
 15
15 -
 16
16 -
 17
17 -
 18
18 -
 19
19 -
 20
20 -
 21
21 -
 22
22 -
 23
23 -
 24
24 -
25
-
26
-
27
-
28
-
29
-
30
-
31
-
32
-
33
-
34
-
35
-
36
-
37
-
38
-
39
-
40
-
41
-
42
-
43
-
44
-
45
-
46
-
47
-
48
-
49
-
50
-
51
-
52
-
53
-
54
-
55
-
56
-
57
-
58
-
59
-
60
-
61
-
62
-
63
-
64
-
65
-
66
 |
 |