Pioneer BDP-43FD Owner's Manual - Page 12
Before Starting Playback
 |
View all Pioneer BDP-43FD manuals
Add to My Manuals
Save this manual to your list of manuals |
Page 12 highlights
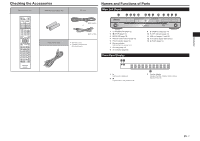
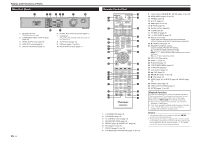
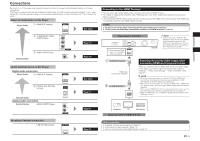
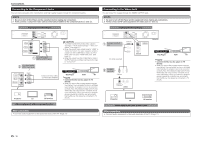
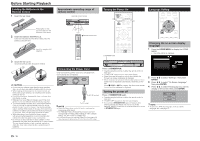
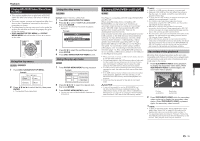
Before Starting Playback Loading the Batteries in the Remote Control 1 Open the rear cover. Approximate operating range of remote control Remote control sensor Turning the Power On Language Setting STANDBY/ON PQLS Press lightly on this part and slide into the direction of the arrow. 2 Insert the batteries (AAA/R03 x 2). Insert as indicated by the / marks into the battery compartment. Insert the negative () side first. 30º 30º 23 ft Remote control unit STANDBY/ON Changing the on-screen display language 1 Press the HOME MENU to display the HOME MENU. • The HOME MENU is displayed. 3 Close the rear cover. Close securely (a click should be heard). CAUTION • Do not use any batteries other than the ones specified. Also, do not use a new battery together with an old one. • When loading the batteries into the remote control, set them in the proper direction, as indicated by the polarity marks ( and ). • Do not heat batteries, disassemble them, or throw them into flames or water. • Batteries may have different voltages, even if they look similar. Do not use different kinds of batteries together. • To prevent leakage of battery fluid, remove the batteries if you do not plan to use the remote control for a long period of time (1 month or more). If the fluid should leak, wipe it carefully off the inside of the case, then insert new batteries. If a battery should leak and the fluid should get on your skin, flush it off with large quantities of water. • When disposing of used batteries, please comply with governmental regulations or environmental public institution's rules that apply in your country/area. • Do not use or store batteries in direct sunlight or other excessively hot place, such as inside a car or near a heater. This can cause batteries to leak, overheat, explode or catch fire. It can also reduce the life or performance of batteries. Connecting the Power Cord Only connect the power cord once all equipment connections are completed. AC IN BDP-43FD To AC IN terminal To AC outlet NOTE • Place the Player close to the AC outlet, and keep the power plug within reach. • TO PREVENT RISK OF ELECTRIC SHOCK, DO NOT TOUCH THE UN-INSULATED PARTS OF ANY CABLES WHILE THE AC CORD IS CONNECTED. • If you are not going to use this Player for a long period of time, be sure to remove the AC cord from the AC outlet. STANDBY/ON PQLS 3D OPEN/CLOSE FL OFF USB 5 V 0.5 A Press STANDBY/ON. • Operate using the buttons on either the remote control or main unit. • "POWER ON" appears on the front panel display. • When the power is turned on with no disc loaded, the Pioneer logo screen (wallpaper) is displayed. • When the power is turned on with the disc loaded, a menu screen may be displayed automatically, depending on the disc. When STOP or EXIT is pressed, the disc's menu screen turns off and the wallpaper is displayed. Turning the power off Press STANDBY/ON again. • Operate using the buttons on either the remote control or main unit. • "POWER OFF" appears on the front panel display. • If you press STANDBY/ON again immediately after entering standby, the Player may not turn on. If this happens, wait for 10 seconds or more and then turn on the STANDBY/ON again. 2 Press to select "Settings", then press ENTER. 3 Press to select "On Screen Language", then press ENTER. 4 Press to select the language you want to display on the screen, then press ENTER. English Español Français NOTE • To select the DVD disc language, such as subtitle language, etc., see page 15. 12
-
 1
1 -
2
-
3
-
4
-
5
-
6
-
 7
7 -
 8
8 -
 9
9 -
 10
10 -
 11
11 -
 12
12 -
 13
13 -
 14
14 -
 15
15 -
 16
16 -
 17
17 -
18
-
19
-
20
-
21
-
22
-
23
-
24
-
25
-
26
-
27
-
28
-
29
-
30
-
31
-
32
-
33
-
34
-
35
-
36
-
37
-
38
-
39
-
40
-
41
-
42
-
43
-
44
-
45
-
46
-
47
-
48
-
49
-
50
-
51
-
52
-
53
-
54
-
55
-
56
-
57
-
58
-
59
-
60
-
61
-
62
-
63
-
64
-
65
-
66
-
67
-
68
 |
 |
