Pioneer BDP-43FD Owner's Manual - Page 9
Connections
 |
View all Pioneer BDP-43FD manuals
Add to My Manuals
Save this manual to your list of manuals |
Page 9 highlights
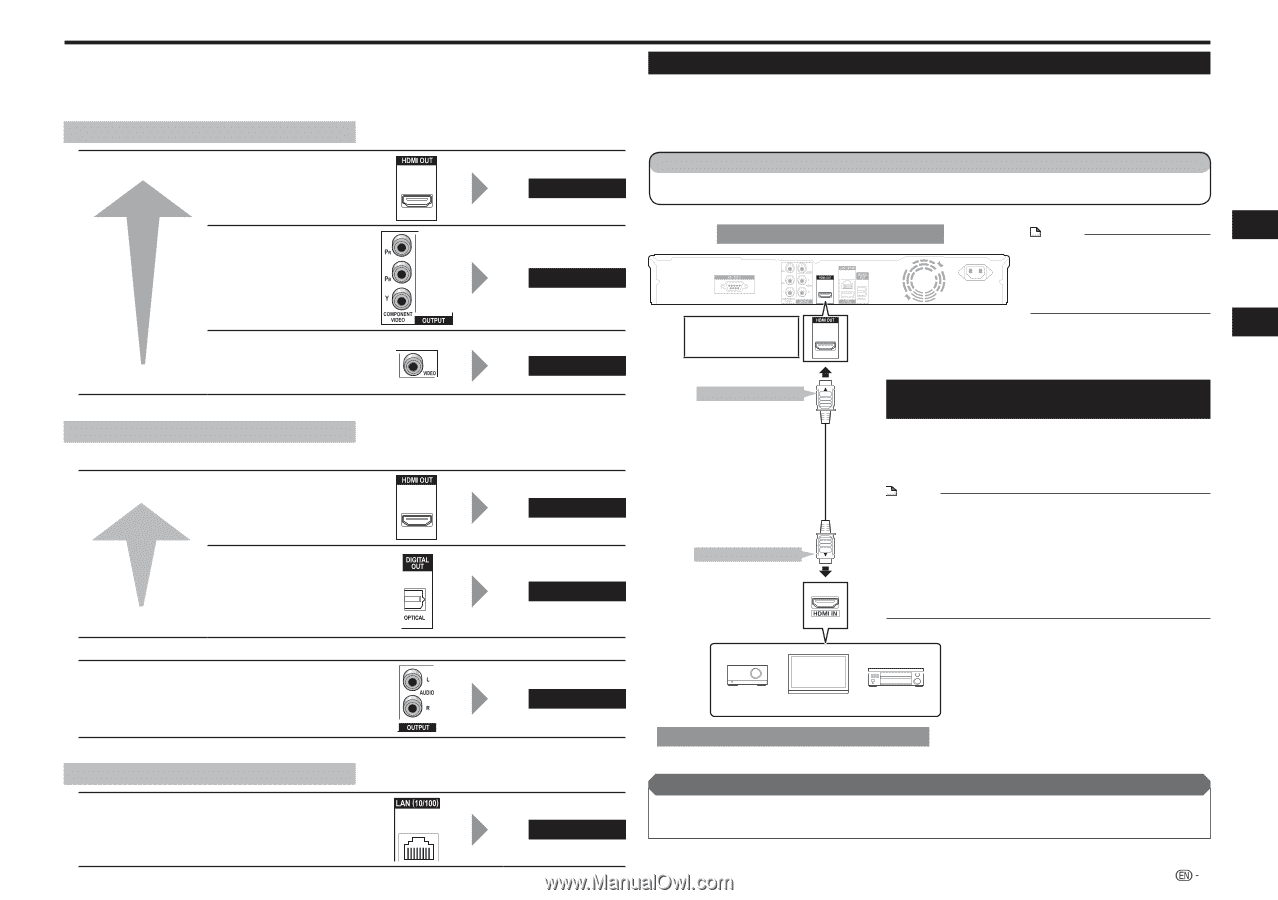
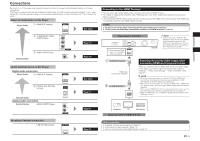
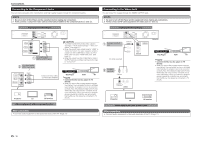
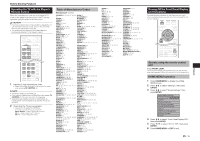
Connections Be sure to turn off the power and unplug the power cord from the power outlet whenever making or changing connections. This Player is equipped with the terminals/jacks listed below. Find the corresponding terminal/jack on your video equipment. Using the supplied cable or commercially available cables, connect the video first. Then connect the audio. Video terminals/jacks on this Player Higher Quality HDMI OUT terminal See right. COMPONENT VIDEO OUTPUT jacks Page 10 VIDEO OUTPUT jack Standard Quality Audio terminals/jacks on this Player Digital audio connection Higher Quality HDMI OUT terminal DIGITAL OUT OPTICAL terminal Standard Quality Analog audio connection Standard Quality AUDIO OUTPUT jacks Page 10 See right. Page 11 Page 11 Broadband Internet connection LAN (10/100) terminal Page 11 Connecting to the HDMI Terminal • You can enjoy high quality digital picture and sound through the HDMI terminal. • For details on digital audio output formats (PCM/bitstream), refer to the digital audio output format selection table on page 25. • Use High Speed HDMI® Cables when using the control function with HDMI. The control function with HDMI may not operate properly if other HDMI cables are used. STEPS 1 Be sure to turn off this Player and the equipment before making any connections. 2 Firmly connect an HDMI cable (commercially available) to the HDMI terminals ( and ). Rear panel of this Player • When using an HDMI output, 7.1 ch Digital Output is available. AC IN BDP-43FD NOTE • Audio transmitted in DTS-HD High Resolution Audio and DTS-HD Master Audio formats is output from the HDMI terminal as Bitstream. Connect an amplifier with a built-in decoder to enjoy the fine sound quality. To HDMI OUT terminal HDMI cable (commercially available) To HDMI IN terminal Selecting the priority video output when connecting HDMI and Component video When you connect both an HDMI cable and a component cable to this player, you need to select the priority video output in "Settings" - "Audio Video Settings" - "Video Out Select". (See page 21.) NOTE • When you connect the player to a Pioneer TV with an HDMI cable only and the TV is turned on, the video output switches to HDMI automatically. (The above setting is unnecessary.) • When you connect the player to a TV with an HDMI cable, "HDMI Video Out" is set to "Auto". If you don't get a stable image, select the desired resolution. When you set "HDMI Video Out" to a setting other than "Auto", you can only select resolutions that are compatible with the connected TV. • Refer to "HDMI Video Out" on page 21 regarding the resolutions of the HDMI video output. Projector TV AV receiver Equipment with an HDMI terminal After connecting • If desired, connect audio equipment. (Page 11) • Load a disc and start playback. (Page 14) • Refer to control function with HDMI. (Pages 14 and 21) 9 Connection Introduction
-
 1
1 -
2
-
3
-
 4
4 -
 5
5 -
 6
6 -
 7
7 -
 8
8 -
 9
9 -
 10
10 -
 11
11 -
 12
12 -
 13
13 -
 14
14 -
15
-
16
-
17
-
18
-
19
-
20
-
21
-
22
-
23
-
24
-
25
-
26
-
27
-
28
-
29
-
30
-
31
-
32
-
33
-
34
-
35
-
36
-
37
-
38
-
39
-
40
-
41
-
42
-
43
-
44
-
45
-
46
-
47
-
48
-
49
-
50
-
51
-
52
-
53
-
54
-
55
-
56
-
57
-
58
-
59
-
60
-
61
-
62
-
63
-
64
-
65
-
66
-
67
-
68
 |
 |