Pioneer DDJ-ERGO Operating Instructions - Page 14
Mixer, EQ HI, MID, LOW controls - v controller
 |
View all Pioneer DDJ-ERGO manuals
Add to My Manuals
Save this manual to your list of manuals |
Page 14 highlights
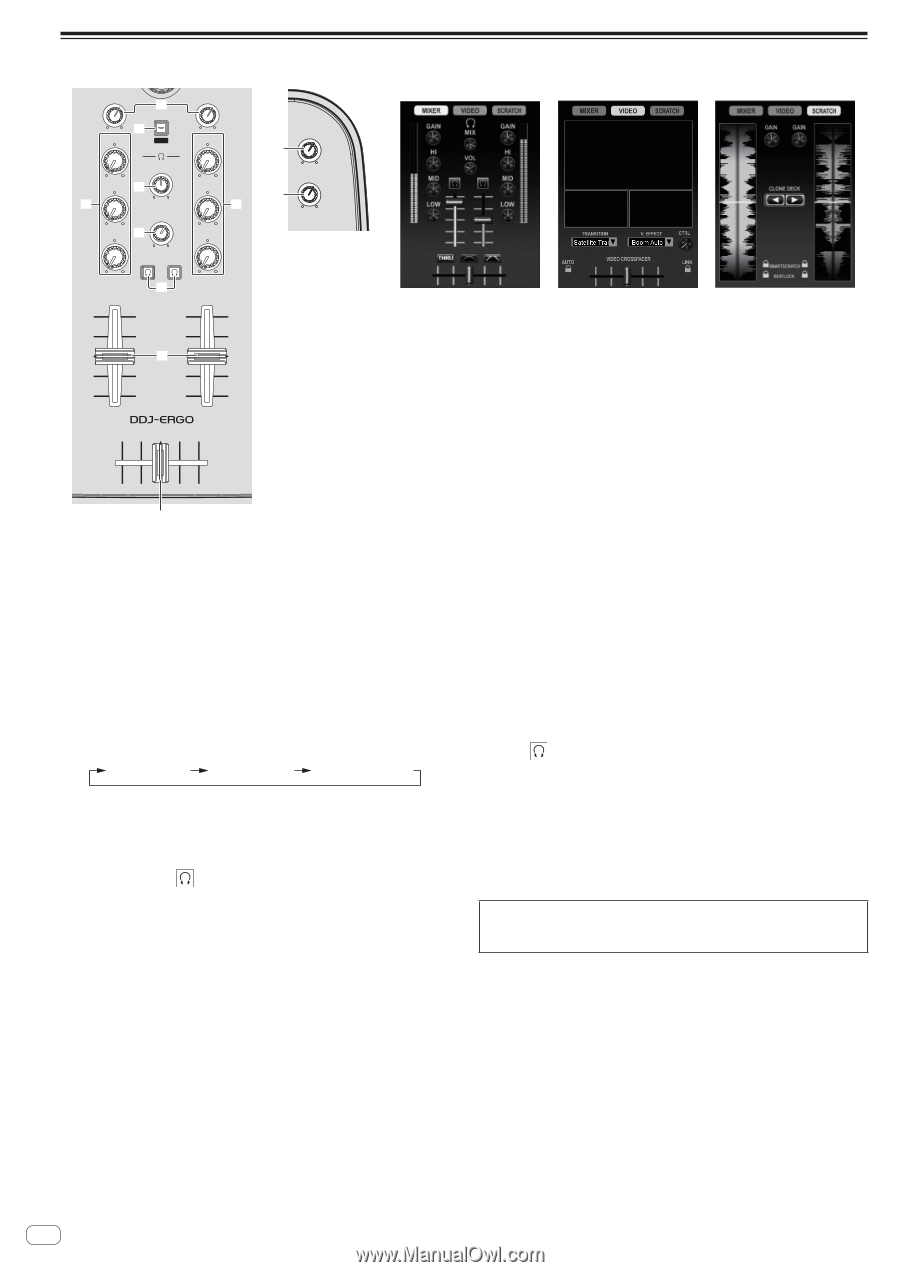
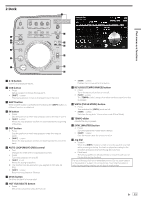
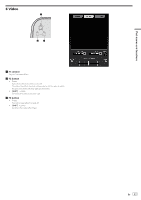
3 Mixer GAIN HI 3 FUNCTION 4 REC GAIN HI MIX 5 MID MID 7 CUE MASTER 7 K VOL 6 LOW LOW CUE 8 MASTER VOL 1 AUX / MIC VOL 2 9 DJ CONTROLLER MIXER panel VIDEO panel SCRATCH panel a 1 MASTER VOL control Adjusts the sound level output from the master. ! Operation is not associated with the [MASTER] control on the computer's screen. 2 AUX/MIC VOL control Adjusts the audio output level of the [AUX IN] and [MIC] terminals. 3 GAIN control Adjusts the sound level input to the various decks. 4 FUNCTION (REC) button ! Press: Switches the display at the center of the computer's screen. [MIXER] panel [VIDEO] panel [SCRATCH] panel ! [SHIFT] + press: Click this to start/stop recording. 5 HEADPHONES MIX control Adjusts the balance of the monitor volume between the sound of the deck whose [CUE ] button is pressed and the master sound. ! The sampler sound is output regardless of the position of the [HEADPHONES MIX] control. 6 HEADPHONES VOL control Adjusts the audio level output from the [PHONES] terminal. ! Operation is not associated with the [VOL] control (headphones volume control) on the computer's screen. ! The sound of the external device connected to the [AUX IN] terminals and the sound of the microphone connected to the [MIC] terminal are not output from the headphones. They are only output from the headphones when assigned to a deck. 7 EQ (HI, MID, LOW) controls These adjust the sound quality input to the various decks. [HI] (treble range), [MID] (middle range), [LOW] (low range) 8 CUE (Headphones cue button) Use this to monitor the sound of the respective decks over the headphones. 9 Channel fader Adjusts the sound level output from the various decks. a Crossfader Switches the sound of the decks assigned to the left and right sides of the crossfader for output. Do not pull on the channel fader and crossfader knobs with excessive force. The knobs are not designed to be removed. Pulling the knobs strongly may result in damaging the unit. 14 En
-
 1
1 -
2
-
3
-
4
-
5
-
6
-
7
-
8
-
 9
9 -
 10
10 -
 11
11 -
 12
12 -
 13
13 -
 14
14 -
 15
15 -
 16
16 -
 17
17 -
 18
18 -
 19
19 -
20
-
21
-
22
-
23
-
24
-
25
-
26
-
27
-
28
-
29
-
30
-
31
-
32
 |
 |