Pioneer DEH 2000MP Owner's Manual - Page 7
Basic Operations, Operating this unit - cd mp3 player
 |
UPC - 012562876603
View all Pioneer DEH 2000MP manuals
Add to My Manuals
Save this manual to your list of manuals |
Page 7 highlights
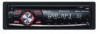
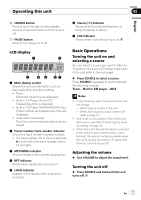
Operating this unit Section 02 English g SOURCE button Press to cycle through all the available sources. Press and hold to turn the source off. h PAUSE button Press to turn pause on or off. LCD display 1 2 3 4 5 67 1 Main display section Shows the various information such as band, play time, and other setting. ! Tuner Band and frequency are displayed. ! Built-in CD Player (Audio CD) Elapsed play time is displayed. ! Built-in CD Player (WMA/MP3/WAV disc) Folder number and elapsed play time are displayed. ! Audio and initial setup Function names and setup status are displayed. 2 Preset number/track number indicator Shows the track number or preset number. ! If a track number 100 or more is selected, d on the left of the track number indicator will light. 3 MP3/WMA indicator Shows the type of the currently playing disc. 4 RPT indicator Shows when repeat play is turned on. 5 LOUD indicator Appears in the display when loudness is turned on. 6 Stereo (5) indicator Shows when the selected frequency is being broadcast in stereo. 7 LOC indicator Shows when local seek tuning is on. Basic Operations Turning the unit on and selecting a source You can select a source you want to listen to. To switch to the built-in CD player, load a disc in the unit (refer to the next page). % Press SOURCE to select a source. Press SOURCE repeatedly to switch between the following sources: Tuner-Built-in CD player-AUX Notes ! In the following cases, the sound source will not change: - When there is no disc in the unit. - When AUX (auxiliary input) is set to off (refer to page 12). ! AUX is set to on by default. Turn off the AUX when not in use (refer to Switching the auxiliary setting on page 12). ! When this unit's blue/white lead is connected to the vehicle's auto-antenna relay control terminal, the vehicle's antenna extends when this unit's source is turned on. To retract the antenna, turn the source off. Adjusting the volume % Use VOLUME to adjust the sound level. Turning the unit off % Press SOURCE and hold until the unit turns off. En 7
-
 1
1 -
 2
2 -
 3
3 -
 4
4 -
 5
5 -
 6
6 -
 7
7 -
 8
8 -
 9
9 -
 10
10 -
 11
11 -
 12
12 -
13
-
14
-
15
-
16
-
17
-
18
-
19
-
20
-
21
-
22
-
23
-
24
-
25
-
26
-
27
-
28
-
29
-
30
-
31
-
32
-
33
-
34
-
35
-
36
-
37
-
38
-
39
-
40
-
41
-
42
-
43
-
44
-
45
-
46
-
47
-
48
-
49
-
50
-
51
-
52
-
53
-
54
-
55
-
56
-
57
-
58
-
59
-
60
-
61
-
62
 |
 |
